
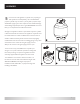
Instructions / Assembly


13
CONVERSION TO NATURAL GAS
WARNING! To avoid the possibility of burns conversion should only be done when the fire pit
is completely cool. Ensure burner is turned off. Turn gas off at source and disconnect the
appliance before beginning conversion.
WARNING! Fire Glass may have sharp edges. Wear safety glasses and gloves when handling.
WARNING! We recommend that the conversion be performed by a licensed gas fitter, and all
connections must be leak tested prior to operating the appliance.
2
3
4
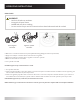
1. If desired, remove the Burner from the enclosure. (Remove the Fire
Glass from the Burner first.) Take care not to damage or kink the
Thermocouple Wire. Alternatively, you may wish to perform the
conversion from below via the Tank Access Door.
2. Disconnect the stainless steel Flex Line from the brass Connector
Valve using two Wrenches.
3. Unscrew the Connector Valve from the Burner Pipe.
4. Slide the Air Shutter tube included in the conversion kit onto the
Burner Pipe, covering the vent screens.
5. Remove the small brass Propane Orifice from the burner end of the
Connector Valve.
6. Replace the Propane Orifice with the Natural Gas Orifice supplied.
Fully tighten with Wrench for a secure seal.
7. Screw the Connector Valve back into the Burner Pipe. Fully tighten
with Wrench for a secure seal.
8. Re-attach Flex Line to Connector Valve. Fully tighten with
Wrenches for a secure seal.
9. Place Burner back into enclosure if you removed it.
10. Place the Conversion Label included with your Conversion Kit on
the inside of the Tank Access Door.
11. Replace the existing LPG hose and regulator with an NG regulator
and hose (not included).
12. Connect your gas supply and perform a Leak Test at each
connection point. Leak Test instructions are found elsewhere in this
manual.