
Instructions / Assembly


5
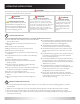
ASSEMBLY
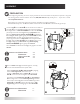
1
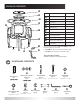
Locate 5 Legs
H
. Screw Studs
P
into the 4 holes on the sides of
each Leg. Make sure all Legs have the foot end pointed down,
then align holes in 4 Side Panels
D/E
with ends of the Studs P
previously inserted in each Leg. Attach the Side Panel to the
Leg using Washer/Spring Washer/Nut
R
/
S
/
T as shown in
the enlarged detail
. Tighten gently with Wrench
V
. (DO NOT
OVERTIGHTEN as you will need to adjust panels to ensure
proper alignment.) Once all Side Panels are loosely attached to
the Legs, align the Door Panel
G
with the Studs sticking out of
the Legs and attach the Door Panel using Washer/Spring
Washer/Nut
R
/
S
/
T
. Tighten gently with Wrench.
Once all Panels are attached to the Legs, fully tighten nuts with
Wrench.
Hardware Used: P Stud 6x40mm x 20
R Washer M6 x 20
S Spring Was her M6 x 20
T Nut M6 x 20
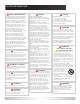
PREPARATION
Before beginning assembly, be sure to empty contents of carton and make sure all parts are present. If any parts
are missing, please contact Customer Service at (866)-985-7877, Monday-Friday, 9 a.m. - 6 p.m. EST, or email
cservice@welltraveled.net.
Place all parts on a soft, level surface for assembly. | DO NOT over tighten hardware!
Estimated Assembly Time: 60 Minutes | NOTE: It is best to use TWO PEOPLE to assemble this gas fire pit.
Hardware Used: Q Bolt 6x20mm x 3
R Washer M6 x 3
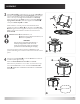
2
1
E
D
E
G
Door
Door
G
D
D
D
Q
2
Once all Panels and Legs are bolted together, carefully
turn the assembled table base upside-down.
Attach Tank Support Bar I to Side Panels D by aligning
holes in Tank Support Bar with holes in the
bottom of Side Panels. Place a Washer R on each of 2
Bolts Q, insert into holes and tighten with Wrench V.
Fit bracket end of Tank Support Ring J over Tank Support
Bar and align hole on front of Tank Support Ring with hole
at the bottom of the Leg attached to the Door hinge. Place
Washer R onto Bolt Q and insert through hole in Tank
Support Ring and into the Leg. Tighten with Wrench V.
R
Nut
Leg
Side Panel
Spring
Washer
Washer
Holes
Holes