
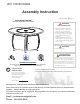
Instructions / Assembly


6
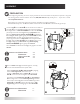
ASSEMBLY
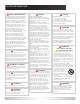
4
3
4
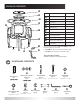
L
M
B
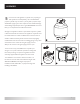
WARNING:
This fire pit is constructed of aluminum, a
relatively soft, flexible metal. Do not sit,
stand, or lean heavily on the top of the fire
pit, which can cause bending or warping.
N
U
O
N Stud (8x30mm) x 4
O Washer/Spring Washer/Nut (8mm) x 4
U Plastic Cap (M8) x 4
3
Hardware Used:
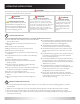
Place Table Top C so underside faces up. Screw 4 Studs N into
the holes on the Table Top with Screwdriver X. Then carefully
turn the assembled fire pit base upside-down and align the
holes in the top of the Legs with the Studs in the Table Top.
Place the holes over the Studs and secure each with Washer/
Spring Washer/Nut O as illustrated. Tighten with Wrench V.
Then place Plastic Caps U over Nuts.
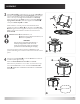
With assistance, carefully turn the assembled base back
upright,then place the
Burner B into the hole in the Table Top
C, allowing the hose and regulator to drop into the fire pit base.
Make sure the Control Panel on the Burner faces the Front
Door Panel G.
Unscrew the igniter button and insert a AAA Battery with
positive end facing out. Screw the button back onto the control
panel.
Gently pour the Fire Glass M
around the Burner. Be careful not
to obstruct pilot light housing.
Place the Removable Burner Cover A on the Burner.
When the fire pit is NOT in use, or after use, when the fire pit
has cooled COMPLETELY, cover it with the Protective Table
Cover L. NEVER PUT THE PROTECTIVE FIRE PIT COVER ON A
HOT FIRE PIT.