
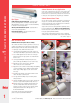
Instructions / Assembly

32 | Oatey
®
Product Catalog For further updates, visit www.oatey.com Phone: 800-321-9532 Fax: 800-321-9535
CATEGORY 1 PLASTIC PIPE CEMENTS AND PRIMERS
1
Pipe Types
CPVC: Chlorinated Polyvinyl Chloride – Typically used for
pressure piping applications, including hot and cold potable
water distribution. Can also be used for corrosive fluid handling
in industrial or chemical applications.
ABS: Acrylonitrile Butadiene Styrene – Typically used for
non-pressure piping applications.
PVC: Polyvinyl Chloride – Typically used for pressure
or non-pressure piping applications.
Solvent Cements for any Application
If you need to solvent weld one pipe joint or one thousand, Oatey
®
is the solvent cement more professionals choose than any other
brand. From hot to cold, wet to dry, Oatey has the solvent cement
to meet your exact requirement for any plastic pipe installation.
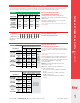
Solvent Cement Cure Times
The cure time of solvent cements is dependent on several factors.
The pipe size, socket fit, ambient temperature, relative humidity,
solvent cements and the system operating pressure should all be
considered when determining cure times.
Oatey Solvent Cements are developed with the plumbing contrac-
tor in mind. New products like Orange Lava Hot CPVC Cement
have the lowest set up and cure times in the industry, a perfect fit
for any job requiring minimal downtime.
Oatey continues to work hard to provide you peace of mind and
confidence when using Oatey brand solvent cements and products.
Cure chart see page 33
HOW TO SOLVENT WELD
How To Solvent Weld
PRIOR TO USE: Read all product labels carefully.
Stir or shake cement before using. If jelly-like, do not use. Keep
container closed when not in use. Avoid eye and skin contact.
Wear safety glasses with side shields and wear rubber gloves.
1. Square pipe ends, chamfer and remove all dirt.
2. Check dry fit of pipe and fitting. Pipe should easily go 1/3
of the way into the fitting. If pipe bottoms, it should be snug.
3. Use a suitable applicator at least 1/2 the size of the pipe
diameter. For larger size pipe systems use a natural bristle
brush or roller.
4. Clean pipe and fitting with a listed primer. (Do not use
primer on ABS pipe and fittings. Use Clear Cleaner only!)
5. Apply liberal coat of cement to pipe to the depth
of the socket, leave no uncoated surface.
6. Apply a thin coat of cement to inside of fitting, avoid puddling
of cement. Puddling can cause weakening and premature
failure of pipe or fitting. Apply a second coat of cement
to the pipe.
7. Assemble parts QUICKLY. Cement must be fluid.If cement
surface has dried, recoat both parts.
8. Push pipe FULLY into fitting using a 1/4 turning motion
until pipe bottoms.
9. Hold pipe and fitting together for 30 seconds to prevent pipe
push-out – longer at low temperatures. Wipe off excess.
10. Allow 15 minutes for good handling strength and 2 hours
cure time at temperatures above 60°F before pressure
testing up to 180 psi. Longer cure times may be required
at temperatures below 60°F or with pipe above 3".
DO NOT TEST WITH AIR.
For specialty cements and chemical applications,
please see specific product label instructions.
1 2
3 4
5 6
7 8
9