
Getting Started Guide
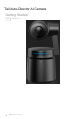

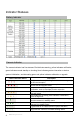
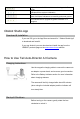

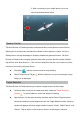

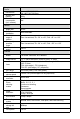
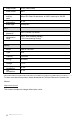
Table Of Contents
- Product Overview
- 2. Camera Indicator
- 3. Lens
- 4. Cooling Intake
- 5. Magnetic Charging Port
- 6. Power/Status Button
- 7. USB-C Data Port
- 8. Cooling Outlet
- 9. Microphone Jack
- 10. Micro SD Slot
- 11. M3 Nut Connection
- 12. Electrical Contact Interface
- Indicator Statuses
- Battery Indicator
- Camera Indicator
- The camera indicator has five statuses: Red indica
- Camera Indicator Status
- Description
- All 3 bars continuously flashing red indicates a w
- 3 bars on steady red indicate an exception alarm,
- All 3 bars continuously flashing yellow indicates
- All 3 bars on steady yellow indicates a notificati
- The middle bar on steady yellow indicates a notifi
- The middle bar on steady green indicates there is
- All 3 bars on steady green indicates there is a ta
- 1 green flash of all 3 bars indicates a photo was
- All 3 bars continuously flashing green indicates t
- 3 green flashes of all 3 bars indicates shooting u
- Blue flashes of 1, 1&2, and then 1&2&3 bars and th
- Continuous flashes of alternating green and yellow
- Obsbot Studio App
- How to Use Tail Auto-Director AI Camera
- Charging Instructions
- Startup & Shutdown
- Connecting to the App
- Gesture Control
- Target Selection
- Tail Auto-Director AI Camera allows you to select
- Gestures: After turning on the camera normally, m
- App Selection: On the app's shooting interface, ta
- •Quick Mode: Tap the "Quick" button to have the cam
- •Multi-Persor Mode: Tap the "Multi-Person" button t
- •Owner Mode: Tap the "Owner" button to have the cam
- Shooting Modes
- Specifications and Parameters
- Warning words

3 green flashes of all 3 bars indicates shooting under Burst
mode
Repeatedly Blue flashes of all three bars from 1 to 3
indicates device system initialization
Blue flashes of 1, 1&2, and then 1&2&3 bars and then 1 blue
flash of all 3 bars indicates a successfully performed gesture
Continuous flashes of alternating green and yellow on all 3
bars indicate that an upgrade or gimbal calibration is in
progress
Obsbot Studio App
Download & Installation
If you use iOS, go to the App Store and search for " Obsbot Studio App"
to download and install it.
If you use Android, you can download and install the app from the
OBSBOT products page on the www.remo-ai.com website.
How to Use Tail Auto-Director AI Camera
Charging Instructions
Use the magnetic charging cable to connect the camera to
an adapter or power bank, and ensure a good connection.
Refer to the Battery Indicator section for more information
about charging statuses.
The camera will be fully charged after about 90 minutes
(when using the included adapter) and the indicator will
turn steady blue.
Startup & Shutdown
Before turning on the camera, gently rotate the lens
clockwise to unlock it.