
Operation Manual


Set-up
2-4
8
In the same manner, set Subnet for subnet mask and
Gateway for gateway addresses.
9
Once it is complete to enter all network addresses and
returned to the Scanner setting screen of Step 7, use
the S and T keys to move D to select End and then
press the Enter key.
Note In a network environment with RARP, select RARP and then select On on the Scanner setting
screen. In this case, you will not need to set the IP address manually.
10
For other network settings, use a web browser or Address Editor.
User registration
To use the scanner, user registration is needed in addition to the network setting. User (transmitter)
registration is performed from a web browser or Address Editor. For details, see the Online Manual
<Functions Edition>.
Date/Time and Time Difference
Sets the required area information for the Send E-mail function. The time of day when email is sent
from the scanner is included in the header of that email message as the transmission time. Perform
the following procedure in order to set the date and time in your area, as well as the time difference
to GMT (Greenwich Mean Time).
1
Press the System Menu/Counter key.
2
Use the S and T keys to move D to select Machine
Default and press the Enter key. The password entry
screen will appear.
3
Enter the password using the numeric keys. The
password at the factory default setting is 1600 for the
16 ppm model and 2000 for the 20 ppm model.
4
Use the S and T keys to move D to select Day/Time
and press the Enter key.
5
Use the S and T keys to move D to select the item to
be changed and use the < and > keys to select the
desired setting.
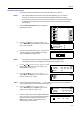
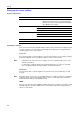
IP address
Subnet
Scanner setting.:
Gateway
200. 200.200.200
255.255.255:
:
:
255.
0. 0. 0. 0
End
IP address
Scanner setting.:
Subnet
200.200.200:
:
200.
255. 255.255.255
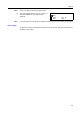
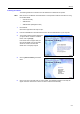
Management
Copy default
Default setting / Counter
Machine default
Enter pin code using # key.
Low power mode c
Key sound ON/OFF
Machine default
Day/Time
:
:
15Min.
On
09:35
:
End
Time
Day/Time
DST
:
:
09:35
OFF