
Operation Manual


Performing the Required Operation at the Scanner
3-6
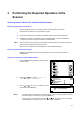
Scan setting
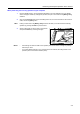
The scan setting screen is displayed when scanning originals. To carry out the various settings, perform the following
procedures. After completing the scan settings, if you set an original in the scanner and press the Start key, scanning will
start.
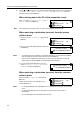
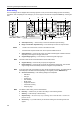
A Auto Exposure key — Press this key to select the automatic exposure setting.
B Image concentration adjustment key — Press these keys to select an exposure level.
Notes • 7 levels in the normal mode, 13 levels in the maximum mode.
• If the automatic exposure mode is set, all the exposure indicators are off.
C Auto%/100% key — Press this key when you enable automatic paper orientation selection
depending on the original in the gray scale mode.
D Original Image Type key — Press this key to select the original image type.
Note The Photo mode cannot be selected with the Send E-mail function.
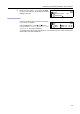
E Original Size key — Press this key to specify the original size.
F Paper Select key — Press this key to specify the transmission (image) size. The scanned
original image will be automatically reduced or enlarged to the specified size.
Note In the gray scale mode, the orientation of paper will be changed with this key. To enable again the
automatic paper orientation selection depending on the original, press the AMS/100% key.
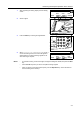
G Scanner Function key — The following settings can be adjusted.
• Resolution
• File type
• Original type
•Auto selection
• Border erase
• Original set direction
• Continuous scanning
• Output by page
Note For details on each setting, see the Online Manual.
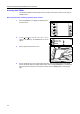
H Enter key — Press this key to confirm the setting in various setting screens.
IStart key — Press this key to start scanning.
J Stop/Clear key — Press this key to stop scanning, clear an entered value or return to the
previous screen.
K Scanner key — If you select this key to cancel scan setting, the scan setting screen will
appear.
K
G
C
E
F
H
J
D
A
B
I