4343-PS222-03 Font Management Utility User’s Guide
Contents 1 2 3 Introduction 1.1 Operating environment ..................................................................... 1-1 1.2 Main functions ................................................................................... 1-2 Installing Font Management Utility 2.1 Installation ......................................................................................... 2-1 To install ......................................................................................... 2-1 2.
.7 Font/form list settings file .............................................................. 3-35 In Add/Delete Mode ..................................................................... 3-35 In Add Collectively Mode .............................................................. 3-37 3.8 Saving lists as files .......................................................................... 3-39 To save a list ................................................................................. 3-39 3.
About this Product Font Management Utility is a utility that allows you to add and delete the fonts and the forms for printing overlays of the supported devices (MFPs) that are on a network. You can display a list of fonts and forms that were added with Font Management Utility. Trademarks and registered trademarks Trademark acknowledgements Microsoft® and Windows® are either registered trademarks or trademarks of Microsoft Corporation in the United States and/or other countries.
Font Management Utility iv
Introduction 1 1 Introduction 1.1 Operating environment The operating environment of Font Management Utility is described below.
Introduction 1.2 1 Main functions The main functions of Font Management Utility are described below. - Adds and deletes the fonts and forms of the supported MFP. - Displays the information of the added fonts and forms in a list. - Saves font/form settings files - Saves files (CSV file) of the font and form list. - Automatically detects the supported MFPs that are on a network. - Manual connection to the supported MFPs that are on a network.
Installing Font Management Utility 2 Installing Font Management Utility 2.1 Installation 2 Install Font Management Utility by following the procedure described below. To install 2.2 1 Double-click Setup.exe. 2 Follow the on-screen instructions to install. Uninstallation Uninstall Font Management Utility by following the procedure described below. To uninstall 1 From the Start menu, click Control Panel (for Windows 2000, Settings — Control Panel) to open the Control Panel.
Installing Font Management Utility Font Management Utility 2 2-2
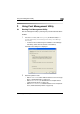
Using Font Management Utility 3 Using Font Management Utility 3.1 Starting Font Management Utility 3 Start Font Management Utility by following the procedure described below. To start 1 From the Start menu, click All Programs (for Windows 2000, Programs)—MFP Utility—Font Management Utility—Font Management Utility. – If a shortcut was created during the installation of Font Management Utility, double-click the shortcut on the desktop. The Mode choice dialog box is displayed.
Using Font Management Utility 3 Click OK. – 3.2 3 Main dialog boxes for each of these operation modes will be displayed. Quiting Font Management Utility Quit the Font Management Utility by following the procedure described below. To quit 1 From the File menu, click Exit. The dialog box to confirm quiting Font Management Utility appears. 2 Click the Yes button. This quits Font Management Utility.
Using Font Management Utility 3.3 3 Selecting and adding devices Before operation, the device must be registered in the Font Management Utility. This section describes registering a device in the Font Management Utility. The two types of lists for selecting a device are described below. Device list Method for adding devices to a list Registered device list Enters the device name and IP address and connects manually. Search result list Searches and detects automatically the devices on a network.
Using Font Management Utility 3 Main dialog boxes for each of the selected operation modes will be displayed. 2 From the Device menu, select Device Registration. The Device registration dialog box will be displayed.
Using Font Management Utility 3 3 Click Register from IP address. – If changing the name of a registered device, select the device, and click Edit. Change the device name from the Register from IP address dialog box that is displayed. – If deleting a registered device, select the device, and click Delete. The Register from IP address dialog box is displayed. 4 Input the Registration name and Device Address to add.
Using Font Management Utility 5 3 Click OK. The device will be added to the Device registration dialog box.
Using Font Management Utility 3.3.2 3 Searching for and adding devices Font Management Utility can search for and automatically detect a supported device that is on a network. Also, the detected device can be added to the registered device list. Add a device to the registered list by following the procedure described below. To add a device 1 From the Mode choice dialog box, select an operation mode, and click OK.
Using Font Management Utility 3 Main dialog boxes for each of the selected operation modes will be displayed. 2 From the Device menu, select Device Registration. The Device registration dialog box will be displayed.
Using Font Management Utility 3 3 Click Search and Register. The Registration by search dialog box will be displayed, and devices automatically detected by the network will be displayed in a list. 4 Select the devices to add. – – – – – To refresh the search results, click Re-search. To specify the device search range, click Search settings. For details on setting the search range, please refer to “Specifying the search range” on page 3-10. To select all devices, click Select All.
Using Font Management Utility 5 3 Click OK. The device will be added to the Device registration dialog box. 3.3.3 Specifying the search range You can specify the search range when searching for a device that is on a network. Specify the search range by following the procedure described below. To specify the search range 1 From the Mode choice dialog box, select an operation mode, and click OK.
Using Font Management Utility 3 Main dialog boxes for each of the selected operation modes will be displayed. 2 From the Device menu, select Device Registration. The Device registration dialog box will be displayed.
Using Font Management Utility 3 3 Click Search and Register. The Registration by search dialog box will be displayed. 4 Click Search settings. The Search range specification dialog box will be displayed, and the registered search settings will be displayed in a list.
Using Font Management Utility 5 3 Click Add. – If changing registered search settings information, select the search settings, and click Edit. On the displayed Device search settings dialog box, change the settings. – If deleting registered search settings, select the search settings, and click Delete. The Device search settings dialog box is displayed. 6 Input settings values. – – – – – Search range settings: Set the IP addresses to search.
Using Font Management Utility 7 3 Click OK. Search settings are added to the Search range specification dialog box.
Using Font Management Utility 3.4 3 Add/Delete Mode Add/Delete Mode lets a user add or delete fonts/forms to or from a single device. This section explains the layout of the Add/Delete Mode dialog box, as well as procedures for adding and deleting fonts/forms. Before using Add/Delete Mode, the device must be registered in the Font Management Utility. For details on how to register a device, please refer to “Selecting and adding devices” on page 3-3. Main dialog box 1 2 3 4 5 6 7 9 10 8 No.
Using Font Management Utility 3 No. Name Description 3 Device Enables registration of the device, and setting of the default device password. 4 Help You can display the Help of Font Management Utility and check the version information. 5 Device Displays the device names displayed in a list. 6 Change Click to display the selection dialog box of the device. For selecting a device, refer to “Selecting and adding devices” on page 3-3.
Using Font Management Utility 3 The Add/Delete Mode main dialog box will be displayed.
Using Font Management Utility 2 Click Change. The Select Device dialog box will be displayed, and registered devices will be displayed in the List of Devices. – 3 3 If no devices are registered, then devices can be searched for, and then registered. From the Selection Mode dropdown list, select from Search Result. For details on device registration by search, please refer to “Searching for and adding devices” on page 3-7. Select devices from the List of Device, and click OK.
Using Font Management Utility 3 This will connect to the selected device, and the font/form list will be displayed on the main dialog box. 4 Click Add. The Add Font/Form dialog box will be displayed.
Using Font Management Utility 5 3 Click the Add to List button. – If adding a font list from a font/form list setting file, click Import. For details on font/form list settings files, please refer to “Font/form list settings file” on page 3-35. The Setting of Adding Font/Form dialog box appears. 6 Specify each setting, and then click the OK button. – – – – Type: Selects the type of the font or form to be added. File Name: Enters the file name of the font or form to be added.
Using Font Management Utility 3 The fonts and forms are added to List of Adding Font/Form. 7 Click the Add to Device button. – Clicking Export can save font/form setting information in the List of Adding Font/Form as a file. For details on font/form list settings files, please refer to “Font/form list settings file” on page 3-35. The Add Font/Form dialog box appears.
Using Font Management Utility 8 3 Click the OK button. The fonts and forms are added to the device. 2 Note Font/form information added to a device is not automatically reflected on the main dialog box. In order to confirm font/form information added to a device, click Refresh on the main dialog box. It may take some time for the information to be updated (obtained). To delete fonts and forms 1 From the Add/Delete Mode main dialog box, click Delete.
Using Font Management Utility 3 The Delete Font/Form dialog box appears. 2 Select the fonts and forms to be deleted, and then click the Delete button. – – To delete all fonts and forms, click the Select All button. All of the font and forms are selected. To clear all of the check boxes, click the Clear All button.
Using Font Management Utility 3 The Delete Font/Form dialog box appears. 3 Click the OK button. The fonts and forms are deleted from the device. 2 Note The PostScript forms and PostScript fonts saved to RAM cannot be deleted from this utility. To delete the PostScript forms and PostScript fonts saved to RAM, turn the power of the device off. Note that when the power of the device is turned off, all of fonts and forms in RAM will be deleted.
Using Font Management Utility 3.5 3 Add Collectively Mode Add Collectively Mode lets a user add fonts/forms to multiple devices. This section explains the layout of the Add Collectively Mode dialog box, as well as procedures for collective adding of fonts/forms. Before using Add Collectively Mode, the device must be registered in the Font Management Utility. For details on how to register a device, please refer to “Selecting and adding devices” on page 3-3.
Using Font Management Utility 3 No. Name Description 4 Help Enables display of the Font Management Utility help, and confirmation of version information. 5 Destination list Displays a list of devices registered in the Font Management Utility. Fonts/forms are added for devices that are selected using the check boxes. The list can be displayed sorted by each item. 6 Select All Click this to select all devices in the Destination List.
Using Font Management Utility 3 Add Collectively procedure 1 From the Mode choice dialog box, select Add Collectively, and click OK. The Add Collectively Mode main dialog box will be displayed.
Using Font Management Utility 2 In the Destination List, select the devices to which to add fonts/forms. – – – 3 3 If no devices are displayed in the Destination List, then devices must first be registered. For details on how to register a device, please refer to “Selecting and adding devices” on page 3-3. To select all devices, click Select All. This places a check mark in all the check boxes. To remove all check marks, click Clear All. Click Add to List.
Using Font Management Utility 3 An addition confirmation dialog box is displayed. 6 Click OK. The fonts and forms are added to the device. 2 Note Font/form information added to a device is not automatically reflected on the main dialog box. In order to confirm font/form information added to a device, click Change on the Add/Delete Mode main dialog box, and select the same device again. Updating (re-acquiring) information may take some time.
Using Font Management Utility 3.6 3 Delete Collectively Mode Select Delete Collectively Mode to delete fonts/forms from multiple devices. This section explains the layout of the Delete Collectively Mode dialog box, as well as procedures for collective deleting of fonts/forms. Before using Delete Collectively Mode, the device must be registered in the Font Management Utility. For details on how to register a device, please refer to “Selecting and adding devices” on page 3-3.
Using Font Management Utility 3 No. Name Description 4 Help Enables display of the Font Management Utility help, and confirmation of version information. 5 Destination list Displays a list of devices registered in the Font Management Utility. Fonts/forms are deleted for devices that are selected using the check boxes. The list can be displayed sorted by each item. 6 Select All Click this to select all devices in the Destination List.
Using Font Management Utility 3 The Delete Collectively Mode main dialog box will be displayed. 2 In the Destination List, select the devices from which to delete fonts/ forms. – – – 3 If no devices are displayed in the Destination List, then devices must first be registered. For details on how to register a device, please refer to “Selecting and adding devices” on page 3-3. To select all devices, click Select All. This places a check mark in all the check boxes.
Using Font Management Utility 3 The Information acquisition device selection dialog box is displayed. 4 Select devices, and click OK. Font/form information is imported from the selected device, and reflected in the Deleting Font/Form List.
Using Font Management Utility 5 In the Deleting Font/Form List, select the fonts/forms to delete using the check boxes. – – 6 3 To select all fonts/forms, click Select All. This places a check mark in all the check boxes. To remove all check marks, click Clear All. Click Delete. A deletion confirmation dialog box is displayed. 7 Click OK. The fonts and forms are deleted from the device. 2 Note Font/form information deleted from a device is not automatically reflected on the main dialog box.
Using Font Management Utility 3.7 3 Font/form list settings file Font/form list settings can be saved as a file (FMD format). The Font/form list settings file contains basic information about fonts/forms, as well as information regarding locations where font/form files are saved. You can collectively import font/form information from a font/form list settings file, reducing repetitive operations. A font/form list settings file can be saved either from Add/Delete Mode or Add Collectively Mode.
Using Font Management Utility 4 3 Click Export. The Export Font/Form List Setting File dialog box will be displayed. 5 Specify the location to save and file name, and click Save. The file is saved in the specified location.
Using Font Management Utility 3 In Add Collectively Mode 1 In the Add Collectively Mode main dialog box, add fonts/forms to the Adding Font/Form List. – 2 For details on how to add fonts/forms to the list, please refer to “Add Collectively procedure” on page 3-27. Click Export. The Export Font/Form List Setting File dialog box will be displayed.
Using Font Management Utility 3 3 Specify the location to save and file name, and click Save. The file is saved in the specified location.
Using Font Management Utility 3.8 3 Saving lists as files You can save the font and form list as a file (CSV file). Lists can be saved as files from Add/Delete Mode. To save a list 1 From the Add/Delete Mode main dialog box, click Change, and select the device. – 2 For details on how to select a device, please refer to “In Add/Delete Mode” on page 3-35. Select Save List from the File menu on the main dialog box, and then click the list you want to save. The dialog box for saving the list appears.
Using Font Management Utility 3.9 Other settings 3.9.1 Default Password settings for registered devices. 3 Devices that do not have an Administrator password set may be registered in Font Management Utility. In these cases, use the default password that has been configured in advance to connect to the device. This section explains setting the default password. Settings procedure 1 From the Mode choice dialog box, select an operation mode, and click OK.
Using Font Management Utility 3 Main dialog boxes for each of the selected operation modes will be displayed. 2 From the Device menu, select Default Device Password. The Default password setting of a registration device dialog box is displayed.
Using Font Management Utility 3 3 Select When a password is not set by a registration device, I am connected to a device with the following passwords. Each of these settings items can be configured. 4 Configure items. – – – 5 Admin password: Input the default password. Save this admin password: Saves the input default password. To save the OpenAPI Username and Password, click Detailed Settings. The OpenAPI Username and Password can be input. Click OK.
2007.