The Curie UV-VIS Emission Spectrofluorometer Installation and Operation Manual Document Number 640-11100-000-02-0406 Offices: Ocean Optics, Inc. 830 Douglas Ave., Dunedin, FL, USA 34698 Phone 727.733.2447 Fax 727.733.3962 8 a.m.– 8 p.m. (Mon-Thu), 8 a.m.– 6 p.m. (Fri) EST Ocean Optics B.V. (Europe) Geograaf 24, 6921 EW DUIVEN, The Netherlands Phone 31-(0)26-3190500 Fax 31-(0)26-3190505 E-mail: 000-00000-000-02-06 Info@OceanOptics.com Info@OceanOpticsBV.com Orders@OceanOptics.
Copyright © 2001-2006 Ocean Optics, Inc. All rights reserved. No part of this publication may be reproduced, stored in a retrieval system, or transmitted, by any means, electronic, mechanical, photocopying, recording, or otherwise, without written permission from Ocean Optics, Inc. This manual is sold as part of an order and subject to the condition that it shall not, by way of trade or otherwise, be lent, re-sold, hired out or otherwise circulated without the prior consent of Ocean Optics, Inc.
Table of Contents About This Manual .......................................................................................................... iii Document Purpose and Intended Audience.............................................................................. iii Document Summary.................................................................................................................. iii Product-Related Documentation ...............................................................................
Table of Contents Chapter 3: Using the Curie System ...................................................19 Introduction...................................................................................................................... 19 Performing Experiments with the Curie System .............................................................. 19 Preparing for Experiments.........................................................................................................
About This Manual Document Purpose and Intended Audience This document provides you with an installation section to get your system up and running. In addition to Curie installation and operation instructions, this manual also includes information for locating the OOIBase32 installation instructions (see Product-Related Documentation). Document Summary Chapter Description Chapter 1: Introduction Provides a list of system components, and operating requirements.
About This Manual You can access documentation for Ocean Optics products by visiting our website at http://www.oceanoptics.com. Select Technical → Operating Instructions, then choose the appropriate document from the available drop-down lists. Or, use the Search by Model Number field at the bottom of the web page. You can also access operating instructions for Ocean Optics products on the Software and Technical Resources CD included with the system.
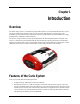
Chapter 1 Introduction Overview The Ocean Optics Curie UV-VIS Emission Spectrofluorometer is a self-contained fluorescence system (the Curie system) that represents a new level of innovation and simplicity in spectroscopy. This standalone system contains all the components required to make fluorescence measurements in a single package with a remarkably compact footprint. The Curie is a high-sensitivity cuvette spectrofluorometer for measuring fluorophores in liquids.
1: Introduction • • Novel filtering technology. The Curie system is the only emission fluorometer with built-in linear variable filters (LVFs). These LVFs are ideal for spectrally shaping the excitation energy from the onboard pulsed-xenon excitation source, and eliminate the need for scanning monochromators. Each filter’s transmission or blocking band can be moved throughout 230–500 nm or 300–750 nm wavelengths. A pushbutton to enable the software trigger for automatic spectral saving.
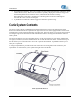
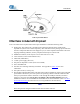
1: Introduction Curie System Left Panel Other Items Included with Shipment Your Curie Fluorescence System from Ocean Optics should also contain the following items: Packing List: The packing list is located inside a plastic bag attached to the outside of the shipment box (the invoice is mailed separately).
1: Introduction Software and Technical Resources CD: Each Curie system order comes with Ocean Optics’ Software and Technical Resources CD. This CD contains all Ocean Optics software and manuals for software operation, spectrometers, and spectroscopic accessories. Documentation is provided in Portable Document Format (PDF). You need the Adobe Acrobat Reader (version 6.0 or higher) to view these files.
1: Introduction 2. Start the OOIBase32 installation process. Installing from CD: a. Insert the Software and Technical Resources CD containing the OOIBase32 software. The CD interface automatically launches. b. Click on Install Ocean Optics Software. c. Click on OOIBase32 Operating Software. The installation process begins. Installing from the Web: a. Go to http://www.oceanoptics.com/technical/softwaredownloads.asp. b.
1: Introduction Installing Custom Curie Software to Activate Relative Irradiance Mode Caution Do NOT connect the Curie System to your PC until after you have installed the OOIBase32 software. Follow the instructions below or in the OOIBase32 manual (see Product-Related Documentation) to properly connect and configure your system. Prior to shipping, your Curie system was calibrated at the factory to allow for operation in Relative Irradiance mode.
1: Introduction Connecting the Curie to a PC The Curie connects to a PC via a standard USB device cable. USB 1.1 is currently supported. Caution Before connecting the Curie to your PC, be sure to install the OOIBase32 Spectrometer Operating Software that comes on the Software and Technical Resources CD. This software contains the necessary USB drivers for the Curie system. You should also install the Curie Custom Software to allow for measurements in Relative Irradiance mode.
1: Introduction 8 640-11100-000-02-0406
Chapter 2 Configuration Introduction This chapter provides instructions for configuring the OOIBase32 Configure Spectrometer options so that the application recognizes your connected Curie system. Configuring the Curie in OOIBase32 Once the Curie system is installed (see Installing OOIBase32 Software), you must configure OOIBase32’s Configure Spectrometer options so that the application recognizes the connected Curie system and its components.
2: Configuration Default Spectrometer Configuration File The Default Spectrometer Configuration File screen prompts you to select a default .SPEC file to use with the Curie system. The .SPEC file extension is preceded by the unique serial number of the spectrometer in your Curie system (for example, USBA001.SPEC). Navigate to the OOIBase32 installation directory and select the default .SPEC file, then proceed. Do not specify a .SPEC file located on removable media (such as a floppy disk).
2: Configuration 3. In the USB Serial Number field, select the serial number of the USB2000 spectrometer in your Curie system from the drop-down list. 4. Click OK. Spectrometer Configuration Dialog Box ► Procedure To set the system parameters, do the following: 1. Select Spectrometer | Configure from the menu. The Spectrometer Configuration screen appears. 2.
2: Configuration 5. On the A/D Interface tab, enter the same values that you entered in the Configure Hardware screen (see Configure Hardware Screen). When you exit the OOIBase32 application, this data is stored in the .SPEC file. 6. Click OK to save the data and close the Spectrometer Configuration screen. Upon exiting OOIBase32, the software stores this configuration information in a spectrometer configuration file named [your serial number].SPEC. Upon restart, OOIBase32 loads this as the default .
2: Configuration 3. In the External Trigger Mode field, select Software Trigger to enable the pushbutton. 4. To save files when the pushbutton is pushed, enable the Automatically save file on trigger option. 5. Click OK. Autoincrementing Filenames When the pushbutton feature is enabled, the Autoincrement Filenames option allows you to choose a name and save spectra automatically when you push the button on the Curie system or when you click the Save command in OOIBase32.
2: Configuration Note If you do not enable the Autoincrement Filenames function, a save file dialog box will open every time you push the button (if enabled) or choose a save command. ► Procedure To configure the Autoincrement Filenames function, do the following: 1. Select File | Autoincrement Filenames | Enabled from the OOIBase32 menu to enable the feature. 2. Select File | Autoincrement Filenames | Show Name to enable the Show Name option.
2: Configuration 3. In the External Trigger Mode field, select None to disable the pushbutton, and click OK. 4. Push the pushbutton on the Curie. The pushbutton is now inactive. Note If you are unable to access the menu after clicking on it, push the pushbutton on the Curie and try accessing the menu again.
2: Configuration • Method 2: Check the Strobe/Lamp Enable box on the Acquisition Parameters toolbar. Once you enable the strobe via any of the options listed above, the lamp activates and a trace displays on the graph when the CVD-DIFFUSE is placed in the cuvette holder. See Using the CVD-DIFFUSE for more detailed information on using the CVD-DIFFUSE with your Curie system. Adding a sample in the cuvette holder should change the graph accordingly.
2: Configuration 3. On the External Trigger tab, configure your external triggering mode to activate your pushbutton and data save option, if necessary. Then, click OK. Note See Enabling the Pushbutton to set the External Trigger when using the Curie pushbutton feature. 4. Flip the light switch on the side of the Curie to the ON position.
2: Configuration 5. On the OOIBase32 main screen, check the Strobe/Lamp Enable option. The pulsed xenon lamp activates, and a fluctuating trace appears on the graph when the CVD-DIFFUSE is placed in the cuvette holder. See Using the CVD-DIFFUSE for more detailed information on using the CVDDIFFUSE with your Curie system. If you put a sample into the cuvette holder, the graph trace should change accordingly. When this occurs, you will know that the software and hardware are correctly installed.
Chapter 3 Using the Curie System Introduction This chapter provides you with instructions for performing experiments using the Curie system with the OOIBase32 application. Performing Experiments with the Curie System The Curie system allows you to detect picomolar-range concentrations of fluorophores in solution with emission from 200–850 nm.
3: Using the Curie System Performing a Fluorescence Experiment You can take a fluorescence reading in either Relative Irradiance mode (I) or Scope mode (S). Relative Irradiance mode – Relative Irradiance mode is the preferred mode for fluorescence experiments. Relative irradiance spectra are a measure of the intensity of a light source relative to a reference emission source.
3: Using the Curie System As shown in the figure, the shape of the fluorescence spectrum is impacted by the measurement mode chosen. The preferred mode for fluorescence measurements is Relative Irradiance mode because the impact of variables such as the intensity of the light source, the reflectivity of the grating and mirrors in the spectrometer, the response of the detector, and the spectral characteristics of the sample do not affect the shape of the spectrum.
3: Using the Curie System Selecting the Excitation Wavelength Range with LVF Filters To set the excitation wavelength range with the LVF filters, place the software in Scope mode. If you are running Curie custom software, click on the toolbar to escape Relative Irradiance mode. Your system returns to raw signal mode. You can then switch back to Relative Irradiance mode for your measurement after the excitation wavelength range is chosen by clicking on the on the toolbar.
3: Using the Curie System • • The UV LVF filter can be used to select excitation energy in the 230 to 500 nm range. The bandwidth is fixed and varies from 30 to 40 nm. For UV excitation light, adjust the UV LVF filter to select your wavelength range. The UV LVF filter is used with the UV (Cold) mirror (Mirror Adjustment knob turned so that the UV label is closest to the cuvette holder – see Selecting the Mirror for Use with the LVFs).
3: Using the Curie System Xenon Lamp Reflected Off of Standard Mirror • Cold mirror – (Mirror Adjustment Knob turned with UV label closest to the cuvette holder). Reflects only the UV light from your light source into the cuvette holder. The Cold mirror option is included in your Curie system because the UV LVF filter does not block light above 500 nm. If your emission occurs above 500 nm, use the cold mirror with the UV LVF filter to select your excitation wavelength range.
3: Using the Curie System In the figure below, the spectrum of the xenon lamp reflected off of the cold mirror is shown. Note that less visible light is reflected from the cold mirror. Xenon Lamp Reflected Off of Cold Mirror To select the mirror for your measurement, lift and turn the mirror adjustment knob on the Curie clockwise to select the desired mirror. When the UV LVF is used, choose the cold mirror by turning the mirror knob until the UV label on the mirror knob is closest to the cuvette holder.
3: Using the Curie System Adjusting the LVFs to Select the Excitation Wavelength Range With the software in Scope mode, the CVD-DIFFUSE in the cuvette holder and the correct mirror chosen, loosen the thumbscrews and slide the handles (one for UV and one for VIS) on the Curie to select the excitation wavelength range. You can only adjust and use one LVF time; the other LVF must be in the No LVF position.
3: Using the Curie System Curie UV LVF 350 nm 640-11100-000-02-0406 27
3: Using the Curie System Curie VIS LVF 500 nm Once you have chosen your excitation wavelength range, make a note of the location on the LVF scale and lock the filter in place with the thumbscrew. Before making your fluorescence measurement, switch back to Relative Irradiance mode by clicking on the on the OOIBASE toolbar. Measuring Fluorescence with your Curie System After you have chosen your excitation wavelength range, you are ready to make your measurements in Relative Irradiance mode.
3: Using the Curie System If the signal you collect . . . You can . . . By . . .
3: Using the Curie System Saturated Fluorescein Signal in Relative Irradiance Mode 30 640-11100-000-02-0406
3: Using the Curie System Examples of Unsaturated Signal Unsaturated Fluorescein Signal in Scope Mode 640-11100-000-02-0406 31
3: Using the Curie System Unsaturated Fluorescein Signal in Relative Irradiance Mode 32 640-11100-000-02-0406
Chapter 4 Troubleshooting Introduction This chapter contains the steps you need to take to solve possible problems that you may encounter with your Curie system installation. Problem 1: Curie System Connected to PC Prior to OOIBase32 Installation If your Curie system was connected to the computer prior to installing your OOIBase32 software application, you may encounter installation issues that you must correct before your Ocean Optics device will operate properly. Perform the following steps: 1.
4: Troubleshooting • For Windows 2000/XP: a. From the desktop, right-click My Computer and select Properties. The System Properties screen appears. b. Select the Hardware tab. c. Click the Device Manager button.
4: Troubleshooting 2. Locate Other Devices and expand the selection by clicking on the " + " sign to the immediate left. Note Improperly installed USB devices can also appear under the Universal Serial Bus Controller option. Be sure to check this location if you cannot locate the unknown device. 3. Locate the unknown device (marked with a large question mark). Right-click on the Unknown Device listing and select either the Uninstall or Remove option. 4. Click OK to continue.
4: Troubleshooting Problem 2: Older Version of OOIBase32 Installed If the computer you want to use to interface to your Curie system already has an older version of the OOIBase32 application installed, you must install the latest OOIBase32 version instead. Note You do not need to uninstall the older version of the OOIBase32 software before you install the latest version.
Appendix A Specifications Curie System Table 1: Curie System Specifications Specification Value System Dimensions 33 cm x 24.9 cm x 12.8 cm Weight 6.75 kg Temperature Limits 0–60 °C Humidity Limits 0–90%, noncondensing Power Consumption 90 mA @ 5 VDC and 0.2 A @ 12 VDC for a total of 2.
A: Specifications Table 1: Curie System Specifications (Cont’d) Specification Value Optical Bench and Detector Detector 2048-element linear silicon CCD array Number of Elements 2048 pixels Pixel Size 14 µm x 200 µm Well Depth ~62,500 electrons Usable Range 200–1100 nm Dynamic Range: System 2 x 10⁸ Single Aquisition 2000:1 Sensitivity (estimate): At 400 nm 90 photons/count At 600 nm 41 photons/count At 800 nm 203 photons/count 2.9 x 10¹⁷ joule/count 2.
A: Specifications Table 1: Curie System Specifications (Cont’d) Specification Value Optical Bench and Detector (Cont’d) Stray Light: At 600 nm < 0.05% At 435 nm < 0.10% At 250 nm < 0.10% Signal-to-Noise 250:1 (at full signal) Pulsed Xenon Light Source Voltage 11–28 VDC DC Current 0.2 amps RMS Peak Current 1.0 amps Trigger 1 TTL Vref (Vo/Vref = 127.5) 3.14–4.
A: Specifications Table 3: Discharge Capacitor Options Capacitor (µfd) Max Input/Flash (mJ) Max Flash Rate Max Flash Rate @600 VDC (Hz) @400 VDC (Hz) 0.22 40 50 115 0.10 18 111 250 0.47 8.
Appendix B Calibrating the Wavelength of the Curie Spectrometer Your Curie system’s spectrometer is calibrated before it leaves Ocean Optics and the values are on the CD that you received with your product. However, the wavelength for all spectrometers will drift slightly as a function of time and environmental conditions, requiring you to recalibrate.
B: Calibrating the Wavelength of the Curie Spectrometer Calibrating the Wavelength of the Spectrometer Preparing for Calibration To recalibrate the wavelength of your Curie spectrometer, you need the following: A light source capable of producing spectral lines. Note Ocean Optics’ HG-1 Mercury Argon Calibration Light Source is ideal for recalibration.
B: Calibrating the Wavelength of the Curie Spectrometer 5. Use the spreadsheet program or calculator to create a table like the one shown in the following figure. In the first column, place the exact or true wavelength of the spectral lines that you used. In the second column of this worksheet, place the observed pixel number. In the third column, calculate the pixel number squared. In the fourth column, calculate the pixel number cubed. Independent Variable True Wavelength (nm) 253.65 296.73 302.15 313.
B: Calibrating the Wavelength of the Curie Spectrometer 7. Select the true wavelength as the dependent variable (Y). Select the pixel number, pixel number squared, and the pixel number cubed as the independent variables (X). After executing the regression, you will obtain an output similar to the one shown below. Regression Statistics Multiple R 0.999999831 R Square 0.999999663 Adjusted R Square 0.999999607 Standard Error 0.
B: Calibrating the Wavelength of the Curie Spectrometer 7. Click the Next button. The Start Installation screen appears. 8. Click the Next button to begin the installation. Once the installation finishes, the Installation Complete screen appears. 9. Click Finish and reboot the computer when prompted. 10. Navigate to the USB EEPROM Programmer and run the software. 11. Click on the Curie device displayed in the left pane of the USB Programmer screen. 12.
B: Calibrating the Wavelength of the Curie Spectrometer 46 640-11100-000-02-0406
Appendix C Relative Irradiance Mode Irradiance is the amount of energy at each wavelength emitted from a radiant sample. In relative terms, it is a comparison of the fraction of energy the sample emits and the energy the sampling system collects from a lamp with a blackbody energy distribution (normalized to 1 at the energy maximum).
C: Relative Irradiance Mode Common applications include characterizing the light output of LEDs, incandescent lamps, and other radiant energy sources such as sunlight. Relative irradiance measurements also include fluorescence measurements, which measure the energy given off by materials excited by light at shorter wavelengths. Before you can access Relative Irradiance Mode, you must take a reference spectrum in Scope Mode of a blackbody of known color temperature.
C: Relative Irradiance Mode Note If you are using Microsoft Excel, choose Tools | Add-Ins and select AnalysisToolPak and AnalysisToolPak-VBA. Calibrating the Spectrometer ► Procedure Perform the steps below to calibrate for relative irradiance: 1. Disable the light source in the Curie system by using the power switch on the light source or by disabling the spectrometer strobe function on the Strobe tab in the Configure Data Acquisition screen in the OOIBase32 software. 2.
C: Relative Irradiance Mode 50 640-11100-000-02-0406
Appendix D Filter Sets The following table lists the specifications for the filters included with the Curie.
D: Filter Sets 52 640-11100-000-02-0406
Index A application tips, 28 C calibration preparing for, 42, 48 procedure, 42, 49 saving new coefficients, 44 spectrometer, 42, 48 wavelength, 41 compatibility PC, 40 configuration with OOIBase32, 9 configuration file default spectrometer, 10 configure data acquisition, 14, 16 hardware, 10 spectrometer, 11 Configure Hardware screen, 10 connecting to a PC, 7 connecting to a power source, 7 CVD-DIFFUSE, 3, 23 D Data Acquisition Parameters, 14, 16 default spectrometer configuration file, 10 disable pushbutt
Index O OOIBase32 Install, 4 operating requirements, 4 operator, 9 P PC compatibility, 40 power connection, 7 power supply, 3 pushbutton, 12, 14 S saturated signal examples, 29 serial number, 9 specifications, 37, 38, 39 detector, 38 light source discharge capacitor options, 40 light source electrical output, 39 light source input, 39 light source light output, 40 optical bench, 38 system, 37 start-up, 9 system contents, 2 T R Relative Irradiance mode, 47 removing improperly installed files, 35 unknown