
Installation Guide

12
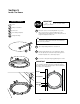
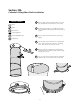
Measuring Tape
Bottom Adjustable Tube
Foil Tape
TOOLS & PARTS
1
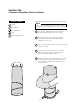
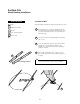
If you have an angled installation you will need to
twist your Bottom Adjustable Tube so it lines up with
the Top Adjustable Tube above. (Be sure you have
removed the protective film.)
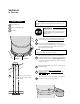
2
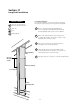
Measure distance from the top of Roof Flashing to
ceiling (See illustration) to determine proper trimming
of length of tubes. Refer to “Tube Length Chart” in
Section 8 for cutting recommendations if you need to
shorten the tubes.
3
Slide Bottom Adjustable Tube over the outside of Top
Adjustable Tube.
4
5
Tape ALL seams securely with Foil Tape to keep dust,
moisture, and insects out of the tube.
6
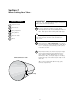
1
Distance from top of ashing
to face of ceiling (take longest
measurement)
3
6
At this point, if you purchased a dimmer or
combo kit, this is where you reference the
dimmer instructions, packaged with the
dimmer unit.
IMPORTANT
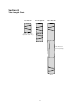
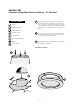
Gently set the Bottom Adjustable Tube ange down
on the trim ring. Do not snap in place at this time.
Now you can push down to lock the Bottom
Adjustable Tube securely into the lock tabs of the
ceiling trim ring.
It is easier if 2 people work/turn the tube in opposite
directions to angle the tube as needed.
NOTE
Section-6
In The Attic
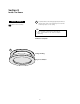
Flip Tab Lock Tab
The vertical seam of the reflective tube should point to
the East or West to avoid irregular light patterns in your
room.
TIP