Reduced Travel Unit Easy to add on. No drilling into door. Las instrucciones en español comienzan en la página 6 La traduction française est sur la page 10 INSTALLATION/MAINTENANCE INSTRUCTIONS For full view and half view sizes.
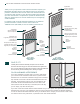
ENCLOSED TREATMENT INSTALLATION INSTRUCTIONS Top Brackets Soportes superiores Supports supérieurs Thank you for your purchase of ODL enclosed treatment. Unpack your blind/shade assembly and check for damage. Be sure to remove the protective cardboard located on both sides of the treatment. Be sure you have the right unit size for your window by holding the assembly up to the door window. It is important to operate the treatment only while it is upright.
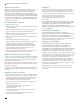
ENCLOSED TREATMENT INSTALLATION INSTRUCTIONS 2 LOOSEN SCREWS AND INSERT SPACERS Loosen frame screws at the top and bottom corners (some snap frame windows do not have screws). If the screws on your window have plugs over them and do not easily come out, use a wood screw and turn it into the plug. Turn the wood screw into the plug until it comes out.
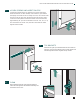
ENCLOSED TREATMENT INSTALLATION INSTRUCTIONS 5 HANG Carefully lift and securely hang the top of the treatment assembly over the top brackets. Angle the lower unit towards you while you slide it on. Be certain the brackets are in the slots at the top, inside edge of the treatment frame. Move side to side to verify the unit is square and secure. PUSH EMPUJAR POUSSER 7 SECURE Check top, bottom and sides of treatment frame to be sure it is flush to door.
ENCLOSED TREATMENT INSTALLATION INSTRUCTIONS OPERATION OPEN/CLOSE (blind only) Slide left hand tab up or down to tilt the treatment. RAISE/LOWER Slide right hand tab up and down to raise and lower the blind/shade. MAINTAIN ■ Frame can be washed with soap and water. Glass can be cleaned with a quality window cleaner. ■ Frame can be painted with acrylic latex enamel paint. ■ To remove treatment from door, reverse installation steps in this guide.
ENCLOSED TREATMENT WARRANTY WARRANTY COVERAGE REMEDIES Subject to the conditions, exclusions and limitations herein, ODL Incorporated (“ODL”) warrants that its Aluminum Blinds and cellular shade for Steel Entry Doors products (“Product”) are free from defects in material and workmanship that would render the Product unfit for its normal and recommended use. THIS WARRANTY APPLIES AND EXTENDS ONLY TO THE ORIGINAL CONSUMER PURCHASING THIS PRODUCT.
Facil de añadir. No hace falta taladrar la puerta. ESPAÑOL Unidad con recorrido reducido INSTRUCCIONES DE INSTALACIÓN/MANTENIMIENTO Para tamaños de vista entera y vista media.
INSTRUCCIONES PARA LA INSTALACIÓN DEL ACCESORIO ENMARCADO Gracias por su compra de ODL. Desempaque su ensamblaje de accesorio enmarcado y verifique que no haya daños. Quite la cartulina en ambos lados del accesorio enmarcado. Cerciórese de tener la unidad del tamaño adecuado para su ventana sosteniendo el ensamblaje frente a la ventana de la puerta. Es importante operar los accesorios enmarcados sólo cuando se encuentran en posición vertical.
INSTRUCCIONES PARA LA INSTALACIÓN DEL ACCESORIO ENMARCADO COLOCACIÓN FUNCIONAMIENTO Levante cuidadosamente el ensamblaje del accesorio enmarcado asegurándolo sobre los soportes superiores. Deslice el ensamblaje en posición angular con la unidad inferior en dirección a Ud. Cerciórese de que los soportes encajen en las ranuras superiores internas del marco de del accesorio enmarcadolas persianas (Ud. podrá sentir los soportes con su dedo en las ranuras de la parte superior del marco).
GARANTÍA DEL ACCESORIO ENMARCADO COBERTURA DE LA GARANTÍA RECURSOS Sujeto a las condiciones, exclusiones y limitaciones de la presente, ODL Incorporated (“ODL”) garantiza que su producto de persianas de aluminio y persianas celulares para puertas de entrada de acero (el “Producto”) está libre de defectos de material y mano de obra que lo convertirían en inadecuado para su uso normal y recomendado. ESTA GARANTÍA SÓLO CUBRE Y ES APLICABLE AL CONSUMIDOR ORIGINAL COMPRADOR DE ESTE PRODUCTO.
Facile à ajouter. Aucun trou à percer. FRANÇAIS Dispositif peu encombrant DIRECTIVES D’INSTALLATION ET D’ENTRETIEN Pour fenêtres complètes ou demi-vue.
DIRECTIVES D’INSTALLATION POUR HABILLEMENTS ENCASTRÉS Nous vous remercions d’avoir acheté des habillements encastrés ODL. Déballez vos stores et assurez-vous qu’ils ne sont pas endommagés. N’oubliez pas d’enlever l’écran protecteur des deux côtés de l'habillement. Assurez-vous aussi d’avoir l'habillement de la taille convenant à votre fenêtre en plaçant le store devant la fenêtre de la porte. Il est important de faire glisser l'habillement seulement lorsqu’il est en position verticale.
DIRECTIVES D’INSTALLATION DES STORES INTÉGRÉS 5 MISE EN PLACE Soulevez doucement l'habillement puis déposez-le lentement sur les supports dans le haut du cadre. Tirez le bas de l'habillement vers vous en le faisant glisser sur les supports. Assurez-vous que les supports sont bien insérés dans les rainures du haut de l'habillement. Essayez de déplacer l'habillement d’un côté à l’autre pour vous assurer qu’il est bien inséré et solidement fixé.
GARANTIE DE L'HABILLEMENT ENCASTRÉ GARANTIE Sous réserve des conditions, exclusions et restrictions définies aux présentes, ODL Incorporated (« ODL ») garantit que ses stores d’aluminium et cellulaires pour portes d’acier (« Produit ») sont exempts de tout défaut de matériau et de fabrication qui pourrait nuire à l’utilisation normale recommandée du Produit. CETTE GARANTIE PROTÈGE SEULEMENT L’ACHETEUR ORIGINAL DU PRODUIT.
U.S. Patent 6,817,401 Part No.