BRISA Retractable Screen Door Double Door Installation Instructions © 2014 ODL Inc.
A fresh approach to fresh air Thank you for purchasing a Brisa Retractable Screen Door from ODL. Make sure the retractable screen door you purchased is the correct size to fit your door. This retractable screen door fits a double inswing or double outswing door. PARTS CALL US FIRST Do not return to the store. For assistance with your installation, or for additional product information, call our customer service department at 1-866-635-4968, or visit www.odl.com.
Identify your door type Before you begin installing your new retractable screen door, it is important to identify your sill and door type. If you have a short sill or an outswing door, you may need to make some modifications before proceeding to the installation steps. SILL TYPE DOOR TYPE Double Inswing Screen assembly will mount on outside of the home. Flush Sill Sill is flush with the exterior trim. Additional steps required Double Outswing* Screen assembly will mount on inside of the home.
Assembly process These instructions outline the step-by-step process to install a retractable screen door. Before starting, review all instructions and become familiar with the parts included. It may be helpful to have a second person assist you during the installation. MEASURE YOUR DOOR TRIM OPENING This screen door is designed to fit door trim openings between 68" and 72" without modifications. If your door trim opening measures less than 68" wide, the top and bottom tracks will require cutting.
Sill Plate Assembly Bottom Track Slide sill plate assembly onto bottom track. Insert the other end of the tracks into the latch hook housing. STEP 2 INSERT SCREEN Place screen assembly onto door sill and lift into place. Flush and short sill – Assembly rests in a position where top of track is flush with edge of sill. Long sill – Assembly rests in a position on top of sill.
Extend housings to the left and right evenly until snug to the door trim. STEP 3 SECURE SCREEN Insert a housing screw into the pre-drilled screw hole at the top of the housing flanges on both sides to hold frame in place. Do not tighten completely. Interior View Center sill plate assembly on the door sill. Slide sill plate assembly extenders to each side to fill gaps. Drive self-drilling screws into sill through all visible pre-drilled holes.
Tighten the top screw and insert housing screws into all remaining pre-drilled holes on each vertical housing flange (2 total per side). Tighten all screws. Deploy slider bar with latch hook until it reaches the middle of the track. Mark the position of the slide bolts on the sill and top molding. Interior View Release the slider bar and drill 1/4" holes in the sill and the top molding. Deploy the slider bar with latch hook to the middle of the track. Drop slide bolts into these top and bottom holes.
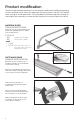
Product modification There are two separate scenarios that will require modifications before proceeding to the installation steps. Door trim openings that measure less than 68" will require track cutting to fit the door width. Outswing door installations require a change to the handle/lock assembly to move the lock mechanism to the inside of the home. NARROW DOOR TRACK MODIFICATION Measure your door trim opening and follow the example below to make your modifications.
Slide the handle assembly back to the middle of the slider bar and align the screw holes of the handle over the slider bar screw holes. Insert and tighten the screws on the handle assembly. Re-insert the slider bar end cap. Insert the slider bar in the screen housing. After completing the handle change steps, please return to the standard assembly process on page 3.
Limited Lifetime Warranty Your purchase of an ODL Brisa Retractable Screen Door includes a Limited Lifetime Warranty. Visit www.odl.com/warranty_brisa.htm to register your product and to view a complete description of the warranty terms, conditions and exclusions (e.g. screen mesh damage). Your product must be registered within 30 days after purchase to receive the full benefits of the warranty.
BRISA Retractable Screen Door Instrucciones para la instalación de la puerta doble Instructions d’installation pour porte double
Una propuesta innovadora para tomar aire fresco Gracias por comprar una puerta de malla retráctil Brisa de ODL. Asegúrese de que la puerta de malla retráctil que compró sea del tamaño adecuado para su puerta. Esta puerta de malla retráctil se adapta a puertas dobles que abren hacia adentro o hacia afuera. Une nouvelle façon de sentir l’air frais Merci d’avoir fait l’acquisition d’une porte-moustiquaire rétractable Brisa de ODL.
Determinar el tipo de puerta Antes de comenzar a instalar la nueva puerta de malla retráctil, es importante que identifique el tipo de solera y de puerta. Si tiene una solera corta o una puerta que abre hacia afuera, es posible que deba hacer algunas modificaciones antes de continuar con la instalación. Identifier votre type de porte Avant de commencer à installer votre nouvelle porte-moustiquaire rétractable, il est important d’identifier le type de seuil et le type de porte que vous avez.
Proceso de montaje Estas instrucciones describen paso por paso el proceso para instalar una puerta de malla retráctil. Antes de comenzar, vuelva a leer todas las instrucciones y familiarícese con las mismas. La ayuda de otra persona puede resultar muy útil durante la instalación. Procédure d’assemblage Ces instructions constituent la procédure à suivre étape par étape pour installer une portemoustiquaire rétractable.
Montaje de umbral Seuil de porte en métal Riel inferior Rail du bas Deslice el montaje de umbral sobre el riel inferior. Glissez le seuil de porte en métal sur le rail du bas. Inserte el otro extremo de los rieles en la carcasa del gancho. Insérer l’autre extrémité des rails dans le logement du loquet de verrouillage. PASO 2 INSERTE LA MALLA Coloque el montante de la malla sobre la solera de la puerta y levante hasta que quede en posición.
Extienda los montantes en forma pareja a la izquierda y a la derecha hasta que se ajusten en el borde de la puerta. Étirez la moustiquaire de façon égale vers la gauche et vers la droite jusqu’à ce qu’elle se soit bien ajustée au cadre intérieur de la porte. PASO 3 ASEGURE LA MALLA Inserte un tornillo de montante en el orificio perforado previamente en la parte superior de las bridas del montante en ambos lados para que el marco quede firme en el lugar. No ajuste los tornillos completamente.
Ajuste los tornillos superiores e inserte los tornillos de la carcasa en los restantes orificios perforados en cada una de los bastidores verticales de la carcasa (total de 2 por lado). Ajuste todos los tornillos. Serrer la vis supérieure et insérer les vis du logement dans les trous prépercés restants sur chaque bride verticale du logement (2 par côté). Serrez les vis. Despliegue la barra corrediza (con gancho) hasta que alcance la mitad del riel.
Puerta que abre hacia afuera – modificación del producto Hay dos escenarios individuales que requerirán modificaciones antes de comenzar con los pasos de instalación. Las aberturas de borde de la puerta que midan menos de 68" requerirán un corte de los rieles para adecuarse al ancho de la puerta. Las instalaciones de puertas que abren hacia afuera necesitan un cambio en el montaje de la manija/cerrojo antes de realizar la instalación completa para cambiar el mecanismo de cierre hacia el interior de la casa.
Deslice la manija del pestillo hacia afuera completamente y gírela de extremo a extremo. Vuelva a insertar el montaje de la manija y asegúrese de que las bridas de la manija se deslicen por los rieles de la barra corrediza. CONSEJO: El cerrojo/pestillo y los montantes se deben instalar del lado de adentro de la casa. Cerrojo/pestillo Crochet du verrou Faites glisser la poignée du loquet pour la retirer et retournez-la de 180 degrés (l’extrémité du haut devient l’extrémité du bas).
Garantía limitada de por vida Su compra de una puerta de malla retráctil Brisa de ODL tiene garantía limitada de por vida. Visite www.odl.com/warranty_brisa.htm para registrar su producto y ver la descripción completa de los términos, condiciones y exclusiones de la garantía (por ejemplo, daños en la malla). Su producto se debe registrar dentro de los 30 días posteriores a la compra para obtener todos los beneficios de la garantía.