BRISA Retractable Screen Door Sliding Door Installation Instructions © 2014 ODL Inc.
A fresh approach to fresh air Thank you for purchasing a Brisa Retractable Screen Door from ODL. Make sure the retractable screen door you purchased is the correct size to fit your door. This retractable screen door fits a 6’ 6” tall sliding glass door. PARTS CALL US FIRST Do not return to the store. For assistance with your installation, or for additional product information, call our customer service department at 1-866-635-4968, or visit www.odl.com.
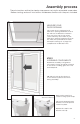
Assembly process These instructions outline the step-by-step process to install a retractable screen door. Before starting, review all instructions and become familiar with the parts included. MEASURE YOUR DOOR OPENING This screen door is designed to fit slider door openings between 32" and 36" without modifications. Measure from your door trim to the center of the stationary door frame. If your slider door opening measures less than 32" wide, the top and bottom tracks will require cutting.
Slider Bar Insert the notch ends of the tracks into the top and bottom screen housing end caps. Make sure the screen threads through the track. Bottom Track Slide attachment bracket onto bottom track. This will be used later to attach the track to the sill. Bottom Track Bottom Track Attachment Bracket Configuration A Configuration B Exterior View Use this attachment bracket configuration when there is a flat edge in front of the sill.
STEP 2 INSERT SCREEN Place screen assembly onto door sill and lift into place. Interior View Assure flexible gasket on back of the screen housing seals along the middle of the fixed panel of the door. Extend the decorative housing to the left or right (depending on the orientation) evenly until snug to the door trim.
STEP 3 SECURE SCREEN Insert a housing screw into the pre-drilled screw hole at the top of decorative housing flange on the latch side of the slider door to hold frame in place. Do not tighten completely. Interior View Interior View Center attachment bracket on lower track. Drive self-drilling 1-1/4" attachment bracket screws through the bracket and sill.
Drive a 4" bracket screw through the bottom end cap attachment bracket and the spacers to secure the bottom of the screen housing to the doorframe or brick mold. Insert second housing screw into decorative housing flange. Tighten all screws to hold frame in place. Pull the slider bar closed to verify the latch and latch hook align properly. Latch hook can be adjusted as needed with a hand screwdriver. TIP: Latch hook can be oriented either hook up or down to connect with latch.
Limited Lifetime Warranty Your purchase of an ODL Brisa Retractable Screen Door includes a Limited Lifetime Warranty. Visit www.odl.com/warranty_brisa.htm to register your product and to view a complete description of the warranty terms, conditions and exclusions (e.g. screen mesh damage). Your product must be registered within 30 days after purchase to receive the full benefits of the warranty.
BRISA Retractable Screen Door Instrucciones para la instalación de la puerta simple Instructions d’installation pour une porte simple
Una propuesta innovadora para tomar aire fresco Gracias por comprar una puerta de malla retráctil Brisa de ODL. Asegúrese de que la puerta de malla retráctil que compró sea del tamaño adecuado para su puerta. Esta puerta de malla retráctil se adapta a puertas de vidrio corredizas de 6' 6" (2 m) de alto. Une nouvelle façon de sentir l’air frais Merci d’avoir fait l’acquisition d’une porte-moustiquaire rétractable Brisa de ODL.
Proceso de montaje Estas instrucciones describen paso por paso el proceso para instalar una puerta de malla retráctil. Antes de comenzar, vuelva a leer todas las instrucciones y familiarícese con las mismas. Procédure d’assemblage Ces instructions constituent la procédure à suivre étape par étape pour installer une porte-moustiquaire rétractable. Avant de commencer, revoyez toutes les instructions et familiarisez-vous avec les pièces incluses.
Inserte los extremos de muesca de los rieles en las tapas de los extremos del montante de la malla superior e inferior. Barra corrediza Barre coulissante Asegúrese de que la malla pase por el riel. Insérez les extrémités avec encoche des rails dans les embouts d’extrémité inférieurs et supérieurs de la moustiquaire. Assurez-vous que la moustiquaire est bien emboîtée sur toute la longueur du rail. Riel inferior Rail du bas Deslice la ménsula de conexión por el riel inferior.
PASO 2 INSERTE LA MALLA Coloque el montante de la malla sobre la solera de la puerta y levante hasta que quede en posición. ÉTAPE 2 INSÉREZ LA MOUSTIQUAIRE Placez la moustiquaire assemblée sur le seuil de porte et levez-là en place. Vista interior Vue de l’intérieur Asegúrese de que la junta flexible que se encuentra en la parte posterior del montante de la malla se selle a lo largo del panel fijo de la puerta.
PASO 3 ASEGURE LA MALLA Inserte un tornillo de montante en el orificio perforado previamente en la parte superior de la brida del montante decorativo del lado del pestillo de la puerta corrediza para que el marco quede firme en el lugar. No ajuste los tornillos completamente. ÉTAPE 3 FIXER LA MOUSTIQUAIRE Insérez une vis de boîtier dans le trou de vis prépercé dans la partie supérieure de la bride du boîtier décoratif du côté du loquet de la porte coulissante pour tenir le cadre en place.
Coloque un tornillo de la ménsula de 4" en la ménsula de conexión de la tapa del extremo inferior y los espaciadores para asegurar la parte inferior del montante de la malla al marco de la puerta o la moldura de ladrillo. Vissez une vis de fixation de 4" à travers l’embout d’extrémité du support de fixation et les bagues d’espacement pour fixer la partie inférieure du cadre de la moustiquaire au dormant de la porte ou à la brique.
Garantía limitada de por vida Su compra de una puerta de malla retráctil Brisa de ODL tiene garantía limitada de por vida. Visite www.odl.com/warranty_brisa.htm para registrar su producto y ver la descripción completa de los términos, condiciones y exclusiones de la garantía (por ejemplo, daños en la malla). Su producto se debe registrar dentro de los 30 días posteriores a la compra para obtener todos los beneficios de la garantía.