
Installation Guide


2
For cathedral ceiling, see Section 10.
For long tube shaft installation, see Section 11.
For metal roof installations, see Section 12.
For tile roof installations, see Section 13.
For 14” skylight with 16” on-center rafter spacing
see Section 4.
REVIEW THIS INFORMATION PRIOR TO BEGINNING INSTALLATION
Caution
The tubular skylight is not designed to hold your
weight or the weight of tools or other objects.
Walking/placing objects on the skylight could cause
personal injury and property damage. A damaged
skylight should be repaired immediately.
For safe installation and use, do not deviate from
these installation instructions.
Warning:
Working on a roof is potentially dangerous but
you can significantly reduce the risk by following
these precautions:
• Never work in wet, windy or cold conditions.
Roofing materials can be slippery when wet;
asphalt shingles are brittle when cold and may
crumble underfoot. Plan your installation for
a calm, dry day.
• Wear shoes with slip-resistant soles.
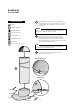
POTENTIAL FIRE HAZARD. After removing the
lm lining from the interior of tube shaft, DO NOT
leave the tube shaft components unattended
and exposed to direct sunlight.
Exposed surfaces may catch fire or incur heat damage
until the tube shaft is properly installed. Assembly and
installation of the tube shaft and attachment of the
inner diffuser eliminates potential hazards from the
reflective inner surface.
Safety information:
• Wear safety glasses and work gloves when
using power tools.
• Use protective work gloves while handling tube
sections to protect hands from sharp edges.
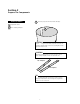
Pre Installation Checklist:
Tube Installation/Location
• Your tubular skylight kit comes with enough
tubing for a 48" installation – if you require
more tubing, you can purchase additional
extension tubes through your retailer.
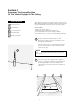
• For best results always attempt to install the tube
as straight as possible (this would locate the
dome/flashing directly above the ceiling diffuser).
• Make sure that the location you pick on your roof
for your dome/flashing is exposed to direct sunlight
throughout the day. You will not want any trees,
chimneys, etc. to cast a shadow on your tube.
• Before installation, carefully survey the attic area
of your desired location. Make sure your tube can
avoid any wiring, plumbing, roof valleys, ceiling
mounted registers/fans, etc.
Building Codes:
• Consult your local building ofcial about local
construction ordinances before starting your
installation.
• Consult your community covenants. Some
subdivisions may not allow tubes on the street
side of home.
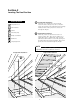
Determining roof pitch:
• “Roof Pitch” is how far the roof drops vertically
for every 12” of horizontal run.
• Sloped composite ashing requires a minimum
pitch of 3:12 and a maximum of 12:12.
• Spun metal ashings can be used on at roof
to 12:12 roof pitch.
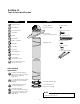
These instructions have been designed to help install your ODL® Tubular Skylight easily and safely. We’ve included a parts
list, list of tools required, installation instructions for a variety of ceiling types, handy tips, and safety precautions. Please
read these instructions thoroughly before installing your ODL® Tubular Skylight. Pay particular attention to the assembly
diagrams, assembly order, and part names. Identify and organize all parts before assembly. Make a list of the tools and
components you will need for each installation location. Following these instructions carefully will greatly enhance your
ability to install your tubular skylight and enjoy flawless performance for many years.
Section-i
What You Need To Know