
User Manual


3
Operating Instructions and Parts Manual 24993/24994/24995/24996/24997/24998/24999
7/18
2018 OEMTOOLS
™
WORKSHOP
CREEPER SEAT
NOTE: The manufacturer declines any and all
responsibility for damage to vehicles or components if
said damage is the result of unskillful handling by the
operator or of failure to observe the basic safety rules set
forth in the instruction manual.
WARNING: Read Rules for Safe Operation and
Instructions carefully.
IMPORTANT SAFETY INSTRUCTIONS
The warnings, precautions, and instructions discussed
in this manual cannot cover all possible conditions
and situations that may occur. The operator must
understand that common sense and caution are factors
which cannot be built into this product but must be
supplied by the operator.
PURPOSE
The OEMTOOLS
™
Workshop Creeper Seat is a fully
functioning seat with 2 tool tray drawers allowing you to
keep everything you need close at hand. Keep your drink
or spray cans close by in the 3 can holder. Four swivel
wheels roll smoothly across the floor with easy turning for
optimum maneuverability.
PRODUCT SPECIFICATIONS
Weight Capacity: 286 Lbs.
Product Weight: 17.6 Lbs.
Tool Drawer Max Weight: 66 Lbs.
Product Dimensions: 11.76" x 11.76" x 16.68"
Construction: Heavy Gauge Steel
CONTENTS
Vinyl Padded Seat (1), Nut & Bolt Drawer (1), Tool Drawer (1),
Support Legs (4), Castors (4), Under Seat Storage Base (1),
Can Holder (1) and Fastener Pack (1).
ASSEMBLY
The OEMTOOLS
™
Workshop Creeper Seat comes packed
flat and requires assembly. Follow the instructions below
to assemble your OEMTOOLS
™
Workshop Creeper Seat.
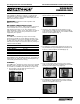
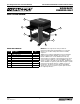
1. Lay out all the contents and ensure there are no
missing/damaged parts (Fig. 1).
2. Lay the Vinyl Padded Seat (1) on a clean flat surface,
with the drawers (2 & 3) facing up (Fig. 2).
3. Using one of the Support Legs (4), align the 4 holes
in the Support Leg with the holes of the Vinyl Padded
Seat (1). Insert the supplied bolts, lock washers and flat
washers and hand tighten (Fig. 3).
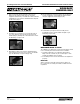
4. Assemble the remaining three Support Legs (4) to the
Vinyl Padded Seat (1). Hand tighten the bolts (leave all
bolts loose until completely assembled) (Fig. 4).
5. Turn over the Under Seat Storage (6) so the storage
cavity is facing the floor (Fig. 5) and align the holes with
the thread on the Support Legs (4) (Fig. 6).
6. Assemble the Under Seat Storage (6) to the Support
Legs (4) with the supplied bolts, lock washers and flat
washers; hand tighten only (Fig. 7).
Figure 1
Figure 5
Figure 2
Figure 4
Figure 6
Figure 7
Figure 3