
User Manual


4
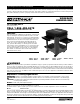
Operating Instructions and Parts Manual 24993/24994/24995/24996/24997/24998/24999
7/18
2018 OEMTOOLS
™
WORKSHOP
CREEPER SEAT
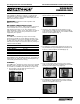
7. Align a Castor (5) with the threads located on the
bottom of the Under Seat Storage (6). Using the
supplied 4 mm Hex Key, assemble the Castors with the
supplied bolts, lock washers and flat washers. Repeat
for all Castors (Fig. 8).
8. Assemble the Can Holder (7) on an opposite side of
one of the drawers. Remove the 4 bolts previously
installed (Fig. 9) and align the can holder to the side of
the Workshop Creeper Seat.
9. Reinstall the 4 bolts, lock washers and flat washers
removed in the previous step. Secure the Can Holder
(7) to the Workshop Creeper Seat (Fig. 10).
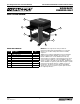
10. Turn the Workshop Creeper Seat over onto its wheels to
ensure everything is correctly aligned. Tighten all bolts
using the supplied 4 mm Hex Key (Fig. 11).
11. Your Workshop Creeper Seat is now ready for use.
Periodically check to ensure all bolts are tight on your
Workshop Creeper Seat.
MAINTENANCE AND STORAGE
The OEMTOOLS
™
Workshop Creeper Seat should be stored
in a cool and dry area and out of the reach of children.
1. Very little maintenance is required for this product.
Wipe clean as needed; only use a mild soap to clean,
and dry immediately upon cleaning.
2. Periodically check to ensure all fasteners are tightened
properly.
DISPOSAL
At the end of the useful life of the product, dispose of
the components according to all state, federal and local
regulations.
Figure 9
Figure 8
Figure 11
Figure 12
Figure 10