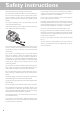
Safety instructions Please read and follow all warnings and instructions. The fax machine should be installed on a level and stable surface. The surface should be smooth and horizontal. Do not place the machine on carpet. The fax machine may be damaged if it falls and may cause serious injury, especially to small children. Do not place anything in front of the fax machine, as this will obstruct the document feeder.
Contents Installation..........................4 Packaging ..................................................................................... 4 Description .................................................................................. 5 Controls ....................................................................................... 6 Accessories ................................................................................... 7 Inserting paper .......................................................
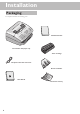
Installation Packaging The shipment includes the following parts: Installation Guide Fax machine with paper tray Toner cartridge Telephone cable with connector Document holder User Manual Document exit tray 4
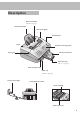
Description Document feeder (Maximum 20 pages) Document holder Document guide Control panel Cover Space for entering names Cover grip Document exit tray Paper exit tray pull out of paper tray Cover for paper tray Paper tray (Maximum 125 pages) to the power supply to the telephone socket Toner cartridge Paper eject lever 5
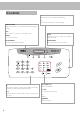
Controls g indicates that your fax machine is transmitting v If this symbol flashes please read the display RESOLUTION Improves the clarity of text and drawings when sending and copying u Select options / set volume / move display cursor MENU Use to select functions STOP Interrupts the process / ejects the document / cancels the input AUTO/MANU Set receive mode (AUTO/MANU) START/COPY Starts fax transfer or copies document R For special functions e.g.
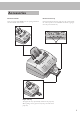
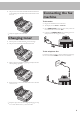
Accessories Document holder Document exit tray Insert the paper holder firmly into the opening behind the document feeder until it blocks. Insert the document exit tray gently into the opening under the control panel. For non-standard documents (e.g. larger than A4) just extend the tray. A Paper exit tray The paper exit tray is permanently attached to the paper tray. When pulling out the paper exit tray keep one hand on the paper tray.
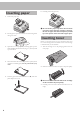
Inserting paper 1 6 Carefully push in the paper tray. Pull out the paper tray. 2 Fan the paper to prevent more than one sheet being drawn through at a time. v Do not fill the paper tray above the mark. Do not insert paper when the machine is printing. Do not use paper that has already been printed by a laser printer as this can lead to paper jams. Inserting toner Before you can send, receive or copy documents, there must be a toner cartridge in the fax machine.
4 Grip the cover at the sides and fold it backwards. Insert the toner cartridge into the holder until it locks and then close the cover. Connecting the fax machine To the mains 1 Plug the fax machine into the wall socket. 2 The display shows SELECT COUNTRY. 3 Press START/COPY and choose the country where the fax machine will be used with u. D Only use original toner from OKI. 4 Confirm with START/COPY. After warming up the machine passes into the energy save mode.
Additional telephones In addition to your fax machine you can connect other devices to your telephone line such as phones, answering machines, charge counters or modems to a single telephone line. If you want to use other equipment with your fax machine please contact your dealer. ISDN connection Your fax machine does not support ISDN fax (Group 4). It is an analog (Group 3) fax machine.
Basic settings Country selection 1 To select the country press MENU and 18. The display shows 18 COUNTRY. 2 Press START/COPY and use u to select the country, where the fax machine will be used. 3 Confirm with START/COPY and press STOP twice. Display language 2 Press START/COPY. The display shows ENTeR NaME. 3 Enter your name using the keypad. Use > to move the cursor one position to the right. Use < to delete the last digit. To delete the whole entry press STOP. Key character 0 space .
Volume Ringing tone The toner save mode decreases the consumption of the toner. Printing quality may fall off. You can set the volume of the ringing tone when the machine is in standby mode or is actually ringing. 1 1 Press u. You will see the current setting displayed for approximately 3 seconds and hear the volume. 2 To change the value, press u until the desired volume is reached. v If the volume level is set to zero, no ringing tone will be heard but faxes will still be automatically received.
Fax switch The built-in fax switch enables a single telephone connection to be used to send and receive faxes and use extra devices. There are two operating modes. Your machine is preset to AUTO mode. 1 The desired operating mode can be selected using AUTO/ MANU. Press the button until the desired mode appears. MANU mode If you receive a fax call you have to press START/COPY to start fax reception. Automatic fax reception is turned off.
Dial options Re-dialling By means of PP you can redial the last five numbers: 1 Press PP for the last five numbers dialed. 2 Press u until the number you want appears. 3 The machine will dial the number automatically. Speed dialling There are eleven speed dial keys for numbers you use regularly. Storing numbers 1 Press MENU and 1. The display shows 11 SPEED DIAL. 2 Press START/COPY. Your fax machine has space to store around 99 names and numbers.
Printing out the phonebook 1 Press MENU, 663 and then START/COPY. 2 The numbers stored are printed out. Groups You can combine entries in your phonebook into groups so you can send a fax to several people at the same time, for example. Setting up a group 1 Press MENU, 13 and then START/COPY. The display shows 13 GROUPS. 2 Use u to select the digit under which you want to store the group (max of five groups), e.g. GROUP NO.: 01. 3 Press START/COPY.
1 Press MENU and 227. The display shows 27 AUTO PRINT. 2 Press START/COPY and use u to select 2 CALLER ID LIST. 3 Press START/COPY and use u to select ON or OFF. 4 Press START/COPY and then STOP three times to end the function. Printing a journal The journal contains the numbers of the last forty faxes sent or received. 1 Press MENU, 66 and then START/COPY. 2 The journal is printed out. The journal can be printed out automatically. 1 Press MENU and 227. The display shows 27 AUTO PRINT.
Fax v It is best only to use A4 documents (80 g/m2). Documents smaller than A5 may jam in the machine. Sending a fax v Do not try to send documents that are 1 ... damp, coated with correction fluid, dirty or have coated surfaces, 2 To improve the image quality press RESOLUTION. ... written on in soft pencil, ink, crayon or charcoal, Transmission starts. If the fax machine is unable to establish a connection, it will redial automatically after a certain time. ...
Memory If there is no paper in the paper tray or if the toner is empty, incoming faxes will be stored in memory (around 120 pages according to Slerexe letter). If an incoming fax has been stored in memory the display will show FAX IN MEMORY. Once the paper tray is refilled or the toner replaced all the faxes stored in memory can be printed out (see Printing from memory). When a fax has been printed it is deleted from memory.
4 Finally, press START/COPY. The document will be scanned and automatically sent. Broadcast list The broadcast list contains the numbers of all the addresses in a broadcast (up to 50 numbers). 1 Press MENU and 664. The display shows 64 GROUP LIST. 2 Press START/COPY. The list will be printed out.
Transmit polling You can program your fax machine to send documents when it is polled by a remote fax machine. 1 Place the document to be faxed (maximum of 20 sheets) loosely in the document feeder, face down. 2 Press MENU and 55. The display shows 51 POLLING TX. Press START/COPY. 3 You can now choose whether or not to protect the fax against unauthorized access. a If you want to protect the fax, use u to select WITH CODE and press START/COPY. Enter a code (up to 20 digits) and press START/COPY.
Copy You can use your fax machine to make copies of an original. Resolution standard is set by default. To select a better image quality press RESOLUTION (see chapter fax/resolution). 1 Place the document (maximum of 20 sheets) in the document feeder, face down. 2 To select a better image quality press RESOLUTION. Making single copies 1 To make a single copy of the original, press START/COPY three times. Copying starts immediately.
Troubleshooting Maintenance PAPER JAM Received faxes or copies are not ejected. Open the cover and take the toner out of the machine. Pull the green lever towards you. Carefully remove the paper without tearing it. CHECK PAPER Take out the paper cassette and remove the paper. Fan it and straighten it on a smooth surface and replace it. Check DOCUMENT Press STOP. The document will be ejected. If not, pull it gently out of the machine. SERVICE Disconnect the machine from the mains and plug it back in.
There are white lines on the printout. Clean the toner drum with a soft cloth. There are black lines on the printout. The toner cartridge is damaged and must be replaced. Only use OKI original toner cartridges. Problems with the connection No dial tone. Check that the machine is connected to the mains and to a telephone line. Receive polling does not work. Check that the machine from which you are trying to receive faxes is set for automatic fax operation and for polling.
Error codes 24 Error codes when sending faxes Problem # 102 No document in the feeder. # 104 Fault on the telephone line. # 105 The receiving fax machine has a transmission error. # 109 The receiving fax machine is not responding. # 110 There is no signal from the receiving fax machine at the end of transmission. # 111 An error message is sent by the receiving fax machine at the end of transmission.
# 161 At the end of the reception process the sending fax machine does not send a signal or the connection was interrupted. # 166 There are repeated errors in the received data. # 167 The data received contains so many errors that a second transmission is needed. # 168 At the start of password-protected polling the machine detects that the wrong password has been entered on the sending fax machine.
Annex SLEREXE-letter: Technical data Compatibility ITU-T Group 3 Connection type Exchange line (PSTN) / Extension (PABX) Flash times Exchange line (PSTN): Extension (PABX): Document size Width: Length: Document feeder max. 20 pages (80 g/m2) Paper A4 210x297 mm, 80 g/m Capacity of paper tray max. 125 sheets Maximum scan width 208 mm Calling line identification: When you receive a fax the number of the sender is displayed (not in all countries).
Guarantee 27
Declaration of conformity 28
Index A E L A-Z key 6 accessories 7 additional telephone 13 annex 26 AUTO mode 13 enlarge copy 21 enter character 11 date and time 11 entry delete 6 error code 24 lamp display 6 list group 15 settings 12 B book telephone 6 C cable telephone 4 caller identification 15 cartridge toner 4 character enter 11 code error 24 connection 9 PABX 10 power supply 9 type 26 copy 6 enlarge 21 multiple pages 21 reduce 21 single page 21 cover grip 5 D date enter 11 delete entry 6 group 15 telephone book 14 descripti
(LFAX3316 OKI) INT 5103 506 XXXX.Y The CE mark confirms that the machine corresponds to the relevant guidelines of the European Union. This product is intended for use on an analogue public switched network (PSTN) and for use in the country indicated on the label of the box. The usage in other countries could cause malfunction. For further information please contact your national technical support centre. Initially contact your dealer if problems occur during operation.