English Section 1: Install the Printer Your printer set up will take about 15-20 minutes. Section 1 : Installez le fil d’alimentation Français La configuration de l'imprimante nécessite de 15 à 20 minutes. Sección 1: Instale la impresora Español La instalación de la impresora que consta tomará de 15-20 minutos. Seção 1: Instale a impressora Português A instalação da impressora demorará aproximadamente de 15 a 20 minutos.
1 Unpack Remove the packing pieces and the protective bag. Note: Illustrations and components are representative only. Your unit may differ slightly from those pictured in this document. English Déballage Retirez les matériaux d'emballage et le sac de protection. Remarque: Les illustrations et composants sont à des fins d’expllication uniquement. Votre unitè peut être légèrement différente des images dans ce document. Français Desempaque Retire el material de embalaje y la bolsa protectora.
2 Check components: A Printer B CD C Light shield bags D Power Cable E LED lens cleaner Manuals (not shown) English Vérifiez les composants : A Imprimante B CD C Sacs pare-lumière D Cordon Guides (non illustrés) Français d'alimentation E Nettoyant pour lentilles Verifique los componentes: A Impresora B CD C Bolsas de protección Manuales (no se muestran) Verifique os componentes: A Impressora B CD C Sacos à prova de luz D Cabo de Manuais (não ilustrados) contra la luz D Cable de alimentación
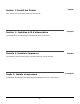
3 38 in. 981mm • Lift the printer and place it on your selected location (space requirements are approximate). • Remove the packing materials and shipping tape. • Soulevez l'imprimante et placez-la à l'endroit désiré (les espace requis sont approximatives). • Retirez les matériaux d'emballage le ruban d'expédition. English Français • Levante la impresora y colóquela en la ubicación seleccionada (espacio necesario aproximadas). • Retire el material y cinta de embalaje.
4 Prepare the Image Drums/Toner Units • Press the release button and lift the top cover. • Remove the black image drum/toner unit (nearest the control panel). CAUTION! Keep unit upright to avoid spillage. English Préparation des unités tambours d'image/toner • Appuyez sur le bouton de déverrouillage et ouvrez le capot supérieur. • Retirez l'unité tambour d'image/toner noir (le plus proche de panneau de commandet). ATTENTION! Maintenez-la orientée vers le haut pour éviter toute fuite de toner.
4 cont. suite cont. cont. • Lower the cover to protect the remaining drums from light. CAUTION! Do not let the drum sit in room light for more than 5 minutes. • Fermez le capot pour protéger les autres tambours d'image contre la lumière. ATTENTION! N'exposez pas la cartouche de tambour d'impression à la lumière pendant plus de 5 minutes. • Baje la tapa para proteger los demás cilindros de la luz. ¡CUIDADO! Los cilindros no deben estar expuestos a la luz de la habitación por más de 5 minutos.
4 cont. suite cont. cont. Caution! Do not touch the image drum’s shiny green surface. Do not expose the drum to direct sunlight. • Remove the tabs and sheets. Attention! Ne touchez pas la surface verte glacée du tambour! N'exposez jamais la cartouche de tambour d'image à la lumière directe du soleil. • Retirez les rubans et les feuilles. English Français ¡Cuidado! No toque la superficie verde brillante del cilindro de imagen. No exponga el cilindro a la luz directa del sol.
4 cont. suite cont. cont. • Open the cover and replace the black drum/toner unit, then push the lock lever toward the back of the printer as far as it will go. • Repeat these steps for each of the remaining drum/toner units. Important! If TONER SENSOR INDICTATOR ERROR appears when you turn on the printer, the lever for the toner cartridge color indicated is not pushed all the way back.
5 Prepare the Fuser • Press firmly on the blue lock (1) to release the orange transport restraint (2). • Pull the restraint out in the direction of the arrow (3). • Remove the orange instruction band (not shown). Préparation de l'unité de fusion • Appuyez fermement sur le levier de verrouillage bleu (1) pour déverrouiller les dispositifs de fixation oranges (2). • Tirez les dispositifs selon la direction indiquée par la flèche (3). • Retirez et la bande orange (non illustrés).
6 5 cont. suite cont. cont. English • Close the top cover. Français • Fermez le capot supérieur. • Cierre la tapa superior. Español Português • Feche a tampa superior.
6 Load Paper: Tray 1 • Pull out the paper tray (1). • Carefully pull the shipping restraint down, and out (2). Important! Be sure you remove the entire piece, including both arms. Chargement du papier: Bac 1 • Sortez le bac à papier (1). • Puiz tirez doucement le dispositif de blocage vers le bas pour le sortir (2). Important! Veillez à retirer toute la pièce, incluant les deux bras. Cargue papel: Bandeja 1 • Saque la bandeja de papel (1).
6 cont. suite cont. cont. • Load the paper (maximum 300 sheets 20-lb [75 g/m2] paper). • Make sure the paper guides are snug against the paper and are locked in place. Note: Do not fill above paper full indicator (1). • Gently close the paper tray. English • Chargez le papier (maximum de 300 feuilles de 20 lb [75 g/m2]). • Assurez-vous que les guides papier sont appuyés contre le papier et le maintiennent bien en place. Remarque: Ne dépassez pas le repère du bac (1).
7 Power Up • Insert the power cable. WARNING! Be sure to use only the power cable supplied with your printer! Use of a power cord not supplied with this printer, or an extension cord, could be a safety hazard. English Mise sous tension • Insérez le cordon d'alimentation dans la prise.
7 cont. suite cont. cont. Caution! Do not connect this product to an uninterruptible power supply (UPS). For more information, please contact Oki Data at 1-800-OKIDATA or www.okiprintingsolutions.com. • Plug the cable into a suitable grounded outlet. Do not connect other cables at this time. • Turn the printer on. Note: TONER SENSOR ERROR? See page 9. Mise en garde! Ne branche pas ce produit dans un systéme d’alimentation sans coupure.
8 English Print the Demo Page 1. Press + one or more times, until you see INFORMATION MENU on the first line of the display. 2. Press ENTER. 3. Press - or + one or more times, until you see DEMO1 on the first line of the display. 4. Press ENTER. The demo page prints and the printer goes back on line. Impression d'une page de démonstration 1. Appuyez une ou plusieurs fois sur + jusqu'à ce que INFORMATION MENU (MENU D'INFORMATION) s'affiche sur la première ligne de l'affichage. 2. Appuyez sur ENTER. 3.
9 Install the Handy Reference Guide Remove the backing from the VELCRO® strip on the back of the Handy Reference Guide and mount it on the side of the printer. English Installation du Guide de référence pratique Retirez la pellicule de la bande Velcro® au dos du Guide de référence pratique et apposer le Guide de référence pratique sur le côté de l'imprimante.
Section 2: Make Connections and Install the Software English Windows® ➯ ➯ ➯ ➯ Network, go to “Windows® Network Setup” sur page 19. USB, go to “Windows USB Connection”on page 26. Parallel, go to “Windows Parallel Connection”on page 28. Setup Options, go to “Windows Setup Options”on page 29. Macintosh® ➯ Macintosh, Go to “Macintosh”on page 33. Section 2 : Réalisation des connexions et installation du logiciel Français Windows® ➯ ➯ ➯ ➯ Réseau, passez à “Windows réseau Configurez” sur page 19.
Windows® Network Setup English 1 Connect to a Network a. Turn the printer OFF. b. Remove the plastic cap from the LAN port if installed (1). c. Connect the Ethernet cable between the printer and the Ethernet hub or router. Windows réseau Configurez Français 1 Connexion à un réseau a. Éteignez l’imprimante. b. Retirez le disposiftif de protection en plastique du connecteur réseau de l’imprimante. c. Branchez le câble Ethernet entre l'imprimante et le concentrateur ou le routeur Ethernet.
Windows Network Setup (cont.) 2 Print the Configuration Sheets. English a. Turn the Printer ON and wait for the print server status light (2) to stop blinking. b. Press the TEST button (3) on the print server to print the Network Information configuration sheets. Keep these sheets handy: they contain information you need to set up the printer on your network. Windows réseau Configurez (suite) 2 Feuilles de configuration s’impriment. Français a.
Windows Network Setup (cont.) 3 Load the CD English a. Insert the CD in the CD-ROM drive. The CD will autorun. If it doesn’t, click Start → Run → Browse. Browse to your CD-ROM drive, double-click Install.exe. Click OK. b. Select your language. c. Accept the License Agreement. d. The Installer screen appears. Windows réseau Configurez (suite) 3 Placez le CD Français a. Insérez le CD dans l’unité de CD-ROM. Le CD est lancé automatiquement.
Windows Network Setup (cont.) 4 Install the Driver English a. Click Install Driver. b. Select network printer. c. Follow the on-screen instructions. d. When prompted, select printer emulation (PS or PCL). Note: You may be required to enter the IP address for the printer. The IP address can be found on the Configuration Sheet (see page 20). Windows réseau Configurez (suite) 4 Installation du pilote Français a. Cliquez sur Installer le pilote d’impression. b. Sélectionnez imprimante réseau. c.
Windows Network Setup (cont.) 5 Test the Printer Driver Installation English a. To make sure the printer driver is correctly installed, print a page from any program. b. Reinstall the driver if the installation failed. ➯ ➯ See pages 24 and 25 for optional Windows Network setup software. See page 29 for additional printer setup options. Windows réseau Configurez (suite) 5 Test de l’installation du ligiciel Français a.
Windows Network Setup (cont.) 6 Network Setup Utility (Optional) English This utility allows easy print server configuration, quick discovery, and IP address assignment. a. Select Optional Utilities from the menu bar. b. Click Install Admin Manager (Quick Setup Utility). c. Follow the on-screen instructions. Note: If the Ethernet Address information does not appear, click Search.
Windows Network Setup (cont.) 7 Using a Web Browser (Optional) English Use your web browser to configure print server and printer menu settings on an embedded web page. Note: For more details, see the Network User’s Guide on the CD supplied. a. Activate your web browser (Microsoft Explorer or Netscape Navigator 4.0 or higher). b. Enter the IP Address for the printer. Find the address on the network Configuration Sheet (see page 20). c. Click on a tab to see a particular category.
Windows USB Connection English 1 Install the Driver before connecting the USB cable to the printer. a. Turn the printer OFF. b. Insert the CD in the CD-ROM drive. The CD will autorun. If it doesn’t, click Start → Run → Browse. Browse to your CD-ROM drive, double-click Setup. Click OK. c. Select a language. Accept the license agreement. d. Click Install Driver. e. Select local printer. Follow the on-screen instructions. f. Select printer emulation (PS or PCL). g.
Windows USB Connection (cont.) 2 Test the Printer Driver Installation English To make sure the printer driver is correctly installed, print a page from any program. Reinstall the driver if the installation failed. ➯ See page 29 for additional printer setup options. Windows connexion USB (suite) 2 Test de l’installation du ligiciel Français Pour vérifier que le logiciel est correctement installé, Imprimiez une page à partir d’un programme quelconque.
Windows Parallel Connection English Requires bi-directional (IEEE 1284 compliant) parallel cable. Cable must be shielded and UL and CSA approved. a. Connect the Parallel cable and switch the printer ON. b. Insert the CD in the CD-ROM drive. The CD will autorun. If it doesn’t, click Start→Run→Browse. Browse to your CD-ROM drive, double-click Setup. Click OK. c. Select a language. Accept the license agreement. d. Click Install Driver. e. Select local printer. Select the LPT1 Port. f.
Windows Setup Options English 1 Install/View Documentation Note: To open the on-line manuals, you must have Adobe® Acrobat® Reader 3.0 or higher installed. a. Select Driver Setup from the CD installer menu bar. b. Click Install User’s Guide. c. Follow the on-screen instructions to complete the installation. d. To view the manuals, click Start → Programs → Okidata.
Windows Setup Options (cont.) 2 Install Utilities and Downloads English Note: You must be connected to the internet to download utilities. a. Select Optional Utilities or Internet Downloads from the CD installer menu bar. b. Click the utilities and downloads you want to install and follow the instructions. Étapes Optionnelle pour Windows (suite) 2 Installer les utilitaires et les téléchargements Français Remarque: Vous devez être connecté à Internet pour installer les téléchargements par Internet. a.
Windows Setup Options (cont.) 3 Change the Display Language English Use this utility to select an alternative language for the printer display panel. a. Select Optional Utilities from the CD installer menu bar. b. Click Change the Printer Display Language. c. Follow the on-screen instructions. Étapes Optionnelle pour Windows (suite) 3 Changer la langue d'affichage Français Utilisez cet utilitaire pour choisir une langue différente pour l'affichage de l'imprimante. a.
Windows Setup Options (cont.) 4 Activate Optional Accessories English Note: If your printer has an optional second paper tray or Hard Disk Drive installed, you must enter the driver and activate it. a. Click Start → Settings → Printers (and Faxes) on the Windows taskbar. b. Right click the printer icon. c. Click Properties. d. Click the device Option tab. e. Click Available Tray and select your paper tray from the drop-down menu.
Macintosh® English 1 Connect USB cable Note: Printer operation is not assured if another USB compatible device is connected concurrently with it. a. Turn the printer OFF. b. Connect the USB cable to the USB port on the computer, then to the USB port (1) on the printer. Macintosh Français 1 Connexion le câble USB Remarque: Le fonctionnement de l’imprimante n’est pas garanti si un autre périphérique copatible USB est connecté en même temps avec l’imprimante. a. Éteignez de l’imprimante. b.
Macintosh (cont.) 2 Install the Printer Driver English a. Turn on the printer, then turn on the computer. b. Place the CD supplied with the printer in the CD-ROM drive. c. Double-click the CD icon that appears on the desktop. d. Open the appropriate MAC OS folder. Select a language. e. Double-click the Printer Installer icon. The Installer displays with the driver pre-selected. f. Select any utilities you want to install. Click Install. Note: For information on utilities, see the online User’s Guide.
Macintosh (cont.) 3 Add the Printer English a. Run the Print Center or Print Setup Utility. Click Add. b. Click More Printers. c. Select OKI USB, OKI TCP/IP, or Rendezvous/Bonjour from the drop-down menu. Note: If you are using USB, select OKI USB and disregard step d. d. Enter the printer’s IP address. e. Select the printer model. Click Add. f. Quit the Print Center. Macintosh (suite) 3 Ajout de l’imprimante Français a. Exécutez l’utilitaire Configuration de l’imprimante ou le Centre d’impression. b.
Macintosh (cont.) 4 Install the Documentation English Note: Adobe ® Acrobat® Reader 3.0 or higher is required to view the manuals. a. Insert the CD into your CD-ROM drive. b. Double-click the CD icon which appears on the desktop. c. Scroll to the C6000_UG_ae.pdf file in the root directory. - To load it: drag the pdf file to the desktop. - To view it: double-click it. Macintosh (suite) 4 Installer le Guide de l’utilisateur Français Remarque: Pour accéder au manuels en ligne, Acrobat Reader (version 3.
Service and Support English Available 24 hours a day, 7 days a week • Visit our multilingual web site: www.okiprintingsolutions.com • Call 1-800-654-3282 Service et soutien Français Offert 24 heures sur 24, 7 jours sur 7 • Visitez notre site Web multilingue : www.okiprintingsolutions.com • Composez le 1-800-654-3282 Assistencia Técnica y Soporte Español Disponible 24 horas al día, días a la semana. • Visite nuestro sitio Web multilingue: www.okiprintingsolutions.