English Read Me First 6eGBrf1a.
Every effort has been made to ensure that the information in this document is complete, accurate, and up-to-date. Oki assumes no responsibility for the results of errors beyond its control. Oki also cannot guarantee that changes in software and equipment made by other manufacturers and referred to in this guide will not affect the applicability of the information in it. Mention of software products manufactured by other companies does not necessarily constitute endorsement by Oki.
Your Oki printer has been carefully designed to give you years of safe, reliable performance. As with all electrical equipment, however, there are a few basic precautions you should take to avoid hurting yourself or damaging the printer: • Read the setup instructions in this handbook carefully. Be sure to save it for future reference. • Read and follow all warning and instruction labels on the printer itself. • Unplug the printer before you clean it.
• Lifting the top cover exposes hot surfaces. These are clearly labelled. Do NOT touch them. • Do not make any adjustments other than those outlined in the handbook you may cause damage requiring extensive repair work. If anything happens that indicates that your printer is not working properly or has been damaged, unplug it immediately and contact your dealer. These are some of the things to look for: • The power cable or plug is frayed or damaged.
English Contents Safety Instructions ............................................................ 3 Manual Feed ................................................................... 16 OKIPAGE 6e Features ...................................................... 7 Transparencies/Adhesive Labels .................................... 17 OKIPAGE 6ex Features .................................................... 7 Printing Envelopes ..........................................................
6eGBrf1a.
Your printer’s features include: English Congratulations! You have selected a printer with fast output, excellent print quality, and easy operation.
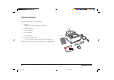
Check the Contents Unpack your printer. You should have: 1. Printer (with Image Drum Cartridge installed). 1 2. Driver Diskettes. 3. Toner Cartridge. e OL 600 4. User Manuals. 5. Power Cable. 5 6 6. Lightproof plastic bag (for storing image drum if printer must be shipped). If anything is missing, contact your dealer for a replacement. 3 2 4 8 6eGBrf1a.
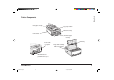
English Printer Components Rear paper exit tray Top paper exit bin Manual feed tray Power switch Automatic paper feed tray LED array Power cable receptacle Image drum cartridge with toner installed Bi-directional parallel interface port Read Me First 6eGBrf1a.
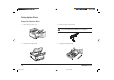
Setting Up Your Printer Remove the Protective Sheet 1. Press and open the cover. 3. Remove the protective sheet. Do not touch the Image Drum’s green surface. 2. Remove the image drum. 4. Replace the image drum. 10 6eGBrf1a.
English Installing Toner Do not remove cartridge from packaging. 1. Remove the sponge and discard. 3. Unwrap the new cartridge. 2. Shake the toner cartridge to evenly distribute toner. 4. Remove the tape. Read Me First 6eGBrf1a.
5. Insert the toner cartridge. 7. Close the printer cover. OL 6. e/PS 41O 0e OL 60 Push the blue lever forward. 12 6eGBrf1a.
Paper Sizes • For best results, use paper that is smooth and of high quality, like copier type paper or paper with a Sheffield rating of 100-250. • Store paper in its ream wrapper until you are ready to use it. Keep it away from moisture or other conditions that can cause it to wrinkle or curl. • Preprinted forms must not scorch, melt, offset, or release hazardous emissions when heated to 392° F (200° C) for 0.1 second.
Installing Paper 1. Push the paper tray handle. 3. Adjust the paper guides. 4. Insert paper. e OL 600 R 1 2 2. Remove the paper tray. PAPER FULL 5. Re-adjust the paper guides. 14 6eGBrf1a.
English Paper Exit Paths 6. Re-insert the paper tray. Top Paper Exit • Printed pages exit face down. e OL 600 R • Pages are stacked in the order printed. • Exit bin holds 100 sheets (20lb. paper). Pull the front exit extender forward. Lift out the metal support bar. Do not change the direction of the paper output during printing. Read Me First 6eGBrf1a.
Manual Feed Rear Paper Exit • Always use rear exit for printing on heavy paper, envelopes, labels and transparencies. • Printed pages exit face up in reverse order. • Exit tray's maximum capacity is 50 sheets (20 lb. paper). Use manual feed for printing envelopes, transparencies, legal and odd size paper. 1. Press the bottom of the front panel to release the manual feed tray. Pull the tray down. OL 600e R Oe OL 4O Pull out the rear exit extender until it locks into place.
English Transparencies/Adhesive Labels 2. Adjust the guides. Insert a sheet of paper until the printer grips it. When using letterhead paper, insert letterhead in first, face up. • Always use Manual Feed • Always use rear output. • Media should be specifically made for laser printers or photocopiers. • Must be able to withstand 200°C for 0.1 sec. • Labels should cover entire carrier sheet. • Carrier sheet or adhesive must not be exposed to any part of the printer. 3.
Printing Envelopes Choosing Envelopes • Always use rear output. • No windows or metal clasps. OL 600e • Media no heavier than 28 lbs. R • Smooth even surface. • No self-sealing flaps. • Seams down the sides, not across the middle. • Squared-off flaps that do not cover the print area. 1. Pull out the rear exit extender until it locks and lift out the support bar. Pull down the manual feed tray and adjust the paper guides. 2. Insert the envelope, flap down and to the left, until the printer grips it.
2. Plug the power cord into the printer, then into a grounded outlet. 3. Switch the printer on. Make sure your printer is not plugged in and your computer is turned off. OL The parallel cable should support bi-directional communication and must be shielded. 1. Plug the interface cable into the parallel socket on the printer. OL 61 Oe POWER ON OFF The Ready light comes on. Read Me First 6eGBrf1a.
Installing the Printer Driver For DOS Users From Windows™ 3.1x Program Manager The DOS Operator Panel may also be installed by running install.bat. 1. Insert Disk 1 supplied with your Oki printer. 1. Insert Disk 2 into drive A: 2. Click FILE – RUN... 2. From the DOS command line go onto drive A. 3. Type a:setup in the Command Line box and click OK. 3. Type INSTALL 4. Follow the on screen instructions. 4. Follow the on screen installation instructions.
1. Press [ON LINE] (Ready light off). 2. Press and hold [Print Demo]. The Demo Page prints.
The Display Window (OKIPAGE 6ex) The Buttons (OKIPAGE 6ex) • Press [ON LINE] to switch printer between on line and off line modes. Press to end Menu session. Indicates the following: • What the printer is doing during normal operation. • When you need to add paper or change consumables. • When there is something wrong with the printer. • Press [PAPER SIZE] to enter the Paper Size Quick Menu. Press and hold to print the current Printer Menu Settings. • Press [TRAY TYPE] to enter the Tray Type Quick Menu.
English Oki Systems Company Oki Systems (UK) Limited 550 Dundee Road Slough Trading Estate Slough Berks. SL1 4LE Tel: 01753-819819 Fax: 01753-819899 Read Me First 6eGBrf1a.
Index B L Buttons 22 Labels choosing 17 Language 20 C Compatibility 7 Components 9 Control Panel 21 M Manual Feed how to use 16 when to use 16 Memory 7 D Demo Page 21 Display 22 DPI (dots per inch) 7 O Optional accessories 7 E P Envelopes 18 choosing 18 how to print 18 F Fonts 7 I Interface cable.