OKIFAX 4500 User’s Guide
Every effort has been made to ensure that the information in this document is complete, accurate, and up-to-date. The manufacturer of this equipment assumes no responsibility for the results of errors beyond its control. The manufacturer of this equipment also cannot guarantee that changes in software and equipment made by other manufacturers and referred to in this guide will not affect the applicability of the information in it.
Symbols in this Book ......................................................... 2 Energy Star ......................................................................... 2 SAFETY .................................................................................. 6 General ................................................................................ 6 Installation Hints ................................................................ 6 Operation & Maintenance ..................................................
Loading Documents ......................................................... 36 Sending Fax to Single Location ....................................... 37 Search Key Dialling ..................................................... 38 Real-Time Dialling ...................................................... 38 Redialling ..................................................................... 38 Confirming Results ...................................................... 38 Stopping a Transmission ....................
REPORTS .............................................................................. 74 Understanding Reports ..................................................... 74 Activity Report ............................................................ 74 Broadcast Confirmation Report ................................... 74 Active Memory Files Report ....................................... 75 Telephone Directory .................................................... 75 Configuration Report ...........................
SAFETY Installation Hints Your fax machine has been carefully designed to give you years of safe, reliable performance. As with all electrical equipment, however, there are a few basic precautions you should take to avoid hurting yourself or damaging the fax machine. • Install your fax machine in a dust-free location away from direct sunlight. • Do not connect your fax machine to a power source that is used by other equipment producing electrical noise (i.e., air conditioners, etc.).
This fax machine may not necessarily provide an effective hand-over of a call from a telephone connected to the same line. • • The operation of this fax machine on the same line as a telephone or other equipment with audible warning devices or automatic ring detectors will rise to bell tinkle or noise and may cause false tripping of the ring detector. Should such problems occur, the user is not to contact the telephone company.
Emergency First Aid • IF TONER IS SWALLOWED: Induce vomiting and seek medical attention. Never attempt to induce vomiting or give anything by mouth to a person who is unconscious. • IF TONER IS INHALED: Take the person to an open area for fresh air. Seek medical attention. • IF TONER GETS IN THE EYES: Flush eyes with large quantities of cool, NOT cold, water for a minimum of 15 minutes keeping eyelids open with fingers. Seek medical attention.
• Thank you for purchasing this OKIFAX fax machine. This fax machine uses advanced Light Emitting Diode technology to transfer received and copied images to plain paper. It is designed to make the sending and receiving faxes a fast and trouble free process. Advanced memory transmission and reception features, including automatic reception into memory with or without password printing. • Reports to help you keep track of the operations and settings of your fax machine. • Automatic power save mode.
Product Options Multi function peripheral (MFP) software is available as an option, which allows your fax machine to communicate with a computer. Once this option is intstalled, you can: • Use your fax machine as a local printer. • Send fax messages directly from your computer. • Receive and store fax messages directly into your computer. • Scan pages from your fax machine into your computer. • Carry out optical character recognition (OCR) on received faxes or scanned pages.
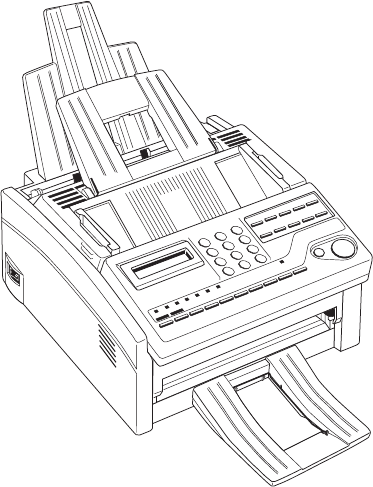
English COMPONENT IDENTIFICATION What You Should Receive Power Cable Document Tray Paper Tray/ Copy Stacker Telephone Cable Toner Cartridge Document Stacker Facsimile Unit Image Drum Unit (Inside fax machine) User’s Guide 11
Components Paper Tray/Copy Stacker Load up to 100 sheets of paper into this tray. Up to 30 sheets of received faxes or finished copies are stacked on top of this tray. Document Tray Holds original documents that are to be faxed or copied. Document Guides Adjust these guides to the page width of the documents that are to be faxed or copied. One Touch Keypad Control Panel Manual Paper Feeder Load paper into this slot when you want to use a type of paper different from the paper in the paper tray.
LINE Terminal Terminal for connecting the unit to a telephone line. PC Connector Connect the computer cable into this connector. TEL Terminals Terminals for connecting the fax machine to an external telephone. Power Switch AC Power Inlet Connect the AC power cable, supplied with your fax machine, into this inlet. LED Print Head This black bar is the part of your fax machine which writes received or copied images onto the image drum unit.
Control Panel 14 OKIFAX 4500
1 LCD Panel: Refer to this liquid crystal display (LCD) panel for instructions and information while your fax machine is operating or while you are programming your fax machine. 2 Transmit Resolution/ô YES Key: This key changes the resolution used for transmitting documents. Use STD for standard originals, FINE and EX.FINE for detailed or small print originals, and PHOTO for originals that include colours or many shades of grey.
9 Note: If your fax machine has been set to enter power save mode (after the fax machine has been inactive for three minutes), the manual redial function does not work. dialled a telephone number, press COPY so you can instantly program that number into an unassigned One Touch Key or AUTO DIAL number. AUTO DIAL Key: AUTO DIAL numbers are abbreviated numbers for rapid dialling. Rather than dialling the entire telephone number, you can enter a 2-digit code to AUTO DIAL number instead.
16 PAUSE Key (One Touch Key 10): Use this key on the One Touch keypad to enter automatic three second pauses in dialling when programming telephone numbers. For example, you may want to use this key to tell your fax machine to wait for an outside or international line to open. Pauses in telephone numbers are marked by a “P” symbol. 17 SPACE Key (One Touch Key 9): Use this key on the One Touch Keypad to enter spaces while programming or to erase previously programmed information.
and an alternate number which will be automatically dialled if the first number is busy or if there is no answer. You can also use the Location IDs (names) associated with One Touch keys to search for these locations by name using the SEARCH key. Using One Touch Keys for Selecting Functions & Programming Note: Changing the answering mode of your fax machine automatically prints out any non-confidential faxes that have been received into memory.
COUNTER DISPLAY Key: Your fax machine keeps track of the number of pages it has printed and scanned. Using this key checks the print counters of your fax machine and resets the drum counter of your fax machine after replacing the image drum unit. experiences a problem during communications, it will emit three long beeps. Press the STOP key to turn the error tone off, then print a Message Confirmation Report to check the source of the problem by pressing the COPY key twice with no documents loaded.
INSTALLATION Getting Started Identification and remove the contents from the carton placing them on a sturdy surface. 1. Fax machine unit 2. Toner cartridge To install your new fax machine, follow the instructions from Unpacking to Setting the Fax Identification. You must complete these steps for your fax machine to operate properly. 3. Image drum unit (inside facsimile unit) 4.
English Setting Up Your Fax Machine Installing Toner Cartridge 1. Open the top cover. 2. Grasp the control panel. Pull upward and toward you until the control panel releases, then swing it out of the way. 3. Carefully remove the protective sheet from the document feeder. Installing Paper Trays & Stackers 1. Slot the tabs of the paper tray/copy stacker into the rearmost slots in the top of the fax machine until the tabs lock into place. 2.
4. 5. Lift the image drum unit out and keeping the image drum unit out of direct sunlight. DO NOT touch the green surface of the drum. inserted correctly as shown. Then press down firmly on both ends of the image drum until it snaps into place. 7. Remove the protective plastic cover from the toner well in the image drum unit. Carefully remove the protective sheet from the image drum unit. Warning: Be careful when handling the toner cartridge.
English Caution: Be careful not to insert the toner cartridge backwards into the image drum unit. 9. With the ridged sides facing up and the coloured lever on your right, insert the toner cartridge into the image drum unit. Slide the left end of the cartridge in first, then lower the right end into place. 12. Close the control panel by pressing down until the cover snaps into place. 10. Once the toner cartridge is in place, push the coloured lever all the way forward to secure it and release the toner.
2. Insert the other end of the telephone cable into your wall telephone socket. Note: Now, you can connect either an external telephone or the external handset option for your fax machine. See the instructions below. Connecting Power Cable Caution: Before connecting power, ensure that the power switch is OFF (“0” is in depressed position) 1. Insert the power cable into the power inlet socket located on the back of the fax machine. 2.
Note: Your fax machine is set at the factory to use A4 paper. If you intend to use a different paper size, change the 1’ST PAPER SIZE user function setting to match your new paper size. See Programming later in this user’s guide for instructions. 1. Adjust the right paper guide to the width size of your paper. Caution: Be sure to grasp the paper tightly to avoid slipping of the uppermost sheet of paper. Setting the Clock Follow these instructions to set the time and date on your fax machine. 1.
Answering Mode Options The answering mode which is best for you will vary depending on how you use your fax machine and what external telephone devices are connected to it. Read through the answering modes listed here, then follow the instructions below. Auto Receive Mode [FAX]: If your fax machine is connected to a telephone line reserved only for fax communications, use the Auto Receive mode.
returns to stand-by mode displaying the new answering mode setting. Fax Machine Identification To prevent any data received from being printed while your fax machine is in Memory Reception Mode, you can program a password into your fax machine. See Creating Memory Password in Programming later in this user’s guide. Fax machines use the information you will enter here to identify themselves during communications. In most countries programming this information into your fax machine is a legal requirement.
are transmitting to another fax machine and no one is there to answer, your fax machine will automatically send a cover letter with a call back message. The call back message is printed on a separate sheet with the message “Please call back” and a telephone number where you can be reached. The call back number entered here is the number that appears on the call back message. Setting Fax Machine Identification 1. Press the SELECT FUNCTION key. 2. Press the USER PROG One Touch key.
Connecting to a PBX 11. Press the SELECT FUNCTION key to finish. A PBX (Private Branch Exchange) is a private telephone system used to route internal calls. If you have to dial a prefix (access) number to get an outside line, then your line is connected to a PBX. Setting Language Your fax machine comes with two languages installed, which appear on the display and in reports. Follow the instructions below to switch languages. Note: Your dealer may be able to provide you with additional languages. 1.
4. 5. Press the ô YES key until the display shows: MFP Function PBX LINE à) [OFF] YES (ß ß) NO (à To use your fax machine as a PC printer/fax/scanner, you will need to install optional Multi-Function Peripheral (MFP) software into your computer. A PC connector and PC interface board are already included on your fax machine as standard equipment. For details on how to use your fax machine as an MFP, please refer to the documentation that comes with the MFP software. Press the NO õ key.
Programming One Touch Keys Your fax machine has ten One Touch keys for rapid dialling. You can store up to two fax numbers with 32 digits for each One Touch key, a main number and an alternate number. The alternate number is used if the main number is busy or does not answer. You can also enter a 15-character Location ID (name) for each One Touch key. Note: To find One Touch keys which are not yet programmed, you may repeatedly press the SEARCH key.
6. Press the START key. The display shows: 2. NO= 7. 8. Enter the alternate fax number. Refer to the instructions following Step 3. 9. 1:FUNC. PROGRAMMING ß) NO (à à/1-7) YES (ß 3. To continue programming One Touch keys, go back to Step 2. If you are finished programming, press the SELECT FUNCTION key. 10. Lift off the plastic cover above the One Touch label. Using a pencil, write in the name for your newly programmed One Touch key. Replace the cover.
Note: Should you later change the location the One Touch key is used for, then remember to switch Echo Protection off and reset the transmission fax speed/rate to 14.4K, if necessary. Programming AUTO DIAL Numbers Your fax machine has 70 AUTO DIAL numbers available for quick, two-digit selection and dialling. For each AUTO DIAL number, you can enter a fax number up to 32 digits long and a Location ID (name) up to 15 characters long.
To Do This Add a switch from pulse to tone dialling for part of the call Move the cursor to make corrections. Use */Tone key ô YES and NO õ keys. 6. Press the START key. 7. Enter the Location ID. This is a descriptive title up to 15 characters long. Refer to the instructions below. To Do This Enter numbers Enter spaces Enter hyphens Enter alpha characters Enter a unique character Enter next character. Move the cursor to make corrections. 8. 9. Use Numeric keypad.
To Do This Add a One Touch location Add AUTO DIAL location Delete One Touch location Delete AUTO DIAL location Search for a location by name to add or delete 5. Use Press the One Touch key. Press START to add it to the group. Press AUTO DIAL. Enter the 2-digit Auto Dial number. Press START to add it to the group. Press the One Touch key. Press START to delete it from the group. Press the AUTO DIAL key. Enter the 2-digit AUTO DIAL number. Press START to delete it from the group.
BASIC OPERATIONS Preparing Documents • Try to use good quality documents for your transmissions. Documents that are typed or created in felt-tip black ink on white (or light) paper work best. • Do not send documents which are not rectangular. • Never use documents that have wet or sticky surfaces, wrinkles, staples or paper clips. However, your fax machine can transmit documents that have been subject to normal wear, such as documents with staple holes, letter folds and minor corner folds.
Adjust the document guides to the width of the paper you are using. Document Type Documents with normal contrast Documents which are too light Documents which are too dark 6. English 1. Contrast to Use NORMAL LIGHT DARK Your documents are now ready for faxing or copying. Sending Fax to Single Location 2. 3. Neatly stack your documents, then insert them face down into the document feeder. If necessary, readjust the document guides for a snug fit. 1. Load your documents. 2. Select a location.
Message (location) DIALLING CALLING SENDING RESULT = OK COMMUN. ERROR Explanation The Personal ID or TSI/CSI of the remote location. If this is not prgrammed in the remote location, the Location ID or telephone number you entered will identify the location during transmission. Your fax machine is dialling the number. The line is ringing. Your fax machine is sending the message. The fax was sent successfully. If you see this or another error message, a problem occurred during the communication.
Note: You can also tell your fax machine to start fax reception by entering your 2 digit code for remote receive using your telephone keypad. Refer to Remote Receive. To stop a transmission while it is in progress, follow the instructions below. 1. Press the STOP key twice. The display will show 3. After you receive the fax, a long beep tells you that the reception was successful. STOPPED 2. If documents are stuck part way through the document feeder, you may see the following message on the display.
2. 3. 4. Press the PRINT OPERATION One Touch key. The display shows: PRINT MEMORY MSG? ß) NO (à à) YES (ß If your fax machine has received a message in memory because toner is low, MSG. IN MEMORY, REPLACE TONER CART. appears on the display. To print out a message stored in memory when toner is low, follow the instructions below. Press the ô YES key. The stored message begins printing. 1. Press the SELECT FUNCTION key.
2. After you have followed the instructions to print out messages stored in memory, the display shows: transmission or reception (OFF). To use the closed network function, follow the instructions below. MSG. IN MEMORY PRINTING 1. Press the SELECT FUNCTION key. 2. Press the USER PROG One Touch key. The display shows: To erase the message instead of printing it, press the STOP key. The display shows: CANCEL? ß) NO (à à) YES (ß 3.
• Any messages your fax machine has received into memory, but not yet printed, are lost. • If you have loaded documents onto the document feeder of your fax machine, any dialling or transmission settings are lost. Your fax machine prints a power outage report to inform you of a power failure. Use this report to determine which received messages you may have lost and which transmissions you may have to resend. Refer to Reports for more information.
Note: A call back message is only sent if you have programmed a call back number into your fax machine. Refer to Setting Fax Identification. You will know if the person on the other fax machine has issued a voice request when you hear a warbling tone. If you do not respond in approximately six seconds, the voice request is automatically cancelled. Note: To be able to initiate a voice request during transmission, user function 17:MEM./FEEDER SW.
ADVANCED OPERATIONS 3. When selecting another group, do not press the AUTO DIAL key, but immediately press the # key and enter the code number for the next group you want to select. Sending Faxes to Multiple Locations and/or Groups 4. Repeat Steps 2 to 3 until you have finished selecting groups and individual locations. Note: Up to ten fax locations can be entered using the numeric keypad. If you want to send the same fax to more than one location, carry out the following steps: 5. 1.
If you want to confirm your entries by printing a report, press the NO õ key and the display shows: ?????? OK (START) CLEAR (à à) Note: ?????? indicates the first location entered into your fax machine. PRINT ENTRY REPORT? ß) NO (à à) YES (ß Press the ô YES key and your fax machine prints a report showing the locations you have selected.
10. If you want to add another group or location after checking the groups and locations you have entered, select your new group or location when the display shows: CHECK LOCATION(S) YES (STR/LOC.) EXIT (à à) locations, your document is scanned into memory to wait for the programmed date and time. This setting allows you to continue to send other faxes from your fax machine. If you send delayed faxes to groups and/or individual multiple locations, the setting of 17:MEM./FEEDER SW. is ignored.
6. Note: If user function 17:MEM./FEEDER SW. has been set to FEED and you are sending a delayed fax to a single location, your document remains on the document feeder until your programmed date and time. This prevents you from sending further faxes until your delayed fax has been sent. Press the ô YES key. The display shows: DELAYED TX TIME [ / ] PRG. TIME 0-9 7. Using the numeric keypad, enter the time on which you wish the transmission to begin. The display changes to: Note: If user function 17:MEM.
4. 5. Press the ô YES key and go to Step 7 if transmission is to occur later today. If the transmission is to occur up to three days later, press the NO õ key. The display shows: Select Location Using A group DELAYED TX DATE [ / ] PRG. DATE 0-9 One Touch key Using the numeric keypad, enter the date on which you wish the transmission to begin. The display changes to: AUTO DIAL number DELAYED TX DATE ß) NO (à à).
If your entries are OK, press the START key. Your fax machine will then scan your document and begin to transmit to your selected locations. 12. When you have finished selecting your groups and individual locations and you DO NOT press the START key, the display shortly shows: 14. If you do not want to print a report, but want to confirm your entries, press the NO õ key and the display shows: MULTI LOCATION ?????? Note: ?????? indicates the locations you have selected.
If your entries are OK, press the START key. Your fax machine will then scan your document and begin to transmit to your selected locations. 15. If you want to cancel an entered location when checking locations, press the NO õ key when the display shows: ?????? OK (START) CLEAR (à à) Note: ?????? indicates the location entered into your fax machine which you may want to cancel. The displayed location will be cancelled and the display will show the next location you have entered.
4. If the delayed transmission was a feeder transmission, press the STOP key again to remove the document from the document feeder. Confidential Faxes Fax machines are often placed in public places where anyone can look through received faxes. To overcome this, use the confidential fax feature when sending and/or receiving confidential faxes. You can send and receive confidential faxes to/from other Okifax machines with personal mail boxes.
Receiving Confidential Faxes Before you can receive confidential faxes, you have to create a confidential or personal mailbox on your fax machine that is password protected (see below). You then have to tell the person sending the confidential fax your mailbox number. When your fax machine receives a confidential fax, it stores the fax in your personal mailbox.
7. DELETE PERSONAL BOX ß) NO (à à) YES (ß Closing a confidential or personal mailbox created on your fax machine is as follows: 1. Press the SELECT FUNCTION key. 2. Press the USER PROG One Touch key. The display shows: 1:FUNC. PROGRAMMING ß) NO (à à/1-7) YES (ß 3. 4. Using the numeric keypad, press number 5. The display shows: Press the ô YES key to close the personal mailbox and the display again shows: PERSONAL BOX NO. [ ENTER 1 - 8 9.
5. Using the numeric keypad, enter the number of the mailbox where you want to change the password and the display shows: PERSONAL BOX [CONF] ß) NO (à à) YES (ß 4. Press the ô YES key and the display shows: Using the numeric keypad, enter a new four digit password and press the ô YES key to confirm your entry. The display again shows: PERSONAL BOX NO. [ ENTER 1 - 8 8. ] Press the SELECT FUNCTION key to finish.
Relay Broadcast Report Relay broadcasting is where one fax machine, which is the relay initiating station, sends a document to another fax machine. The receiving fax machine, which is the relay key station, then resends (broadcasts) the document to a number of other locations. After a relay broadcast is completed, it is possible for the relay key station to send a message back to your fax machine confirming the success of the relay broadcast.
6. Using the numeric keypad, enter a 2-digit number which corresponds to a relay group programmed into the relay key station. Note: If you are initiating a relay broadcast to another relay group, press the NO õ key. Using the numeric keypad, enter the 2-digit number of the other relay group. 7. Press the ô YES key and the display changes to: SELECT LOCATION. 8.
5. For standard bulletin polling, press the ô YES key and the display changes to: PERSONAL BOX NO. [ ENTER 0-8 ] Note: Standard bulletin polling uses the personal mailbox number of 0 to store the document in the memory of your fax machine. After your fax machine has been polled and the document has been sent, your document remains in mailbox 0 allowing the document to retrieved more than once. 6. Using the numeric keypad, enter 0 for the personal mailbox you want to use and press the ô YES key.
Polling Reception Cancelling Polling Transmission When carrying out polling reception, the fax machine you are polling should be able to carry out standard polling transmission or ITU polling transmission. Cancelling a standard one-time polling transmission or a standard bulletin polling transmission is as follows: 1. With no documents loaded, press the SELECT FUNCTION key. 2. Press the POLLING One Touch Key. The display shows: 1. COMMUNICATION CANCEL ß) NO (à à) YES (ß 2. NO.=< MAIL BOX NO.
Using the numeric keypad, enter the number of the personal mailbox you want to close and press the ô YES key. The display shows: 4. Note: Standard one-time polling messages cannot be printed. PERSONAL BOX [POLL] ß) NO (à à) YES (ß 6. Press the NO õ key until the display shows: Dual Access PERSONAL BOX [CLOSE] ß) NO (à à) YES (ß 7. Press the ô YES key and the display shows: DELETE PERSONAL BOX ß) NO (à à) YES (ß 8.
While Receiving Faxes While your fax machine is receiving faxes, you can: • Load another document and prepare it for transmission. • Continue to load documents as long as there is memory available on your fax machine. When the first transmission is complete, the next fax is automatically sent. • Continue to receive faxes while earlier messages are being printed if your fax machine has been set to memory reception mode.
User Function Settings Customizing Features & Operations User function settings allow you to customize the general operation of your fax machine. Refer to the list below to determine which settings you may need to change, then refer to Changing User Function Settings to make the change. Many features and functions of your fax machine have settings which can be changed to customize the operations of your fax machine.
Note: This image function only becomes effective if user function 17:MEM./FEEDER SW. is set to MEM and/or user function 25:INSTANT DIALLING is set to ON. 05:SENDER ID - This function controls the printing of your fax machine’s Sender ID on the faxes you send. When turned on, your fax machine’s Sender ID, date and time will be printed on each page slightly outside the image area of your document. When turned off, your Sender ID, date and time will not be printed.
13:1’ST PAPER SIZE - This function allows you to tell your fax machine what size of paper you are using in the paper tray and manual paper feed of your fax machine. Available settings are A4, letter, legal 13 and legal 14. 14:USER LANGUAGE - This function allows you to switch between the two languages programmed into your fax machine 15:INCOMING RING - This function controls the telephone ringing sound your fax machine makes when a call comes in.
telephone rings, when the telephone handset is lifted, or when a document is loaded. Available settings are on and off. Note: If you have purchased the optional MFP software and you have connected your fax machine to a PC, it is recommended that you turn 18:POWER SAVE MODE off. Your PC cannot switch your fax machine back to full operation. 19:ECM FUNCTION - The error correction mode function helps your fax machine to improve communication in areas where telephone line conditions are poor.
RELOAD DOCUMENT After you have reloaded your document, you can send the remaining pages of your document with another fax transmission. If this function is set to on and you DO NOT press the NO õ key within one minute of the message SEND SCANNED PAGES, your fax machine automatically starts sending the scanned pages. If this function is set to off and you DO NOT press the NO õ key within one minute, your scanned pages are cleared from the memory. Available settings for this function are on and off.
6. To select another user function, press the STOP key and return to step 4. 7. Press the SELECT FUNCTION key to finish. 7. AUTO DETECTING RING PATTERN Setting Distinctive Ring Note: In some countries, distinctive ring service is not available from the local telephone company. 1. Press the SELECT FUNCTION key. 2. Press the USER PROG One Touch key. The display shows: Your fax machine then automatically detects and remembers its assigned ring pattern.
6. Personal mailboxes are used to store messages in memory of your fax machine for bulletin polling or receiving confidential faxes. Note: To use a personal mailbox for confidential messages, refer to Confidential Faxes in Advanced Operations. Creating Personal Mailbox (Polling) 1. 2. Press the SELECT FUNCTION key. Press the USER PROG One Touch key. The display shows: 1:FUNC. PROGRAMMING ß) NO (à à/1-7) YES (ß 3. 4. 7. Press the ô YES key and a personal mailbox is created for polling. 8.
6. Press the NO õ key until the display shows: PERSONAL BOX [CLOSE] ß) NO (à à) YES (ß 7. 4. Press the ô YES key and the display shows: DELETE PERSONAL BOX ß) NO (à à) YES (ß 8. 5. Using the numeric keypad, enter a four digit password and the display changes to: Note: [????] indicates the four digit password you have entered. 6. Press the ô YES key and the display changes to: MEM. PASSWORD PRG.
Press the ô YES key and the display shows: PRG PASSWORD. [XXXX] ENTER 4DIGITS 5. Note: [????] indicates the four digit password you have entered. 7. 5. Using the numeric keypad, enter a new four digit password and the display changes to: PRG. PASSWORD [????] ß) NO (à à) YES (ß 6. PRG. PASSWORD [XXXX] ENTER 4DIGITS To delete the password, press the SPACE One Touch key and the display changes to: DELETE PASSWORD? ß) NO (à à) YES (ß 6. Press the ô YES key and the password is deleted. 7.
4. Press the ô YES key and the display shows: DEPARTMENT NO. [ ENTER 01-24 5. 3. ] Using the numeric keypad, enter a two digit code and the display changes to: 1:FUNC. PROGRAMMING ß) NO (à à/1-7) YES (ß 4. ENTER ID [ ] ENTER 4DIGITS 6. Using the numeric keypad, enter a four digit password and the display changes to: 5. 8. 6. Press the ô YES key and the display changes to: 7. 1. Using the numeric keypad, enter your four digit password. 2. Press the SELECT FUNCTION key.
8. Closing Restricted ID 9. 1. Using the numeric keypad, enter your four digit password. 2. Press the SELECT FUNCTION key. 3. Press the USER PROG One Touch key. The display shows: 1:FUNC. PROGRAMMING ß) NO (à à/1-7) YES (ß 4. Using the numeric keypad, press number 7. The display shows: 7:RESTRICT ID PRG. ß) NO (à à/1-7) YES (ß 5. Press the ô YES key and the display shows: DEPARTMENT NO. [ ENTER 01-24 6.
BUSY TONE DETECT: This function allows your fax machine to detect a busy tone when sending a fax. Available settings are on and off. MF(TONE)/DP(PULSE): This function controls what method your fax machine uses for dialling. Two dialling methods are in common use. DP, or dial pulse dialling, uses monotone pulses to dial a number (like a rotary telephone). MF, or multi-frequency dialling (touch tone), uses different tones to dial a number. Available settings are MF and DP.
English 3. Using the numeric keypad, press number 2. The display shows: 2:DIAL PARAMETER ß) NO (à à/1-7) YES (ß 4. Press the ô YES key until the display shows the dial parameter you want to change. 5. Repeatedly press the NO õ key until the setting you want appears in the display. 6. Press the ô YES key to confirm your selection. The name of the next dial parameter setting will appear in the display. 7. Press the SELECT FUNCTION key to finish.
If you were receiving a fax and the remote fax machine does not have a Personal ID or telephone number programmed, no data is printed. REPORTS Understanding Reports Your fax machine provides a variety of useful reports which help you understand the current settings, programming and operations of your fax machine. Refer to the reports listing below to determine which reports you may want to print, then refer to Printing Reports for instructions on printing a report.
codes and groups of your fax machine. The information includes: The active memory files report provides a list of all fax messages stored in the memory of your fax machine, either documents waiting for transmission or documents which have been received and not yet printed. Information provided on this report includes: • The Location ID and main fax number (TEL NO) for each One Touch key. • The alternate number (OR) for each One Touch key. • The One Touch Parameter settings (PRM.
Message Confirmation Report • The date the message was received. This report provides information about your last single location fax transmission or polling transmission. Information in this report includes: • The total amount of time your fax machine spent receiving the message (S,R-TIME). • The Personal ID or telephone number of the fax machine you were communicating with (DISTANT STATION ID).
If the electrical power to your fax machine has been interupted and your fax machine had delayed transmissions or messages received into memory, your fax machine automatically prints a power outage report to alert you that fax messages have been lost. 5. English Power Outage Report Press the SELECT FUNCTION key to finish. Codes Used in Reports Result Codes The following codes indicate the results of communications. Printing Reports Code BUSY Printing Message Confirmation Report COMP.
Communication Codes The following codes indicate the communication mode used for a communication. Code B.C. CALLING CALLED POLLING POLLED POLL=** CONF=** LOST 78 Description Multiple-location transmission (broadcast) A communication initiated by your fax machine.
English PROBLEM SOLVING Clearing Document Jams When a document jam occurs, your fax machine beeps and an error message appears in the display. If the jammed document looks like it is positioned straight in your feeder, press the STOP key to try to feed the document the rest of the way through the feeder. If this fails, follow the instructions below. 1. Grasp the control panel. Pull up and toward you until it releases. Swing the control panel out of the way.
2. Grasp the control panel. Pull upward and toward you until it releases. Swing the control panel out of the way. Caution: Never expose the image drum unit to light for more than 5 minutes. Never expose the image drum unit to direct sunlight. Always hold the image drum unit by the ends. Never touch the surface of the green drum inside the image drum unit. 3. 4. 80 5. Place the image drum unit back into your fax machine.
Pull the paper out of the paper tray. If any of the paper is damaged, remove and replace it. LED array (see Step 6). If the print density does not improve, replace the toner cartridge. When your fax machine’s display shows CHANGE DRUM, replace the image drum unit. Warning: Be careful when handling the toner cartridge. Do not let toner spill on your clothing or other porous materials. See Safety at the beginning of this User's Guide. 9.
3. 4. 5. 82 Pull the coloured lever on the old toner cartridge all the way toward you. Carefully pull the old toner cartridge out of the image drum unit. Dispose of it in the plastic bag you received with your new toner cartridge. 6. Once the toner cartridge is in place, push the coloured lever all the way forward to secure it and release the toner. Remove the new toner cartridge from its package and gently shake it from side to side to distribute the toner.
Close the control panel. Press down until it snaps into place. should last about 10,000 pages for continuous printing, up to 8,000 pages at 3 pages per job, and about 4,500 pages at 1 page per job. Caution: Never expose the image drum unit to light for more than 5 minutes. Never expose the image drum unit to direct sunlight. Always hold the image drum unit by the ends. Never touch the surface of the green drum inside the image drum unit.
3. Remove the old image drum unit (with its toner cartridge), wrap it in the packaging materials from your new image drum unit and throw it away. 6. Install a new toner cartridge, close the top cover and close the control panel. See Replacing Toner Cartridge above. 7. Wait until the time and answering mode appear on the display. Then press the SELECT FUNCTION key. 8. Press the COUNTER DISPLAY One Touch key. The display shows: DRUM COUNT ß) NEXT (à CLEAR (ß à) 4.
Press the COUNTER DISPLAY One Touch key. The display shows: DRUM COUNT ß) NEXT (à CLEAR (ß à) 3. Press the NO õ key. The display shows the PRINT COUNT. 4. Press the NO õ key again. The display shows the SCAN COUNT. 5. Press the SELECT FUNCTION key to finish. Shipping the Fax Machine When shipping the fax machine once it has been in use, please follow the re-packaging procedure below: 1. 2. 3. Remove the image drum unit with toner cartridge from the fax machine.
Your fax machine will not dial. Check the power cable and wall outlet. Make sure that your telephone line (not your external telephone or handset) is connected to the LINE outlet on the back of your fax machine. If you have an external telephone connected, lift the handset and check for a dial tone. If you do not have an external telephone connected, press the HOOK/V. REQUEST key and check for a dial tone. If you do not hear one, there may be a problem with your telephone line.
Your fax machine does not answer the phone or receive faxes. First check to see that the power cable is connected to the power outlet and the telephone line is connected to LINE. Also check the reception mode you are using. Your fax machine will not automatically receive faxes in manual answering mode [TEL]. See Setting the Answering Mode in Installation. Your received documents are light or have vertical streaks on them and you are not out of toner.
You are constantly receiving unsolicited advertising on your fax machine. Try using the closed network function. See Receiving Faxes in Basic Operations. Error Messages Your fax machine does not immediately switch to TEL mode when you make or receive a voice call. Try pressing the STOP key. Your fax machine will return to stand-by mode so that you can converse. This condition may happen infrequently due to telephone line conditions, or the type of external telephone used.
Document-feed Error: A document to be faxed or scanned has not fed into the scanner properly. Remove the document and reload it into the document. TONER LOW :FAX REPLACE TONER CART. or 14:14 FAX REPLACE TONER CART. No Toner: Toner is running low in the toner cartridge. Replace the cartridge as soon as possible. When you close the cover after replacing the toner cartridge, the message clears. See Replacing the Toner Cartridge.
SPECIFICATIONS Dimensions Approx.
A ADF Error (Jam) ....................................... 88 Alarm Indicator ......................................... 16 Answering Mode Changing .............................................. 27 Options ................................................. 26 Auto Dial Key ........................................... 16 Auto Dial Numbers ................................... 33 Auto Rec Key ............................................ 15 Auto Receive Mode .................................. 26 Auto Start .........
F Flash/Earth/Normal ................................... 72 G Group Key ................................................. 17 H Hook/Voice Request Key .......................... 15 Hyphen Key ............................................... 15 I ID= ............................................................ ILLEGAL OPERATION ..... 52, 53, 54, Image Drum Alarm ................................... Image in MCF. .......................................... Incoming Ring ........................................
S S_JAM ....................................................... 77 Search Key ................................................ 15 Select Function Key .................................. 16 Sender ID ........................................... 27, 62 SENDING ................................................. 38 Shipping .................................................... 85 Space Key .................................................. 17 S,R-TIME ........................................... 74, 76 Start Key ...
Statutory User Information (UK only) The OKIFAX 4500 is approved for connection to telecommunications systems specified in the instructions for use subject to the conditions set out in them.
Difficulties may occasionally be experienced when making calls from other apparatus connected to the PSTN via the series apparatus. Such difficulties may include: (i) was not designed to be compatible. Failure of the apparatus to work under these circumstances may not be the responsibility of the network operator. If such difficulties are experienced, please consult your OKIFAX supplier.
OKI SYSTEMS COMPANIES Oki Systems (UK) Limited 550 Dundee Road Slough Trading Estate Slough Berks SL1 4LE Tel: 44 (0) 1753 819819 Fax: 44 (0) 1753 819899 http://www.oki.co.uk Oki Systems (Ireland) Limited The Square Industrial Complex Tallaght Dublin 24 Tel: (01) 4598666 Fax: (01) 4598840 http://www.oki.ie Hawthorn Business Centre Adelaide Industrial Estate Falcon Road Belfast BT12 6HP Tel: (01232) 572355 Fax: (01232) 572350 http://www.oki.