
Printer User Manual


B6500 Series Setup Guide
English - 6
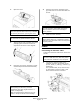
1. Open the cover.
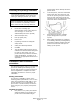
2. Take the drum-toner cartridge out of the
packaging box and shake it seven or
eight times as shown in the diagram.
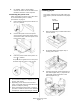
3. Place the drum-toner cartridge on a flat
surface and pull out the seal horizontally.
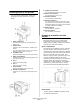
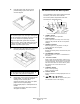
4. Hold the drum-toner cartridge by the
grip and insert it into the slot inside the
printer.
5. Close the cover securely.
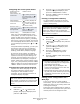
Cables
Connecting an interface cable
Connect the interface cable to be used to the
printer.
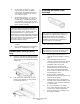
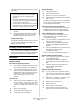
1. Connect the interface cable to the
interface connector at the back of the
printer: serial (1), USB (2), network (3),
parallel (4).
For a parallel cable, lift up the wire clip
on both sides to secure it after it has
been inserted into the connector.
NOTE
When the optional offset catch tray is installed,
fold the tray first before opening the cover.
WARNING!
Do not touch any parts inside the printer.
CAUTION!
When pulling out the seal, pull it out
horizontally. The tape might break if it is
pulled out diagonally.
After the seal has been pulled out, do not
shake or bump the drum-toner cartridge.
CAUTION!
Do not touch any parts inside the printer.
Ensure that the drum-toner cartridge is
firmly located.
NOTE
If the offset catch tray is folded as in Step 1,
close the cover and then return the tray to its
original position.
NOTE
Connect a USB cable only after the printer
driver has been installed on the computer.