59381601.
Copyright Information Copyright © 2007 by Oki Data. All Rights Reserved Document Information ________________________________ C3400n User’s Guide P/N 59381601, Revision 1.2 February, 2007 Disclaimer__________________________________________ Every effort has been made to ensure that the information in this document is complete, accurate, and up-to-date. The manufacturer assumes no responsibility for the results of errors beyond its control.
Contents Copyright Information . . . . . . . . . . . . . . . . . . . . . . . . . . . . Document Information . . . . . . . . . . . . . . . . . . . . . . . . . . . Disclaimer . . . . . . . . . . . . . . . . . . . . . . . . . . . . . . . . . . . . Trademark Information . . . . . . . . . . . . . . . . . . . . . . . . . . . Regulatory Information . . . . . . . . . . . . . . . . . . . . . . . . . . . Notes, Cautions and Warnings . . . . . . . . . . . . . . . . . . . . . . Introduction . . . . . . . . . . . . . .
Print menu . . . . . . . . . . . . . . . . . . . . . . . . . . . . . . . . . 65 Media menu. . . . . . . . . . . . . . . . . . . . . . . . . . . . . . . . . 66 Color menu . . . . . . . . . . . . . . . . . . . . . . . . . . . . . . . . . 68 System configuration menu . . . . . . . . . . . . . . . . . . . . . . 69 USB menu . . . . . . . . . . . . . . . . . . . . . . . . . . . . . . . . . . 71 System adjustment menu . . . . . . . . . . . . . . . . . . . . . . . 71 Maintenance menu . . . . . . . . . . . . . . . .
Notes, Cautions and Warnings NOTE A note provides additional information to supplement the main text which may help you to use and understand the product. CAUTION! A caution provides additional information which, if ignored, may result in equipment malfunction or damage. WARNING! A warning provides additional information which, if ignored, may result in a risk of personal injury.
Introduction Congratulations on buying this Oki color printer. Your new printer is designed with advanced features to give you clear, vibrant color prints and crisp black and white pages at high speed on a range of office print media. Your printer includes these features: > Multi-level technology produces subtle tones and smooth gradations of color to lend photographic quality to your documents.
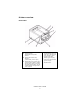
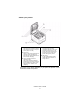
Printer overview Front view printer parts_Fig1_03.jpg 1. Printer cover. 2. Operation Panel. Status LEDs and operator buttons. 3. Multi Purpose Feeder Tray Release. (when closed, press to open). 4. Multi Purpose Tray (shown open). Used for manual duplex, feeding heavier paper stocks, envelopes and other special media. Also for manual feeding of single sheets when required. 5. Cassette Tray. Standard blank paper tray. Holds up to 250 sheets of 20 lb. (80g/m²) paper. 6.
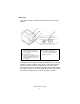
Rear view This view shows the connection panel and the rear output stacker. Ports rear position_F12_3 v11.jpg 9. Output stacker, face down. Standard printed copy delivery point. Holds up to 150 sheets at 20 lb. (80g/m²). 10. Rear Stacker, face up. Can hold up to 10 sheets of 20 lb. (80g/m²) standard paper and can handle paper stocks of up to 54 lb. (203g/m²). 11. AC Power Socket. 12. USB interface and LAN Port USB cable must be of length 2m maximum for reliable Status Monitor operation.
Inside your printer Inside printer_Fig1_04.eps.jpg 13. Fuser unit. The Fuser unit contains a heated roller that fixes toner to the print media (paper or card). 14. Fuser lever. The lever has a locked position for when the toner cartridge is in place and an unlocked position for removal and changing. 15. Toner cartridges and toner cartridge levers. The 4 toner cartridges hold dry powdered ink. The lever locks the toner cartridge into place on the image drum or releases it for changing. 16.
The Operation Panel The Operation Panel allows operator intervention and indicates both when the printer is operating normally and when it requires attention. Detailed printer status is provided by the Status Monitor in Windows or Printer Driver in Mac. (See “Using the Status Monitor” on page 61.) op panel_F8_03.jpg The Operation Panel incorporates 3 LEDs and 2 push-button switches as follows (from left to right): 1. Power (Ready) LED (green) 2. Paper LED (amber) 3. Alarm LED (amber) 4.
Switches Operation There are two switches on the operation panel labelled ON LINE and CANCEL. Each has four modes of operation as follows: MODE OF OPERATION DESCRIPTION Momentary press Press the switch and release it within 2 seconds of (Press 1) pressing it. On releasing the switch, operation starts. 2-second press (Press 2) 5-second press (Press 5) Press at Power On Press the switch and hold for between 2 and 5 seconds after pressing it.
Function The results of operating the switches in different contexts are summarised below: STATUS BEFORE PRESSING ONLINE SWITCH PRESS 1 CANCEL SWITCH PRESS PRESS 2 5 PRESS 1 PRESS PRESS 2 5 ON LINE (idling mode) Shifts to OFF LINE Prints Menu Map (*1) Prints Demo Print – – – OFF LINE (idling mode) Shifts to ON LINE Prints Menu Map (*2) Prints Demo Print (*2) – – – – Cancels job – Shifts to ON LINE (data being OFF LINE received, processing or printing) – Requesting manual feed – (*
LED displays General Printer status (as indicated by the LEDs) can be broadly categorised as follows: 1. Normal status (Green): the printer is operating normally e.g. it is ON LINE or processing. 2. Warning status (Amber): you can continue to use the printer without intervention but an error may result. 3. Error status (Amber, blinking): you cannot continue to use the printer. Intervention is required to recover from the error. Fatal errors are irrecoverable and require a service call.
Illumination and meaning To be able to indicate a large number of status situations both individually and in combination, the LEDs are illuminated as follows: LED Power (Ready) Green ILLUMINATION STATUS OFF Power OFF ON ON LINE (idle) Blinking 1 (2S cycle) OFF LINE (this blinking pattern always takes place while an error is occurring) Blinking 2 (500mS cycle) Data being received, printing, warming up, density adjustment/temperature adjustment in progress Blinking 3 (120mS cycle) Job cancelling in
Service call error When a service call error occurs, all LEDs blink rapidly and simultaneously at 120ms intervals.
Paper recommendations Your printer will handle a variety of print media, including a range of paper weights and sizes, including envelopes. This section provides general advice on choice of media, and explains how to use each type. The best performance will be obtained when using standard 20~ 24 lb. (75~90 g/m²) paper designed for use in copiers and laser printers. Suitable types are: • Hammermill® Laser Printer Radiant White, 24 lb. US Bond (90 g/m²) • Xerox® 4024, 20 lb.
Cassette Tray The Cassette Tray can handle paper in weights of 17 to 47 lb. (64 g/m² to 176 g/m²). The Cassette Tray is ideal for printing Letter size documents of more than 1 page in length. TRAY WEIGHT SIZE DIMENSIONS Light: A6 4.13 x 5.83 in. A5 5.83 x 8.27 in B5 7.17 x 10.12 in 17-20 lb. 105 x 148 mm 64-74 g/m² 148 x 210 mm Cassette Medium: Tray 20-24 lb. 182 x 257 mm 75-90 g/m² Heavy: Executive 7.25 x 10.5 in A4 8.27 x 11.69 in 184.2 x 266.7 mm 24-47 lb.
Multi Purpose Tray The Multi Purpose Tray can handle the same sizes as the Cassette Tray but in weights up to 54 lb. (203 g/m²). For very heavy paper stock, always use the face up (rear) paper stacker. This ensures that the paper path through the printer is almost straight. The Multi Purpose Tray can feed paper widths as small as 3.94 in (100 mm) and lengths up to 47.24 (1200mm) [banner printing]. For paper lengths exceeding Legal 14in. (356mm) use paper stock between 24 and 34 lb.
TRAY WEIGHT SIZE A6 DIMENSIONS 4.13 x 5.83 in. 105 x 148mm A5 5.83 x 8.27 in B5 7.17 x 10.12 in 148 x 210mm 182 x 257mm Light: Executive 17-20 lb. Multi Purpose Tray 7.25 x 10.5 in 184.2 x 266.7mm 64-74 g/m² A4 Medium: 8.27 x 11.69 in 210 x 297mm 20-24 lb. Letter 75-90 g/m² 8.5 x 11 in. 215.9 x 279.4mm Heavy: Legal 13in. 24-32 lb. 91-120 g/m² Ultra heavy: 8.5 x 13 in. 216 x 330mm Legal 13.5in. 8.5 x 13.5 in. 216 x 343mm 32-47 lb. 121-176 g/m² Legal 14in. 8.5 x 14 in.
Face Down Stacker The Face Down Stacker on the top of the printer can hold up to 150 sheets of 20 lb. (80g/m²) standard paper, and can handle paper stocks up to 32 lb (120g/m²). Pages printed in reading order (page 1 first) will be sorted in reading order (last page on top, facing down). Face Up Stacker The Face Up Stacker at the rear of the printer should be opened and the paper support extended when required for use. In this condition paper will exit via this path, regardless of driver settings.
Loading Paper Cassette Tray 1. Remove the Cassette Tray from the printer. cassette tray empty_Fig1_16.jpg 2. Fan the paper to be loaded at the edges (1) and in the middle (2) to ensure that all sheets are properly separated, then tap the edges of the stack on a flat surface to make it flush again.(3). Fan Paper.jpg 3. Adjust the Rear Stopper (1) and Paper Guides (2) to the size of paper being used. Use the markings on the printer as a guide.
Cassette Tray paper guides_F7_01.jpg 4. Load the paper (1). Use the level indicators (2) as a guide. For letter headed paper, load face down with top edge towards the front of the printer. paper load_Fig1_17 v11.jpg To prevent paper jams: 5. • Do not leave space between the paper and the guides and rear stopper. • Do not overfill the Cassette Tray. Capacity depends on the type of paper stock. • Do not load damaged paper. • Do not load paper of different sizes or types at the same time.
Cassette Tray wPaper_close_Fig1_22.jpg 6. For face down printing, make sure the Face Up (rear) Stacker is closed (the paper exits from the top of the printer). Stacking capacity is approximately 150 sheets, depending on paper weight. 7. For face up printing, make sure the Face Up (rear) Stacker is open and the paper support (1) is extended. Paper is stacked in reverse order and tray capacity is approximately 10 Letter/A4 sheets, depending on paper weight, or 1 envelope or 1 sheet of heavier media. 8.
Multi Purpose Tray 1. Open the Multi Purpose Tray and press gently down on the Paper Platform (2) to ensure it is latched down. mpt tray_F7_05.jpg 2. Adjust the Paper Guides (1) to the size of paper you are going to print on, using the markings on the Paper Platform. 3. Position a sheet of paper on the Paper Platform so that it is gripped in place. • Load your chosen media one sheet at a time.
Printing from Windows Your printer’s menus provide access to many options. See “Using the printer software” on page 61 for more information. The Windows printer driver also contains settings for many of these items. Where items in the printer driver are the same as those in the menus, and you print documents from Windows, the settings in the Windows printer driver will override those items in the menus. The illustrations in this chapter show the printer in Windows XP/2000.
Printing preferences in Windows applications When you choose to print your document from a Windows application program a Print dialog box appears. This dialog usually specifies the name of the printer on which you will print your document. Next to the printer name is a Properties button. When you click Properties a new window opens which contains a short list of the printer settings available in the driver, which you can choose for this document.
Setup tab When you click the Properties button from your application’s Print dialog, the driver window opens to allow you to specify your printing preferences for the current document. 1. Size Paper size should be the same as the page size of your document (unless you wish to scale the printout to fit another size), and should also be the same as the size of paper you will feed into the printer. 2.
page 46. The Duplex Help button also offers guidelines on how to carry out manual duplex printing. 7. Driver Settings If you have changed some printing preferences before and saved them as a set under a specific name, you can recall them under driver settings. Saving driver settings means that you can avoid having to set printing preferences individually each time you need them. 8. Default Click the Default button to restore the default printer settings.
Job Options tab 1. Print Resolution The output resolution of the printed page can be set as follows. 2. • The High Quality setting prints at 600 x 600dpi multi-level. This setting requires the most printer memory and takes the longest to print. It is the best option for printing photographs and reproducing color details. • The Fine/Detail setting prints at 1200 x 600dpi is the best option for printing vector objects such as graphics and text.
9. Advanced Clicking the Advanced button gives you access to further settings. For example, you can elect to have black areas printed using 100%K toner (a more matte appearance). 10. Default Click the Default button to restore the default printer settings.
Color tab 1. Color Matching: Auto or Manual Control over the color output of your printer may be performed automatically, or for advanced control, by manual adjustment. The automatic setting will be appropriate in most cases. The other options in this window only become visible when you select a choice other than Auto. For grayscale printing, the printer runs at the fastest print speed (approx. 20ppm) and all pages are printed in black and white. 2.
Setting from Windows Control Panel When you open the driver properties window directly from Windows, rather than from within an application program, a somewhat more extensive range of settings is provided. Changes made here will generally affect all documents you print from Windows applications, and will be remembered from one Windows session to the next. General tab 1. Features This area lists some of the main features of your printer. 2.
This specifies that printing should not start until the last page has been spooled. If your application program needs a lot of time for further computation in the middle of printing, causing the print job to pause for more than a short period, the printer could prematurely assume that the document has finished. Selecting this option would prevent that situation, but printing will be completed a little later, as the start is delayed. 5.
printing again from the application program. If you use this option frequently it will require large amounts of disk space on your computer. 10. Enable advanced printing features Specifies whether advanced features, such as page order and pages per sheet, are available, depending on your printer. For normal printing keep this option enabled. If compatibility problems occur you can disable the feature. However, these advanced options may then not be available, even though the hardware might support them.
Printing From Mac Mac OS 9 Choosing Printing Options Use the print dialog to choose your printer and select options for how you want your document to print. 1. Open the document you want to print. 2. If you wish to change the paper size or page orientation, choose File > Page Setup. 3. Select File > Print. 4. Select your printer from the Printer pop-up menu. 5. If you wish to change any printer driver settings, select the necessary options in the print dialog.
Selects either portrait (tall) or landscape (wide). If using landscape, you can flip the orientation 180 degrees. Reduce or Enlarge Documents can be scaled up or down to fit on different paper sizes. Page Setup Options - Layout Multiple pages can be shrunk and printed on a single sheet of paper. For example, choosing 4-up will tile four of your document's pages across a single sheet of paper.
cannot be used together with the High Quality print quality setting. Toner Saving Toner saving uses less toner when printing your document. This is best suited to draft text documents as it lightens the print significantly. Print Options - Print Control If you are using the Windows Print Control Server software to manage printers, enter your assigned user name and ID. This information is sent along with your print job and is recorded by the printer.
COLOR DESCRIPTION sRGB The printer reproduces the sRGB color space. This might be useful if color matching from an sRGB input device such as a scanner or digital camera. Black Finish Controls the way black is printed in color documents. Composite Black (CMYK): Uses all 4 toner colors to represent black. Recommended for color photos. True Black (K): Uses 100% black toner to represent black. Recommended for text and business graphics. Brightness / Saturation Increase Brightness for a lighter print.
A warning message is displayed and printing continues when you load the correct paper and press ONLINE. When this option is switched off, the printer uses the paper loaded in the selected tray regardless of the document size. Feed Manually from Multi Purpose Tray Select this if you want the printer to wait until you press the ON LINE button when feeding from the Multi Purpose Tray. This can be useful if printing on envelopes.
Mac OS X The information in this section is based on Mac OS X Tiger (10.4). Other versions such as Panther (10.3) and Jaguar(10.2) versions may appear slightly different, but the principles are the same. Setting Printing Options You can choose your printer and select options for how you want your documents to print from the Print dialog box. To set your printer options: 1. Open the document you want to print. 2. To change the paper size or page orientation, select File > Page Setup. 3.
2. Click the Print & Fax icon. 3. Select your printer in the “Selected Printer in Print Dialog” dropdown menu. 4. Select your required paper size in the “Default Size in Page Setup” drop-down menu. Page setup options This section provides a description of the page setup options available to you. Page Attributes You can select “Save As Default” to use the current Page Setup settings as a standard for all documents.
Layout Pages per sheet You can shrink multiple pages and print them on a single sheet of paper. For example, choosing 4-up will tile four of your document's pages across a single sheet of paper. You can control the order in which the documents are tiled and also choose to surround each document page with a border. Scheduler This option lets you choose whether to print your document immediately, or defer printing until later. You can also assign a priority to a print job.
Cover page Choosing a cover page may help you to identify your printed document in a large pile of paper. This is useful in a busy office with many people sharing the printer. Paper source This option allows you to select which paper tray to use for your print job. Print quality Print quality Use this option to selects the print resolution. The setting produces the best graphic images, but these images can take longer to print.
COLOR DESCRIPTION Monitor (6500K) Perceptual optimized for printing photos. Colors are printed with emphasis on saturation. Monitor (6500K) Vivid optimized for printing photos, but with even more saturated colors. Monitor (9300K) optimized for printing graphics from applications such as Microsoft Office. Colors are printed with emphasis on Lightness. Digital Camera Results will vary depending on the subject and conditions the image was taken. sRGB The printer reproduces the sRGB color space.
Paper size check Select Paper Size check if you want the printer to warn you when the document paper size is different from the paper in the printer. A warning message is displayed and printing continues when you load the correct paper in the tray and press ON LINE. When this option is deselected, the printer uses the paper loaded in the selected tray regardless of the document size.
Printing This chapter describes how to carry out basic printing tasks using your printer. Test printing Print a demo page Switch on the printer and allow it to warm up. Press the ON LINE button on your printer and hold down for 5 seconds. A demo page should print. Print a status page Switch on the printer and allow it to warm up. To print a status page, hold down the ON LINE button on your printer for 2 seconds. A status page should print.
Manual duplex printing using the cassette tray 1. Ensure that there is enough paper in the cassette tray to carry out the print job. 2. Select File -> Print and click the Properties button. In the 2sided printing drop down menu, select either “Long Edge” or “Short Edge” according to your printing preferences. If you require further information, click the Duplex Help button. Then, Click the Print button. 3. Every second page of your document is printed first.
1-4_P_paper in.jpg 6. Close the Cassette Tray and press the ON LINE button as directed in the status message. The message window should disappear from your screen and the document finishes printing the remaining pages of your document. 1-5_P _press online.
Manual duplex printing using the Multi Purpose Tray NOTE: When using the Multi Purpose Tray, feed pages one sheet at a time. 1. Position the paper guides on the Multi Purpose Tray according to the paper size. 2. Place paper one sheet at a time in the Multi Purpose Tray. The paper is automatically gripped in position. 3. Select File -> Print to display the Print dialog box. 4. Click the Properties button.
2-3_P_mpt_insert paper_a.jpg 7. Press the ON LINE button. The remaining pages of your document print on the blank side of the paper.
Printing on different media This section describes how to print on material other than normal Letter/A4 paper. Printing on legal paper When printing on legal paper you need to change the media settings for the printer software to get the best results. You can either set a default driver for each type of media or you can change the print media settings through your Windows printer properties or Mac Print options any time you print on different media.
Setting other printing options This sections briefly describes how to set printing options for your particular print job. Fit to page printing You can choose to print your document on larger or smaller sized paper depending on the size of print media available to you. 1. Insert paper in the Cassette Tray or Multi Purpose Tray in the usual manner. 2. Select File -> Print and click the Properties button. Then click the Paper Feed Options button.
Cancelling a print job You can cancel a print job from your software application, from the print queue or by using the CANCEL button on your printer. PRINTING STATE HOW TO CANCEL Document has not started printing Try to cancel printing job within software application Document is waiting in a print queue Delete print job from Print Queue. You can access the print queue from the System Tray in Windows or the Print Center Queue in Mac.
Color Printing The printer drivers supplied with your printer provide several controls for changing the color output. For general use the automatic settings will suffice, providing reasonable default settings that will produce good results for most documents. Many applications have their own color settings, and these may override the settings in the printer driver. Please refer to the documentation for your software application for details on how that particular program’s color management functions.
Viewing conditions A print can look very different under different lighting conditions. For example, the colors in a print may look different when viewed standing next to a sunlit window, compared to how they look under standard office fluorescent lighting. Printer driver color settings The driver settings for Manual color can change the appearance of a print. There are several options available to help match the printed colors with those displayed on screen.
Tips for printing in color The following guidelines may help you to achieve good color output from your printer. Printing photographic images Use the Monitor (6500k) Perceptual setting. If the colors look too dull, try the Monitor (6500k) Vivid or Digital Camera settings. Printing from Microsoft Office applications Use the Monitor (9300k) setting. This may help if you are having problems with specific colors from applications such as Microsoft Excel or Microsoft Powerpoint. Printing specific colors (e.g.
Accessing the color matching options The Color Matching options in the printer driver can be used to help match your printed colors to the ones displayed on your monitor or from some other source, such as a digital camera. To open color matching options from the Windows Control Panel: 1. Open the Printers window (called “Printers and Faxes” in Windows XP). 2. Right-click the printer name and choose Properties. 3. Click the Printing Preferences button (1).
The printer will try to reproduce the sRGB color space. This may be useful if color matching from an sRGB input device such as a scanner or digital camera.
Using the Color Swatch feature To use the Color Swatch feature, you must install the Color Swatch Utility. This is supplied on the CD-ROM that was supplied with your printer. The Color Swatch function prints charts which contain a range of sample colors. Note that this is not the full range of colors that the printer can produce. Listed on each sample color are the corresponding RGB (Red, Green, Blue) values.
Using the Color Correct Utility The Oki Color Correct Utility is provided on your printer driver CD-ROM. You must install it separately since it is not installed along with the printer driver. The Color Correct utility has the following features: > Microsoft Office palette colors can be individually adjusted. This is useful if you want to change how a specific color is printed. > Colors can be adjusted by changing Hue, Saturation and Gamma. This is useful if you wish to change the overall color output.
Using the printer software Status Monitor (Windows only) The Status Monitor software is distinct from and installed separately from the driver software. NOTE For reliable operation of the Status Monitor, ensure that the USB cable is of length 2m maximum. The Status Monitor provides a readable indication of the printer status as displayed on the indicator LEDs on the Operation Panel (see “The Operation Panel” on page 10.
Printer Setup tab Selecting this tab provides access to the Select Printer button, which, when selected, allows you to monitor the status any printer configured for use with your computer. The Printer Menu button enables you to access the printer menu settings. From the printer menu, you can configure your printer settings. Preferences tab Selecting this tab provides the means to choose the information displayed by the Status Monitor and how/when the Status Monitor appears.
To save your changes, click the “Apply the changed settings” icon (as shown below), in the top left hand corner. To undo a change, click the Undo changed settings icon. NOTE You can access the printer menu settings window direct by clicking [Start], [All Programs] and selecting Okidata|OKI C3400n|Printer Name Printer Settings. It should be noted that many of these settings can be, and often are, overridden by settings made in the printer drivers.
Printer menus Information menu This menu provides a quick method of listing various items stored within the printer. INFORMATION MENU ITEM ACTION EXPLANATION PRINT MENU MAP EXECUTE / STATUS PAGE PRINT Prints complete menu listing with current settings shown. PRINT NETWORK EXECUTE CONFIGURATION Prints a page that lists the printer’s current network settings. DEMO PRINT Prints demo page. EXECUTE Shut down menu This menu provides an option to ensure that your printer can be safely switched off.
Print menu This menu provides adjustment of various print job related functions. PRINT MENU ITEM SETTINGS EXPLANATION COPIES 1-999 Enter the number of copies of a document to be printed from 1 to 999. MANUAL FEED (Multi Purpose Tray) ON/OFF Selects the default tray for paper feed, Cassette Tray or Multi Purpose Tray. MEDIA SIZE CHECK ENABLE DISABLE Determines whether the printer checks the size of paper loaded matches that required for the document sent to print.
Media menu This menu provides adjustment to suit a wide range of print media. MEDIA MENU ITEM SETTINGS EXPLANATION TRAY A4 / A5 / A6 / B5 LETTER EXECUTIVE LEGAL14 LEGAL13 Selects the size of paper loaded in Tray 1. For CUSTOM setting see X-DIMENSION and Y-DIMENSION later in this table. - MEDIA SIZE LEGAL13.5 CUSTOM TRAY - MEDIA TYPE TRAY - MEDIA WEIGHT PLAIN LETTERHEAD BOND RECYCLED ROUGH Glossy Selects the type of media loaded in this tray.
MEDIA MENU ITEM SETTINGS EXPLANATION MANUAL (Multi Purpose Tray) A4 / A5 / A6 / B5/ LETTER EXECUTIVE LEGAL14 LEGAL13 LEGAL13.5 CUSTOM COM-9 ENVELOPE COM-10 ENVELOPE MONARCH ENV DL ENVELOPE C5 ENVELOPE Selects the size of paper to be fed from the Multi Purpose Tray. For CUSTOM setting see XDIMENSION and Y-DIMENSION later in this table.
Color menu The printer automatically adjusts color balance and density at appropriate intervals, optimising the printed output for bright white paper viewed in natural daylight conditions. The items on this menu provide a means of changing the default settings for special or particularly difficult print jobs. Settings revert to their default values when the next print job is complete.
System configuration menu This menu adjusts general printer settings to suit the way you prefer to work. SYSTEM CONFIGURATION MENU ITEMS SETTINGS EXPLANATION STATUS PAGE AUTO PRINT ENABLED DISABLED Automatically prints status on power up. TIME TO POWER 5 MIN SAVE MODE 15 MIN 30 MIN 60 MIN 240 MIN Adjusts the idling time before the printer automatically switches into power saving mode.
SYSTEM CONFIGURATION MENU ITEMS SETTINGS EXPLANATION LANGUAGE Sets the language used for the English, Status Monitor and printed reports.
USB menu This menu controls the operation of the printer’s USB data interface. USB MENU ITEM SETTINGS EXPLANATION SOFTWARE RESET ENABLED / DISABLED Enables or disables the SOFT RESET command. (Only available on Windows 98 and Windows Me.) MAXIMUM SPEED 12MBPS 480MBPS Specifies the maximum transfer speed. SERIAL NUMBER ENABLED / DISABLED Specifies the USB serial number to differentiate between USB devices connected to the PC. If ENABLED, the serial number is transmitted.
Maintenance menu This menu provides access to various printer maintenance functions. MAINTENANCE MENU ITEM SETTINGS EXPLANATION MENU RESET EXECUTE Resets menus to default settings. POWER SAVE MODE ON/OFF Enables or disables automatic power save mode. Delay before entering this mode is set in the system configuration menu. PAPER BLACK SET –2~0~+2 Used for small adjustment when you experience faded print or light specks / streaking in monochrome printing on white paper.
Usage menu This menu is for information only, and provides an indication of total usage of the printer and the expected life left in its consumable items. This is particularly useful if you do not have a full set of replacement consumables to hand and you need to know how soon you will need them. USAGE MENU ITEM EXPLANATION SHEETS - TOTAL The total number of prints output by the printer. - TRAY The total number of pages fed from Tray.
Printing settings To print a list of the printer settings: 1. Start the Status Monitor. 2. Select the Printer Setup tab. 3. Click on the Printer Settings button on the Printer Setup tab. 4. Click on the Information menu and then select Print Menu Map. 5. Click on the Printer Menu button to print a Menu Map of printer settings. NOTE A menu map of printer settings can also be printed from the Status Panel by holding down the ON LINE button for 2 seconds.
Part Numbers Life Expectancy See “Specifications” on page 108.
Toner cartridge replacement CAUTION! To avoid toner wastage and possible toner sensor errors, do not change the- toner cartridge(s) until “TONER EMPTY” is displayed through the Status Monitor. The toner used in this printer is a very fine dry powder. It is contained in four cartridges: one each for cyan, magenta, yellow and black. Have a sheet of paper handy so that you have somewhere to place the used cartridge while you install the new one.
cover open button_F5_23.jpg WARNING! If the printer has been powered on, the fuser may be hot. This area is clearly labelled. Do not touch this area. 2. Note the positions of the 4 cartridges. ID Positions_Fig1_04.jpg 1. Cyan cartridge 2. Magenta cartridge 3. Yellow cartridge 4.
3. Carry out one of the following: (a) If you are replacing a toner cartridge that has been supplied with your printer (release lever has 3 positions), pull the colored toner release lever on the cartridge to be replaced towards the front of the printer, in the direction of the arrow, but stop at the central (upright) position (1). Toner 3 positions_2.
5. Put the cartridge down gently onto a piece of paper to prevent toner from marking your furniture. CAUTION! The green image drum surface is very delicate and light sensitive. Do not touch it and do not expose it to normal room light for more than 5 minutes. If the drum unit needs to be out of the printer for longer than this, please wrap the cartridge inside a black plastic bag to keep it away from light. Never expose the drum to direct sunlight or very bright room lighting. 6.
9. Holding the cartridge by its top center with the colored lever to the right, lower it into the printer over the image drum unit from which the old cartridge was removed. 10. Insert the left end of the cartridge into the top of the image drum unit first, pushing it against the spring on the drum unit, then lower the right end of the cartridge onto the image drum unit. Toner_replace_F5_03.jpg 11.
toner in positon_lock_Fig1_15.jpg 12. Finally, close the top cover and press down firmly so that the cover latches closed. cover close_F5_22.
Image drum replacement WARNING! If the printer has been powered on, the fuser will be hot. This area is clearly labelled. Do not touch. Switch off the printer and allow the fuser to cool for about 10 minutes before opening the cover. CAUTION! Static sensitive devices, handle with care. Antistatic symbol.jpg The printer contains four image drums: cyan, magenta, yellow and black. 1. Press the cover release and open the printer’s top cover fully. cover open button_F5_23.jpg 2.
ID Positions_Fig1_04.jpg 3. 1. Cyan cartridge 2. Magenta cartridge 3. Yellow cartridge 4. Black cartridge Holding it by its top center, lift the image drum, complete with its toner cartridge (1), up and out of the printer. ID going out_Fig1_12.jpg 4. Put the old unit down gently onto a piece of paper to prevent toner from marking your furniture. 5.
CAUTION! The green image drum surface at the base of the cartridge is very delicate and light sensitive. Do not touch it and do not expose it to normal room light for more than 5 minutes. If the drum unit needs to be out of the printer for longer than this, please wrap the cartridge inside a black plastic bag to keep it away from light. Never expose the drum to direct sunlight or very bright room lighting. 6. Remove the protective sheets from the image drum unit. Keep it the same way round as the old unit.
ID_going in_Fig1_14.jpg 8. Finally, close the top cover and press down firmly at both sides so that the cover latches closed. NOTE If you need to return or transport your printer for any reason, please make sure you remove the image drum unit beforehand and place in the bag provided. This is to avoid toner spillage.
Fuser replacement The fuser is located inside the printer just behind the four image drum units. WARNING! If the printer has recently been powered on, some fuser components will be very hot. Handle the fuser with extreme care, holding it only by its handle, which will only be mildly warm to the touch. A warning label clearly indicates the area. If in doubt, switch the printer off and wait at least 10 minutes for the fuser to cool before opening the printer cover.
fuser_out_F5_10.jpg 3. Pull the two fuser retaining levers (2) towards the front of the printer so that they are fully upright. 4. Holding the fuser by its handle (1), lift the fuser straight up and out of the printer. If the fuser is still warm, place it on a flat surface which will not be damaged by heat. 5. Remove the new fuser from its packaging and remove the transit material. 6. Holding the new fuser by its handle, make sure that it is the correct way round.
fuser going in_F8_12.jpg 8. Push the two retaining levers (1) towards the rear of the printer to lock the fuser in place. 9. Finally, close the top cover and press down firmly at both sides so that the cover latches closed.
Replacing the belt unit The belt unit is located under the four image drums. This unit requires replacement approximately every 50,000 pages. WARNING! If the printer has been powered on, the fuser will be hot. This area is clearly labelled. Do not touch. Switch off the printer and allow the fuser to cool for about 10 minutes before opening the cover. 1. Press the cover release and open the printer’s top cover fully. cover open button_F5_23.jpg 2. Note the positions of the 4 cartridges.
3. Lift each of the image drum units (1), starting from the rear, out of the printer and place them in a safe place away from direct sources of heat and light (2). CAUTION! The green image drum surface at the base of each cartridge is very delicate and light sensitive. Do not touch it and do not expose it to normal room light for more than 5 minutes. If the drum unit needs to be out of the printer for longer than this, please wrap the cartridge inside a black plastic bag to keep it away from light.
unlock belt_F5_08.jpg 5. Turn the two fasteners (1) 90° to the left. This will release the belt from the printer chassis. 6. Pull the lifting bar (2) upwards so that belt tilts up towards the front, and withdraw the belt unit from the printer. belt coming out_Fig1_33.jpg 7. Lower the new belt unit into place, with the lifting bar at the front and the drive gear towards the rear of the printer.
drive gear into the gear inside the printer by the rear left corner of the unit, and lower the belt unit flat inside the printer. belt_roll in _ F5_09.jpg 8. Turn the two fasteners (1) 90° to the right until they lock. This will secure the belt unit in place. belt_lock_F5_09_1.jpg 9. Replace the 4 image drums, complete with their toner cartridges, into the printer in the correct positions as shown.
ID Positions_Fig1_04.jpg 10. 1. Cyan cartridge 2. Magenta cartridge 3. Yellow cartridge 4. Black cartridge Finally, close the top cover and press down firmly at both sides so that the cover latches closed.
Cleaning the LED head Clean the LED head when printing does not come out clearly, has white lines or when text is blurred. 1. Switch off the printer and open the top cover. 2. Gently wipe the LED head surface (1) with LED lens cleaner or soft tissue. Cleaning LED Head_F5_04.jpg CAUTION! Do not use methyl alcohol or other solvents on the LED head as damage to the lens surface will occur. 3. Close the top cover.
Installing additional memory This section explains how to install additional RAM memory into your printer as a memory upgrade. Part Numbers See “Part Numbers” on page 75. Memory upgrade The basic printer model comes equipped with 32MB of main memory. This can be upgraded with an additional memory board containing 64MB or 256MB, giving a maximum total memory capacity of 288MB. Installation takes a few minutes, and requires a medium size cross-head (Philips type) screwdriver. 1.
3. Remove each image drum units, starting with the front. Cover the image drum units to protect them from direct light IDs _ all out_cover_F8_19.jpg 4. Locate the two fasteners (1) at each side of the belt (3) and the lifting bar (2) at the front end. unlock belt_F5_08.
5. Unlock the fasteners and remove the belt as shown. belt coming out_Fig1_33.jpg 6. Carefully remove the new memory board from its wrapping. Try to handle the board only by its short edges, avoiding contact with any metal parts as far as possible. In particular, avoid touching the edge connector. 7. Notice that the memory board has a small cutout in the edge connector, which is closer to one end than the other. Memory card_Fig1_30.
8. Identify the RAM expansion slot in the printer. Unclip the plastic cover to open this slot. Memory slot_Fig1_34.jpg 9. 10. If the RAM expansion slot already contains a memory upgrade board, that board will have to be removed before you can install the new one. To remove it proceed as follows, otherwise skip to step 10. (a) Identify the locking clips at each end of the RAM expansion slot. (b) Push the clips outward and back into the printer. The board will pop out slightly.
11. Gently push the board into the RAM expansion slot until it latches in and will not go any further. Memory card In_Fig1_35.jpg 12. Close the RAM expansion slot. 13. Replace the belt and image drum units. See “Image drum replacement” on page 82. See “Replacing the belt unit” on page 89. 14. Close the top cover of the printer. 15. Reconnect the AC power cable and switch the printer on. 16.
Troubleshooting Clearing paper jams Provided that you follow the recommendations in this guide on use of print media, and you keep the media in good condition prior to use, your printer should give years of reliable service. However, paper jams occasionally do occur, and this section explains how to clear them quickly and simply. Jams can occur due to paper misfeeding from a paper tray or at any point on the paper path through the printer.
3. Note the positions of the 4 cartridges. ID Positions_Fig1_04.jpg 1. Cyan cartridge 2. Magenta cartridge 3. Yellow cartridge 4. Black cartridge It will be necessary to remove the four image drums to gain access to the paper path. 4. Holding it by its top center, lift the cyan image drum, complete with its toner cartridge (1), up and out of the printer. ID going out_Fig1_12.
5. Put the cartridge down gently onto a piece of paper to prevent toner from marking your furniture and to avoid damaging the green drum surface. CAUTION! The green image drum surface at the base of the cartridge is very delicate and light sensitive. Do not touch it and do not expose it to normal room light for more than 5 minutes. 6. Repeat this removal procedure for each of the remaining image drum units. Cover the image drum units to protect them from direct light. IDs _ all out_cover_2_F8_19.jpg 7.
forwards into the internal drum cavity and withdraw the sheet. CAUTION! Do not use any sharp or abrasive objects to separate sheets from the belt. This may damage the belt surface. paper jam belt_F8_07.jpg • To remove a sheet from the central area of the belt, carefully separate the sheet from the belt surface and withdraw the sheet. Paper Jam fuser In_F8_08.
through the drum cavity area. Then allow the pressure release lever to rise again. NOTE If the sheet is well advanced into the fuser (only a short length is still visible), do not attempt to pull it back. Follow the next step to remove it from the rear of the printer. 9. Starting with the cyan image drum unit nearest the fuser, replace the four image drums into the drum cavity, making sure to locate them in the correct order. ID Positions_Fig1_04.jpg • 10. 1. Cyan cartridge 2. Magenta cartridge 3.
11. Open the rear stacker and check for a sheet of paper in the rear path area. Paper Jam Back_F8_09.jpg • Pull out any sheets found in this area. • If the sheet is low down in this area and difficult to remove, it is probably still gripped by the fuser. In this case raise the top cover, reach around and press down on the fuser pressure release lever (1). Paper Jam fuser release_F8_08.jpg 12. If you are not using the rear stacker, close it once paper has been removed from this area.
13. Press the front cover release and pull open the front cover. front cover open release_F7_04.jpg 14. Check inside the cover for sheets in this area and remove any that you find, then close the cover. Paper Jam_front cover_F8_05_1.jpg 15. Pull out the Cassette Tray and ensure that all paper is stacked properly, is undamaged, and that the paper guides are properly positioned against the edges of the paper stack. When satisfied, replace the tray. Cassette Tray wPaper_Fig1_22.
16. Finally, close the top cover and press down firmly at both sides so that the cover latches closed. front cover close_F7_04_a.jpg When the jam has been cleared, if Jam Recovery is set to ON in the System Configuration Menu, the printer will attempt to reprint any pages lost due to paper jams.
Specifications ITEM Dimensions SPECIFICATION 14.8 x 18.86'' x 11.42'' (W x D x H) 376 x 479 x 290mm (W x D x H) Weight Print speeds 46.3 lbs.
ITEM SPECIFICATION Toner life Standard cartridge (at 5% coverage) C,M,Y: approximately 1,000 pages B: approximately 1,500 pages High-capacity cartridge (at 5% coverage) C,M,Y: approximately 2,000 pages B: approximately 2,500 pages Image drum life 15,000 pages at 3 pages per job Belt life 50,000 letter-size pages Fuser life 50,000 letter-size pages C3400n User’s Guide 109
Utilities Overview ________________________ The following utilities are available for your printer. Color Correction Utility Color Swatch Utility Direct Network Printing Utility (LPR) Network Print Status Utility Network Setup Utility Print Job Accounting Utility PrintSuperVision Web Driver Installer Accessing ________________________ You may access the utilities two ways.
Descriptions of Utilities _____________ 1. Color Correction Utility This utility allows you to fine tune the printer’s color settings and save them for future use. See “Color Correction Utility” on page 115. 2. Color Swatch Utility This utility allows you to print color samples or swatches on your color printer. The swatches are used with your software program to select and reproduce color accurately.
6. Print Job Accounting Utility The Print Job Accounting software, designed specifically for OKI printers in a network environment, provides job accounting features that allow you to track printer usage, calculate printing costs, and specify access available to each client (user). 7. PrintSuperVision PrintSuperVision is a web-based application for managing printing devices connected to a network.
Installing the Utilities_______________ Windows Utilities on the CD Load the utilities from the Menu Installer located on the CD supplied with your printer. Download Utilities Download the utilities from the internet, accessed through the Menu Installer on the CD. Macintosh OS 9.x Utilities on the CD 1. Insert the CD supplied with your printer into the CD-ROM drive. 2. Double-click the CD icon that appears on the desktop. 3. Open the MAC folder. 4. Click PSDRV → 5. Click Continue.
Download Utilities Download the utilities from the internet, accessed through the Menu Installer on the CD.
Color Correction Utility ______________ General Information This utility allows you to fine tune the printer’s color settings and save them for future use. The Color Correct Utility is the best choice for working with Microsoft Excel or Word. You can use the Color Correct Utility to: • Change the Pallete Color: see page 116 • Adjust the Gamma Value and Hue: see page 126 How to Install Load this program from the Menu Installer located on the CD.
Change the Pallete Color General Information NOTES This feature is not available for Windows Me/98. This feature is not available for shared printers. When test printing, use paper larger than B5 size. There are four steps in changing the Pallete Color. 1. Print the Sample Color Chart. 2. Print the Color Adjustment Chart. See page 117. See page 118. 3. Make the adjustments. Save the adjustments, using a name you select. See page 120. 4.
Change the Pallete Color Step 1: Print the Sample Color Chart 1. Click Start → Programs → All Applications. Windows XP Click Start → Programs → Okidata → Utility → Color Adjustment Utility. Color Correct 2. Select Adjust Pallete Color. Click Next. 3. The Select Printer screen appears. Select the printer you are using. Click Next. The Color Correct Utility starts. Installed printer drivers display. You must setup each driver. 4. The Select Setting screen appears.
Change the Pallete Color Step 2: Print the Color Adjustment Chart First, you must perform the steps in “Step 1: Print the Sample Color Chart” see page 117. 6. Click Next. 7. The Pallete Color Matching screen appears. cadjust1.
8. Click Test print. The Color Adjustment Chart prints. Fig5-17.jpg 9. Compare the printed Color Adjustment Chart to the Pallete Color Matching screen. If the printed colors do not match the screen, perform an adjustment. You cannot adjust colors marked with an X.
Change the Pallete Color Step 3: Make the adjustments and save the settings First, you must perform the steps in “Step 1: Print the Sample Color Chart” see page 117 and “Step 2: Print the Color Adjustment Chart” see page 118. When making the adjustments, you are obtaining the best possible match between the values for Hue and Brightness on your Sample Color Chart and the Pallete Color Matching screen. 10. On the Pallete Color Matching screen, click the color you want to adjust. cadjust1.
11. The Enter Adjustment Value screen appears. View the pull down menus for the Hue (X) and Brightness (Y) values. You are finding the available ranges for both Hue (X) and Brightness (Y). The available ranges (values) vary according to color. 12. Use the Sample Color Chart. Find the color you want to adjust. Locate the desired color within the identified available ranges (values) from Step 10.
13. On the Pallete Color Matching screen, click the color you want to adjust. The Enter Adjustment Value screen appears. View the pull down menus for the Hue (X) and Brightness (Y) values. Adjust the values for Hue and Brightness to match the values from Step 11. cadjust1.
14. Click OK. 15. The Pallete Color Matching screen appears. cadjust1.
16. Click Test Print. The Color Adjustment Chart prints. Fig5-17.jpg 17. Compare the printed Color Adjustment Chart to the Pallete Color Matching screen. If you are satisfied with the comparison, go to step 17. If you are not satisfied, repeat steps 10 through 16. 18. If you have another color you want to adjust, repeat 10 through 16. 19. When you have finished adjusting all desired colors, click Next. 20. Enter the setting name. Remember the name for future use. 21. Click Save. 22. Click OK.
Change the Pallete Color Step 4: Use the saved settings to print a document Windows 1. Open the file you want to print. 2. Click File → Print. 3. In the Print dialog box, select your printer. 4. Next: Windows XP: Click Properties. Click Advanced. Windows 2000: go to the next step. 5. On the Color tab, under Color Mode, under User Setting, select the Color Matching name you created using the Color Correct Utility 6. Click OK. 7. Print the document.
Adjust the Gamma Value and Hue General Information NOTES This feature is not available for Windows Me/98. This feature is not available for shared printers. When test printing, use paper larger than B5 size. You must have Administrator authority when setting up a network connection in Windows XP/2000/NT4.0/Server 2003. 1. Click Start → Programs → All Applications. 2. Your action depends on your operating system. Windows XP: Click Okidata → Applications.
10. Change the slide bar values of gamma, hue, brightness, and saturation to adjust the color. Use primary colors of ink Select this to adjusts the settings to the standard hues for the printer. Hue Toner printing R (Red) 50% yellow and 50% magenta Y (Yellow) 100% yellow G (Green) 50% cyan and 50% yellow C (Cyan) 100% cyan B (Blue) 50% magenta and 50% cyan M (Magenta) 100% magenta The Gamma slide bar adjusts total brightness. The Hue/Brightness slide bar adjusts output color.
Example: adjust the Y (yellow) slide bar: Move forward = + (counter-clockwise), the color becomes more green. Move backward = - (clockwise), the color becomes more red. F5_03_300.jpg 11. Click Test Print. 12. The Adjustment Confirmation Sample prints. 13. If the sample meets your requirements, click Set. If the sample does not meet your requirements, repeat Steps 10 - 12 until your requirements are met. Then, click Set. 14. Click Save. 15. Enter the setting name. 16. Click OK. 17. Click OK.
Adjusting the Gamma Value and Hue Use the saved settings to print a document Windows 1. Open the file you want to print. 2. Click File → Print. 3. In the Print dialog box, select your printer. 4. Next: Windows XP: Click Properties. Click Advanced. Windows 2000: Go to the next step. 5. On the Color tab, under Color Mode, under User Setting, select the Color Matching name you created using the Color Correct Utility.
Color Swatch Utility ________________ General Information The Color Swatch Utility allows you to • print color samples (swatches) on your color printer. • create custom color swatches The swatches are used with your software program to select and reproduce color accurately. The swatches represent selected samples of the printer's color palette. Use the swatches to find the desired colors for your printed documents.
How to Install Load this program from the Menu Installer located the CD. Additional Information For additional information, see the Swatch Utility Read-me file located in the Windows Programs list. Printing Color Swatches NOTE • The color swatch samples do not show all the colors your printer can print. • The Swatch Utility does not guarantee that the printer prints the same color as displayed on your monitor. Consider the displayed color as a reference.
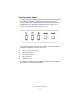
color_swatch_samples.jpg 5. Use the color blocks to pick the specific colors that you want to appear in your printed document. Each color block, or sample, is identified with information your software package needs to reproduce that color accurately. The numbers under each block specify the amounts of the primary colors—red (R), green (G), and blue (B)—that mix to form each particular shade. The amounts are given as a numerical value between 0 and 255.
Creating Custom Swatch Colors NOTE The Swatch Utility does not guarantee that the printer prints the same color as displayed on your monitor. Consider the displayed color as a reference. The printer may not be able to print the exact color that you desire. If you don't find your desired color, you can create or customize colors: 1. Select Custom Swatch from the File menu. 2.
Direct Network Printing Utility (LPR) ___ General Information The Direct Network Printing Utility (LPR) allows you to print directly to a printer on the network without a print server. It creates a Printer Port, and installs a pop-up status box so you can monitor printer status. The Direct Network Printing Utility (LPR) operates in Windows Me/98, Windows NT 4.0, Windows 2000, and Windows XP operating systems. Load this program from the Menu Installer located the CD.
Direct Network Printing Utility (LPR) status (empty, connecting, sending, paused, checking status, not connected) • Finish Number of completed jobs. • Queue Number of jobs waiting to be printed. Additional Information For help, click on HELP in the program.
Network Printer Status Utility Windows • Available on TCP/IP network connection only. The Network Printer Status utility is available if your administrator has installed it. If the utility is installed, the printer driver Properties dialog box changes. • a new Status tab is added. • an Option button is added to the Device Option tab. This utility allows you to view (but not change) the status of the following on the Status tab: • paper trays installed and the media assigned to them.
General Information This utility creates an additional tab (STATUS) in the PostScript and PCL drivers that allows the client to monitor the selected printer’s status. Load this program from the Menu Installer located on CD1. Installation 1. Insert the Drivers, Color, and Network Utilities disk into the CD-ROM drive. If CD does not AutoPlay, click Start → Run → Browse. Browse to your CD-ROM. Double-click Install.exe. Click OK. 2. Click Network Software → Administration Tools → Printer Status.
Using 1. Click Start → Settings → icon. Click Properties. Printers. Right-click the Sharp Printer 2. Click on the STATUS tab. 3. Click the UPDATE button to see device settings. The following screen displays: NetStatus2K.
NOTE If the Automatic Status Check box is checked, this utility “pings” the printer every time you open the Printer Properties dialog in the printer driver. This severely slows opening Printer Properties.
Checking the Printer Status Click the WEB SETTING button. The following screen displays: NetStatusK.jpg Click on the items listed on the left to see: • Network Summary • Login for Administrators • Job Login • Printer Menu To see real-time printer status, click the UPDATE STATUS button.
Network Setup Utility _______________ General Information This utility provides an easy way to configure your printer on a network. How to Install Load this program from the Menu Installer located on the CD. Additional Information See the online Network User’s Guide for details on how to use this utility. The Network User’s Guide is found on the CD shipped with your printer.
Index Numerics choosing image source ..............57 general advice ..........................54 2-sided printing ............................ 46 general settings ........................31 A how to access...........................57 printing color swatch .................59 Access, user access to printer........112 Color samples (swatches) ............. 130 Accounting printer usage ..........................112 Color swatch utility ......................
Lightness, adjustment for color .....133 O M OKI Admin Manager Utility............ 141 Mac OS 9..................................... 35 OKI LPR utility ............................ 134 Color ...................................... 37 Default print settings ................ 35 Page Setup Options .................. 35 Print Control ............................ 37 Printing options........................ 35 Mac OS X Changing the default printer and paper size ................................
Priority print queue priority .................. 32 R Reports color swatch sample ................131 Resolution setting in Windows ................... 29 RGB numbers for software applications .. 132 S Sample color swatches .................131 Saturation, adjustment for color ....133 Separator page separating print jobs ................ 34 Setting menus.............................. 62 Slow printing ..............................136 Software utilities .........................