
Printer User Manual
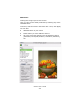
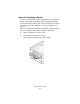
Table Of Contents
- Copyright Information
- Contents
- Notes, Cautions, etc.
- Introduction
- Parts of the Printer
- Paper (Print Media)
- Paper Trays
- Paper Exit Paths
- Loading Paper
- Consumables and Replacement Supplies
- Printer Settings (Menu Settings)
- Options
- Specifications
- Troubleshooting
- General Information
- Display Panel Messages
- Paper Jams
- Print Quality Problems
- USB Problems
- Application error
- General Protection Fault
- Paper Size Change Request
- Printer does not go online
- Printer makes a strange noise
- Printer takes a long time to start printing
- Printing cancels
- Printing does not start
- Printing is slow
- Cleaning Page
- Printer Drivers
- Printer Features
- Overview
- Banners
- Black Finish
- Black Overprint
- Black Printing
- Booklets (Binding Print)
- Collating
- Color Matching
- Overview
- Basics
- What this guide describes
- Background Information
- Factors that Affect Color Printing
- Choosing a Color Matching Method
- Color Settings
- Hue, Brightness, and Saturation
- How To
- Color Match Precision
- List of Color Matching Methods
- Descriptions of Color Matching Methods
- Automatic
- Office Color
- No Color Matching
- Grayscale
- Color Synch
- Custom Page Sizes
- Duplex Printing
- (Printing on Both Sides of the Paper)
- General Information
- Paper Types
- Paper Weights
- Paper Sizes
- Long Edge vs. Short Edge
- Duplexing Restrictions
- Windows PostScript: All Print Jobs (Default)
- Windows PostScript: Single Job
- Windows PCL: All Print Jobs (Default)
- Windows PCL: Single Print Job
- Macintosh OS 9.x
- Macintosh OS 10.1 & 10.2
- Macintosh OS 10.3
- Grayscale
- N-Up Printing
- Photographs
- Posters
- Print Resolution
- Save as File
- Toner Saving
- Watermarks
- Utilities
- Overview
- Accessing
- Descriptions of Utilities
- Installing the Utilities
- Color Correction Utility
- Color Swatch Utility
- Direct Network Printing Utility (LPR)
- Display Language Utility
- Network Printer Status Utility
- Network Setup Utility
- PS Gamma Adjuster Utility

C6000n User’s Guide
240
Windows PCL
For more information,
General Information: see page 234
Restrictions: see page 236
Custom Size Ranges: see page 235
Special Print Media (Paper): see page 237
1. Open the file you want to print.
2. Click File → Print.
3. Select your printer.
4. Click Properties (or Setup, or your application’s
equivalent).
5. Click the Setup tab.
6. Under Media, in the Size drop-down list, select User
Defined Size.
7. The Set Free Size dialog box appears.
8. Select the unit of measurement.
9. Enter the width and length measurements.
See “Custom Size Ranges” on page 235.
10. Click OK.
11. Make sure that User Defined now appears in the Size list
on the Setup tab.
12. You now have two choices.
NOTE
You may see a Warning dialog box indicating a conflict.
If you do, click OK.
The driver automatically makes the needed changes to
correct for the conflict.