C3200 User’s Guide
PREFACE Every effort has been made to ensure that the information in this document is complete, accurate, and up-to-date. The manufacturer assumes no responsibility for the results of errors beyond its control. The manufacturer also cannot guarantee that changes in software and equipment made by other manufacturers and referred to in this guide will not affect the applicability of the information in it.
CONTENTS Preface . . . . . . . . . . . . . . . . . . . . . . . . . . . . . . . . . . 2 Notes, Cautions and Warnings . . . . . . . . . . . . . . . . 5 Introduction . . . . . . . . . . . . . . . . . . . . . . . . . . . . Printer overview. . . . . . . . . . . . . . . . . . . . . . . . Front view. . . . . . . . . . . . . . . . . . . . . . . . . . Rear view . . . . . . . . . . . . . . . . . . . . . . . . . . The Status Panel . . . . . . . . . . . . . . . . . . . . . . . Switches . . . . . . . . . . . . . . . . .
The Status Monitor . . . . . . . . . . . . . . . . . . . . . . . Using the Status Monitor . . . . . . . . . . . . . . . . . . Printer State tab . . . . . . . . . . . . . . . . . . . . . Printer Setup tab . . . . . . . . . . . . . . . . . . . . . Preferences tab . . . . . . . . . . . . . . . . . . . . . . Printer functions (User Settings) . . . . . . . . . . . . Information menu . . . . . . . . . . . . . . . . . . . . Print menu . . . . . . . . . . . . . . . . . . . . . . . . . Media menu . . . . . . . . . .
NOTES, CAUTIONS AND WARNINGS NOTE A note provides additional information to supplement the main text which may help you to use and understand the product. CAUTION! A caution provides additional information which, if ignored, may result in equipment malfunction or damage. WARNING! A warning provides additional information which, if ignored, may result in a risk of personal injury.
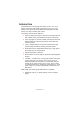
INTRODUCTION Congratulations on buying this Oki colour printer. Your new printer is designed with advanced features to give you clear, vibrant colour prints and crisp black and white pages at high speed on a range of office print media.
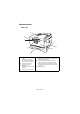
PRINTER OVERVIEW FRONT VIEW 1 2 3 2 7 4 6 5 1. Output stacker, face down. Standard printed copy delivery point. Holds up to 250 sheets at 80g/m². 2. Multi purpose feeder release (2) (press). 3. Status Panel. Status LEDs and operator buttons. 5. Paper tray. Standard blank paper tray. Holds up to 300 sheets of 80g/m² paper. 6. Multi purpose feeder (shown closed). Used for feeding heavier paper stocks, envelopes and other special media. Also for manual feeding of single sheets when required. 7.
REAR VIEW This view shows the connection panel and the rear output stacker. 10 8 9 8. USB interface. (USB cable must be of length 2m maximum for reliable Status Monitor operation.) 10. Rear, face up, 100 sheet stacker. 9. AC power socket. When the rear paper stacker is folded down, paper exits through the rear of the printer and is stacked here face up. This is mainly used for heavy print media.
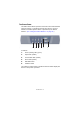
THE STATUS PANEL The Status Panel allows operator intervention and indicates both when the printer is operating normally and when it requires attention. Detailed printer status is provided by the Status Monitor. (See “Using the Status Monitor” on page 35.) 1 2 3 4 5 6 The Status Panel incorporates 4 LEDs and 2 push-button switches as follows: 1. Power (Ready) LED (green) 2. Paper LED (amber) 3. Consumable LED (amber) 4. Alarm LED (amber) 5. ON LINE switch 6.
SWITCHES Operation The switches are labelled ON LINE and CANCEL and each has three modes of operation as follows: MODE OF OPERATION DESCRIPTION Momentary press Press the switch and release it within 2 seconds of (Press 1) pressing it. The operation starts immediately the switch is released. 2-second press (Press 2) 5-second press (Press 5) Press the switch and release it between2 and 5 seconds after pressing it. The operation starts immediately the switch is released (except at job cancellation).
STATUS BEFORE PRESSING ONLINE SWITCH PRESS 1 CANCEL SWITCH PRESS PRESS 2 5 Requesting Starts manual paper feed, no supply paper in MP Tray or paper size mismatch – – – – – – – – No paper in Tray 1 or Tray 1 open – PRESS PRESS 2 5 Cancels job – (*3) Cancels job – (*3) Memory Recovers overflow or from the invalid data error and shifts to ON LINE Paper jam At cover open/close after the waste toner has become full – PRESS 1 – – – – – – – – Recognises the toner has been changed –
3. Error status: you cannot continue to use the printer. Intervention is required to recover from the error. Fatal errors are irrecoverable and require a service call. When several different status situations occur concurrently, only the status with the highest priority is displayed on the LEDs. Warning status combined with the highest-priority normal status is displayed on the LEDs.
LED ILLUMINATION STATUS OFF ON LINE ON A warning is indicated (printing possible) Blinking 1 (2S cycle) An error has occurred but printing can continue if you press the ON LINE or CANCEL switch. Paper, Consumable, Blinking 2 (500mS cycle) An error has occurred. You need to replace consumables Alarm or remove jammed paper, for (Amber) example. The printer then recovers from the error and printing becomes possible again. Blinking 3 (120mS cycle) A serious error has occurred.
PAPER RECOMMENDATIONS Your printer will handle a variety of print media, including a range of paper weights and sizes, transparencies and envelopes. This section provides general advice on choice of media, and explains how to use each type. The best performance will be obtained when using standard 75~90g/m² paper designed for use in copiers and laser printers. Suitable types are: • Arjo Wiggins Conqueror Colour Solutions 90g/m²; • Colour Copy by Neusiedler.
CASSETTE TRAY SIZE DIMENSIONS A6 105 x 148mm A5 148 x 210mm B5 182 x 257mm Executive 184.2 x 266.7mm A4 210 x 297mm Letter 215.9 x 279.4mm Legal 13in. 216 x 330mm Legal 13.5in. 216 x 343mm Legal 14in. 216 x 356mm WEIGHT (G/M²) Light 64-74g/m² Medium 75-90g/m² Heavy 91-120g/m² If you have identical paper stock loaded in the multi purpose tray, you can have the printer automatically switch to the other tray when the current tray runs out of paper.
FACE DOWN STACKER The face down stacker on the top of the printer can hold up to 250 sheets of 80g/m² standard paper and can handle paper stocks up to 120g/m². Pages printed in reading order (page 1 first) will be sorted in reading order (last page on top, facing down). FACE UP STACKER The face up stacker at the rear of the printer should be opened and the tray extension pulled out when required for use. In this condition paper will exit via this path, regardless of driver settings.
LOADING PAPER CASSETTE TRAY 1. Remove the paper tray from the printer. 2. Fan the paper to be loaded at the edges (1) and in the middle (2) to ensure that all sheets are properly separated, then tap the edges of the stack on a flat surface to make it flush again (3).
3. Load the paper (for letter headed paper load face down with top edge towards the front of the printer). 1 4. 2 Adjust the rear stopper (1) and paper guides (2) to the size of paper being used. To prevent paper jams: • Do not leave space between the paper and the guides and rear stopper. • Do not overfill the paper tray. Capacity depends on the type of paper stock. • Do not load damaged paper. • Do not load paper of different sizes or types at the same time.
5. For face down printing, make sure the face up (rear) stacker (3) is closed (the paper exits from the top of the printer). Stacking capacity is approximately 250 sheets, depending on paper weight. 6. For face up printing, make sure the face up (rear) stacker (3) is open and the paper support (4) is extended. Paper is stacked in reverse order and tray capacity is approximately 100 sheets, depending on paper weight. 7. Always use the face up (rear) stacker for heavy paper (card stock etc.).
MULTI PURPOSE TRAY 1. Open the multi purpose tray and press gently down on the paper platform (1) to ensure it is latched down. 1 3 2 2. 3. Load the paper and adjust the paper guides (2) to the size of paper being used. • When printing on headed paper load the paper into the multi purpose tray with pre-printed side up and top edge into the printer. • Envelopes should be loaded face up with top edge to the left and short edge into the printer.
PRINTER SETTINGS IN WINDOWS Your printer’s menus (accessed via the “The Status Monitor” on page 35) provide access to many options. The Windows printer driver also contains settings for many of these items. Where items in the printer driver are the same as those in the menus, and you print documents from Windows, the settings in the Windows printer driver will override those items in the menus. The illustrations in this chapter show Windows XP.
When you click Properties a new window opens which contains a short list of the printer settings available in the driver, which you can choose for this document. The settings available from within your application are only those which you may want to change for specific applications or documents. Settings you change here will usually only last for as long as the particular application program is running.
JOB OPTIONS TAB 3 4 1 5 2 7 8 1. The output resolution of the printed page can be set as follows. • The highest quality setting prints at 1200 x 600dpi. This option requires the most printer memory and takes the longest to print. • The normal setting prints at 600 x 600dpi and is adequate for all but the most discerning applications. • The draft setting prints at 300 x 300dpi and is suitable for draft documents, where print quality is less critical. 2.
COLOUR TAB 1 2 4 3 5 1. Control over the colour output of your printer may be performed automatically, or for advanced control, by manual adjustment. The automatic setting will be appropriate in most cases. The other options in this window only become visible when you select a choice other than Auto. For grayscale printing, the printer runs at 20ppm and all pages are printed in black and white. 2. You can choose from a range of colour matching options, depending on the image source for your document.
SETTING FROM WINDOWS CONTROL PANEL When you open the driver properties window directly from Windows, rather than from within an application program, a somewhat more extensive range of settings is provided. Changes made here will generally affect all documents you print from Windows applications, and will be remembered from one Windows session to the next. GENERAL TAB 1 2 3 1. This area lists some of the main features of your printer. 2.
ADVANCED TAB 1 2 3 4 5 6 7 8 9 10 12 11 1. You can specify which times of day your printer will be available. 2. Indicates current priority, from 1 (lowest) to 99 (highest). Highest priority documents will print first. 3. Specifies that documents should be spooled (stored in a special print file) before being printed. The document is then printed in the background, allowing your application program to become available more quickly. 4.
in the print queue and does not print until the printer setup is changed and the document restarted from the print queue. Mismatched documents in the queue will not prevent correctly matched documents from printing. 8. Specifies that the spooler should favour documents which have completed spooling when deciding which document to print next, even if completed documents are lower priority than documents which are still spooling.
COLOUR PRINTING The printer drivers supplied with your printer provide several controls for changing the colour output. For general use the automatic settings will suffice, providing reasonable default settings that will produce good results for most documents. Many applications have their own colour settings, and these may override the settings in the printer driver. Please refer to the documentation for your software application for details on how that particular program’s colour management functions.
Viewing conditions A print can look very different under different lighting conditions. For example, the colours in a print may look different when viewed standing next to a sunlit window, compared to how they look under standard office fluorescent lighting. Printer driver colour settings The driver settings for Manual colour can change the appearance of a print. There are several options available to help match the printed colours with those displayed on screen.
TIPS FOR PRINTING IN COLOUR The following guidelines may help you to achieve good colour output from your printer. PRINTING PHOTOGRAPHIC IMAGES Use the Monitor (6500k) Perceptual setting. If the colours look too dull, try the Monitor (6500k) Vivid or Digital Camera settings. PRINTING FROM MICROSOFT OFFICE APPLICATIONS Use the Monitor (9300k) setting. This may help if you are having problems with specific colours from applications such as Microsoft Excel or Microsoft Powerpoint.
ACCESSING THE COLOUR MATCHING OPTIONS The Colour Matching options in the printer driver can be used to help match your printed colours to the ones displayed on your monitor or from some other source, such as a digital camera. To open colour matching options from the Windows Control Panel: 1. Open the Printers window (called “Printers and Faxes” in Windows XP). 2. Right-click the printer name and choose Properties. 3. Click the Printing Preferences button (1).
2. Choose the Manual colour setting (2) and select from the following options: 1 b c d a 2 e (a) Monitor (6500k) Perceptual Optimised for printing photographs. Colours are printed with emphasis on saturation. (b) Monitor (6500k) Vivid Optimised for printing photographs, but with even more saturated colours than the Monitor (6500k) Perceptual setting. (c) Monitor (9300k) Optimised for printing graphics from applications such as Microsoft Office. Colours are printed with emphasis on Lightness.
USING THE COLOUR SWATCH FEATURE To use the Colour Swatch feature, you must install the Colour Swatch Utility. This is supplied on the CD-ROM that was supplied with your printer. The Colour Swatch function prints charts which contain a range of sample colours. Note that this is not the full range of colours that the printer can produce. Listed on each sample colour are the corresponding RGB (Red, Green, Blue) values.
USING THE COLOUR CORRECT UTILITY The Oki Colour Correct Utility is provided on your printer driver CD-ROM. You must install it separately since it is not installed along with the printer driver. The Colour Correct utility has the following features: > Microsoft Office palette colours can be individually adjusted. This is useful if you want to change how a specific colour is printed. > Colours can be adjusted by changing Hue, Saturation and Gamma.
THE STATUS MONITOR The Status Monitor software is distinct from and installed separately from the driver software. NOTE For reliable operation of the Status Monitor, ensure that the USB cable is of length 2m maximum. The Status Monitor provides a readable indication of the printer status as displayed on the indicator LEDs on the Status Panel (See “The Status Panel” on page 9.) and allows you to access the printer menus (listed at the end of this chapter) to set printer parameters such as paper size etc.
2. Click on the window maximise button and the view will expand to include the Printer State, Printer Setup and Preferences tabs. PRINTER STATE TAB This tab is visible by default on opening the Status Monitor and displays detailed information about the status of the printer. PRINTER SETUP TAB Selecting this tab provides access to the Printer Settings button, which, when selected, enables you to configure the printer settings.
User Settings This tab is intended to be used for normal day-to-day use by any user. The User Settings tab has the menu items on the left and allows you to configure a selected setting on the right. Click the Save button to save the new setting or the Undo button to undo the change. Use File|Exit to return to the Printer Setup Tab. Administrator Settings This tab is intended to be used only by designated staff.
Click the Save button to save the new setting or the Undo button to undo the change. Use File|Exit to return to the Printer Setup Tab. NOTE You can access the printer menu settings window direct by clicking [Start], [All Programs] and selecting Okidata|OKI C3200|Printer Name Printer Settings.
PREFERENCES TAB Selecting this tab provides the means to choose the information displayed by the Status Monitor and how/when the Status Monitor appears. The default Alert view setting (Pop up on alerts) ensures that the Status Monitor pops up to inform you of a condition that requires your attention e.g. a missing or badly fitted toner cartridge.
PRINTER FUNCTIONS (USER SETTINGS) The printer settings made from the Status Monitor can be seen collectively on a printed Menu Map (or Status Page). (For details of how to print such a map, see the next section.) It should be noted that many of these settings can be, and often are, overridden by settings made in the printer drivers. However, several of the driver settings can be left at “Printer Setting”, which will then default to the settings entered in these printer menus.
PRINT MENU ITEM SETTINGS EXPLANATION MP TRAY USAGE DO NOT USE WHEN MISMATCH If a document to be printed demands a paper size not installed in the selected tray, the printer can automatically feed from the multi purpose tray instead. If this function is not enabled, the printer will stop and request the correct size of paper to be loaded. MEDIA CHECK ENABLE DISABLE Determines whether the printer checks the size of paper loaded matches that required for the document sent to print.
MEDIA MENU ITEM SETTINGS EXPLANATION TRAY1 MEDIATYPE PLAIN LETTERHEAD BOND RECYCLED ROUGH USERTYPE1 – 5 Selects the type of media loaded in this tray. This will help the printer to adjust its internal operating parameters, such as engine speed and fusing temperature, to better accommodate the media to be fed. For example, letterhead may benefit from a slightly lower fusing temperature to ensure that its ink does not offset. Usertype 1 – 5 will be displayed only when registered from the host PC.
MEDIA MENU ITEM SETTINGS EXPLANATION MPT MEDIAWEIGHT MEDIUM (7590g/m²) Selects the media weight to be fed from the multi purpose tray. HEAVY (91-120g/ m²) ULTRA HEAVY (121-203g/m²) UNIT OF MEASURE MILLIMETRE INCH Selects the unit of measure for the next two items. X-DIMENSION 64-210-216 MILLIMETRE Selects the width of paper defined by the “CUSTOM” settings referred to in the foregoing PAPER SIZE settings.
COLOUR MENU The printer automatically adjusts colour balance and density at appropriate intervals, optimising the printed output for bright white paper viewed in natural daylight conditions. The items on this menu provide a means of changing the default settings for special or particularly difficult print jobs. Settings revert to their default values when the next print job is complete.
SYSTEM CONFIGURATION MENU This menu adjusts general printer settings to suit the way you prefer to work. SYSTEM CONFIGURATION MENU ITEMS SETTINGS EXPLANATION POW SAVE TIME 5 MIN 15 MIN 30 MIN 60 MIN 240 MIN Adjusts the idling time before the printer automatically switches into power saving mode. In this mode power consumption is reduced to a low level required to just keep the printer operating and ready to receive data.
SYSTEM CONFIGURATION MENU ITEMS SETTINGS LANGUAGE English, Sets the language used for the German, Status Monitor and printed reports. French, Italian, Spanish, Swedish, Norwegian, Danish, Dutch, Turkish, Portuguese, Polish, Russian, Greek EXPLANATION USB MENU This menu controls the operation of the printer’s USB data interface. USB MENU ITEM SETTINGS EXPLANATION SOFT RESET ENABLE / DISABLE Enables or disables the SOFT RESET command. (Only available on Windows 98 and Windows Me.
MEMORY MENU This menu determines how printer memory is used. MEMORY MENU ITEM SETTINGS EXPLANATION RECEIVE BUFFER SIZE AUTO, 0.5MB, 1MB Sets the size of buffer memory for receiving incoming data. Normally this is allocated dynamically as required. FLASH INITIALIZE EXECUTE Clears all data from flash memory. SYSTEM ADJUSTMENT MENU This menu provides fine adjustment of image position on the printed page in steps of 0.25mm. SYS ADJUST MENU ITEM SETTINGS EXPLANATION X ADJUST -2.00 ~ 0 ~ +2.
MAINTENANCE MENU This menu provides access to various printer maintenance functions. MAINTENANCE MENU ITEM SETTINGS EXPLANATION MENU RESET EXECUTE Resets menus to default settings. SAVE MENU EXECUTE Saves current menu settings as default values. At confirmation prompt, press ENTER to confirm save, or CANCEL to cancel. POWER SAVE ENABLE / DISABLE Enables or disables automatic power save mode. Delay before entering this mode is set in the system configuration menu.
USAGE MENU This menu is for information only, and provides an indication of total usage of the printer and the expected life left in its consumable items. This is particularly useful if you do not have a full set of replacement consumables to hand and you need to know how soon you will need them. USAGE MENU ITEM EXPLANATION TOTAL PAGE COUNT The total number of prints output by the printer. TRAY1 PAGE COUNT The total number of pages fed from Tray 1.
PRINTING SETTINGS To print a list of the printer settings: 1. Start the Status Monitor. 2. Select the Printer Setup tab. 3. Click on the Printer Settings button on the Printer Setup tab. 4. Click on the Information menu and then select Print Menu Map. 5. Click on the Execute button to print a Menu Map of printer settings. NOTE A menu map of printer settings can also be printed from the Status Panel by holding down the ON LINE button for 2 seconds.
REPLACING CONSUMABLE ITEMS This section explains how to replace consumable items when due. As a guide, the life expectancy of these items is: > Toner — 1,500 (standard capacity) or 3,000 (high capacity) A4 pages at 5% coverage, which means that 5% of the addressable print area is printed with this colour. Toner life is directly affected by coverage, e.g. at 10% coverage there is sufficient toner for 750 pages (standard capacity) or 1,500 pages (high capacity), conversely at 2.
CONSUMABLE ORDER DETAILS ITEM LIFE ORDER NO.
TONER CARTRIDGE REPLACEMENT CAUTION! To avoid toner wastage and possible toner sensor errors, do not change the- toner cartridge(s) until “TONER EMPTY” is displayed. The toner used in this printer is a very fine dry powder. It is contained in four cartridges: one each for cyan, magenta, yellow and black. Have a sheet of paper handy so that you have somewhere to place the used cartridge while you install the new one. Dispose of the old cartridge responsibly, inside the pack that the new one came in.
1. Press the cover release and open the printer’s top cover fully. WARNING! If the printer has been powered on, the fuser may be hot. This area is clearly labelled. Do not touch. 2. Note the positions of the four cartridges. 1 2 3 4 1. Cyan cartridge 2. Magenta cartridge 3. Yellow cartridge 4.
3. Carry out one of the following: (a) If you are replacing a toner cartridge that has been supplied with your printer (release lever has 3 positions), pull the coloured toner release lever on the cartridge to be replaced towards the front of the printer, in the direction of the arrow, but stop at the central (upright) position (1).
4. Lift the right-hand end of the cartridge and then draw the cartridge to the right to release the left-hand end as shown, and withdraw the toner cartridge from the printer. 1 2 5. Put the cartridge down gently onto a piece of paper to prevent toner from marking your furniture. CAUTION! The green image drum surface is very delicate and light sensitive. Do not touch it and do not expose it to normal room light for more than 5 minutes.
7. Gently shake the new cartridge from end to end several times to loosen and distribute the toner evenly inside the cartridge. 8. Remove the wrapping material and peel off the adhesive tape from the underside of the cartridge. 9. Holding the cartridge by its top centre with the coloured lever to the right, lower it into the printer over the image drum unit from which the old cartridge was removed. 10.
11. Pressing gently down on the cartridge to ensure that it is firmly seated, push the coloured lever (1) towards the rear of the printer. This will lock the cartridge into place and release toner into the image drum unit. 1 12. Finally, close the top cover and press down firmly at both sides so that the cover latches closed.
IMAGE DRUM REPLACEMENT Switch off the printer and allow the fuser to cool for about 10 minutes before opening the cover. CAUTION! Static sensitive devices, handle with care. The printer contains four image drums: cyan, magenta, yellow and black. 1. Press the cover release and open the printer’s top cover fully. WARNING! If the printer has been powered on, the fuser will be hot. This area is clearly labelled. Do not touch.
2. Note the positions of the four cartridges. 1 2 3 4 3. 1. Cyan cartridge 2. Magenta cartridge 3. Yellow cartridge 4. Black cartridge Holding it by its top centre, lift the image drum, complete with its toner cartridge, up and out of the printer.
4. Put the old unit down gently onto a piece of paper to prevent toner from marking your furniture. 5. Take the new image drum unit, complete with toner cartridge (assembled according to the installation guide) and place it on the piece of paper where the old ID unit was placed. Keep it the same way round as the old unit. Pack the old ID unit inside the packaging material for disposal. CAUTION! The green image drum surface at the base of the cartridge is very delicate and light sensitive.
7. Finally, close the top cover and press down firmly at both sides so that the cover latches closed. NOTE If you need to return or transport your printer for any reason, please make sure you remove the image drum unit beforehand and place in the bag provided. This is to avoid toner spillage. REPLACING THE BELT UNIT The belt unit is located under the four image drums. This unit requires replacement approximately every 50,000 pages.
2. Note the positions of the four cartridges. It is essential that they go back in the same order 1 2 3 4 3. 1. Cyan cartridge 2. Magenta cartridge 3. Yellow cartridge 4. Black cartridge Lift each of the image drum units, starting from the rear, out of the printer and place them in a safe place away from direct sources of heat and light. CAUTION! The green image drum surface at the base of each cartridge is very delicate and light sensitive.
4. Locate the two fasteners (5) at each side of the belt and the lifting bar (6) at the front end. 5 6 5. Turn the two fasteners 90° to the left. This will release the belt from the printer chassis. 6. Pull the lifting bar (6) upwards so that belt tilts up towards the front, and withdraw the belt unit from the printer. 7. Lower the new belt unit into place, with the lifting bar at the front and the drive gear towards the rear of the printer.
FUSER REPLACEMENT The fuser is located inside the printer just behind the four image drum units. WARNING! If the printer has recently been powered on, some fuser components will be very hot. Handle the fuser with extreme care, holding it only by its handle, which will only be mildly warm to the touch. A warning label clearly indicates the area. If in doubt, switch the printer off and wait at least 10 minutes for the fuser to cool before opening the printer cover.
2. Identify the fuser handle (1) on the top of the fuser unit. 1 C 2 M Y K 3. Pull the two fuser retaining levers (2) towards the front of the printer so that they are fully upright. 4. Holding the fuser by its handle (1), lift the fuser straight up and out of the printer. If the fuser is still warm, place it on a flat surface which will not be damaged by heat. 5. Remove the new fuser from its packaging and remove the transit material. 6.
7. Lower the fuser into the printer, locating the two lugs (3) into their slots in the metal partition which separates the fuser area from the image drums. 8. Push the two retaining levers (2) towards the rear of the printer to lock the fuser in place. C 2 M Y K 9. Finally, close the top cover and press down firmly at both sides so that the cover latches closed.
CLEANING THE LED HEAD Clean the LED head when printing does not come out clearly, has white lines or when text is blurred. 1. 2. Switch off the printer and open the top cover. Gently wipe the LED head surface with LED lens cleaner or soft tissue. CAUTION! Do not use methyl alcohol or other solvents on the LED head as damage to the lens surface will occur. 3. Close the top cover.
INSTALLING ADDITIONAL MEMORY This section explains how to install additional RAM memory into your printer as a memory upgrade. ORDER CODES Use the following order codes for additional memory: > 64MB RAM – 01110301 > 256MB RAM – 01110302 MEMORY UPGRADE The basic printer model comes equipped with 32MB of main memory. This can be upgraded with an additional memory board containing 64MB or 256MB, giving a maximum total memory capacity of 288MB.
3. Lift the front cover latch and pull open the front cover. 4. Remove the screw securing the right-hand side cover. 5. Lift the edge of the side cover slightly at the two points shown, and pull the cover away from the printer at the top. Lift the cover slightly to detach it from the printer. Place it safely to one side. 6. Carefully remove the new memory board from its wrapping. Try to handle the board only by its short edges, avoiding contact with any metal parts as far as possible.
8. Identify the RAM expansion slot (1) in the printer. 2 1 2 9. If the RAM expansion slot already contains a memory upgrade board, that board will have to be removed before you can install the new one. To remove it proceed as follows, otherwise skip to step 10. (a) Identify the locking clips (2) at each end of the RAM expansion slot (1). (b) Push the clips outward and back into the printer. The board will pop out slightly. (c) Grip the board firmly by its short edges and pull it out of the slot.
13. Close the top of the side cover up to the printer and refit the securing screw removed in step 4. 14. Close the front cover and close the top cover, pressing down firmly at each side to latch it closed. 15. Reconnect the AC power cable and switch the printer on. 16. When the printer is ready, print a menu map by holding down the ON LINE button on the Status Panel for 2 seconds. 17. Examine the first page of the menu map.
CLEARING PAPER JAMS Provided that you follow the recommendations in this guide on use of print media, and you keep the media in good condition prior to use, your printer should give years of reliable service. However, paper jams occasionally do occur, and this section explains how to clear them quickly and simply. Jams can occur due to paper misfeeding from a paper tray or at any point on the paper path through the printer.
3. Note the positions of the four cartridges. 1 2 3 4 1. Cyan cartridge 2. Magenta cartridge 3. Yellow cartridge 4. Black cartridge It will be necessary to remove the four image drums to gain access to the paper path. 4. Holding it by its top centre, lift the cyan image drum, complete with its toner cartridge, up and out of the printer.
5. Put the cartridge down gently onto a piece of paper to prevent toner from marking your furniture and to avoid damaging the green drum surface. CAUTION! The green image drum surface at the base of the cartridge is very delicate and light sensitive. Do not touch it and do not expose it to normal room light for more than 5 minutes. 6. Repeat this removal procedure for each of the remaining image drum units. 7.
• To remove a sheet from the central area of the belt (2), carefully separate the sheet from the belt surface and withdraw the sheet. 4 3 2 1 • To remove a sheet just entering the fuser (3), separate the trailing edge of the sheet from the belt, push the fuser pressure release lever (4) towards the front and down to release the fuser’s grip on the sheet, and withdraw the sheet through the drum cavity area. Then allow the pressure release lever to rise again.
8. Starting with the cyan image drum unit nearest the fuser, replace the four image drums into the drum cavity, making sure to locate them in the correct order. 1 2 3 4 • 1. Cyan cartridge 2. Magenta cartridge 3. Yellow cartridge 4. Black cartridge Holding the complete assembly by its top centre, lower it into place in the printer, locating the pegs at each end into their slots in the sides of the printer cavity.
9. Lower the top cover but do not press down to latch it closed yet. This will protect the drums from excessive exposure to room lighting while you check the remaining areas for jammed sheets. 10. Open the rear exit tray (5) and check for a sheet of paper in the rear path area (6). 6 5 • Pull out any sheets found in this area. • If the sheet is low down in this area and difficult to remove, it is probably still gripped by the fuser.
12. Lift the front cover release and pull open the front cover. 13. Check inside the cover for sheets in this area and remove any that you find, then close the cover.
14. Pull out the paper tray and ensure that all paper is stacked properly, is undamaged, and that the paper guides are properly positioned against the edges of the paper stack. When satisfied, replace the tray. 15. Finally, close the top cover and press down firmly at both sides so that the cover latches closed. When the jam has been cleared, if Jam Recovery is set to ON in the System Configuration Menu, the printer will attempt to reprint any pages lost due to paper jams.
SPECIFICATIONS ITEM SPECIFICATION Dimensions 425 x 561 x 345mm (W x D x H) Weight 26Kg approximately Print speeds 12 pages per minute colour/20 pages per minute monochrome Resolution 600dpi or 1200 x 600dpi Emulations Windows GDI Auto Features Auto registration Auto density adjustment Auto consumable counter reset Memory 32MB standard, upgradable to 96MB or 288MB Paper capacity 300 sheets in main tray at 80g/m² 100 sheets in multi purpose tray Paper weight 64 ~ 120g/m² in main tray 75 ~ 203g/
INDEX A L Advanced features Labels enabling or disabling................. 27 recommended types ..................14 Language B changing display and reports language ...............................46 Belt how to replace ......................... 62 LED head .....................................68 life expectancy......................... 51 M Black printing glossy or matte........................ 24 Business cards recommended type .................. 14 Maintenance Cleaning LED head ..............
Poster printing ............................. 22 Power saving delay time............................... 45 Preferences Menu ......................... 39 Print order face down stacker .................... 19 face up stacker ........................ 19 Print settings how to save............................. 22 Printer default settings Windows defaults ..................... 25 Printing adjusting image position ........... 47 Priority print queue priority .................. 26 R Resolution setting in Windows .
OKI CONTACT DETAILS Oki Systems (UK) Limited 550 Dundee Road Slough Trading Estate Slough, SL1 4LE Tel:44 (0) 1753 819819 Fax:44 (0) 1753 819899 http://www.oki.co.uk Oki Systems Ireland Limited The Square Industrial Complex Tallaght, Dublin 24, Ireland Tel:+353 1 4049590 Fax:+353 1 4049591 http://www.oki.ie Oki Systems (Thailand) Ltd. 956 Udomvidhya Building 6th Floor, Rama IV Rd., Bangkok 10500, Thailand Tel:(662) 636 2535 Fax:(662) 636 2536 http://www.okisysthai.
OKI Europe Limited Central House Balfour Road, Hounslow TW3 1HY, United Kingdom Tel: +44 (0) 20 8219 2190 Fax: +44 (0) 20 8219 2199 www.okiprintingsolutions.com 07064801 iss.