✁ OKI C7000 Series ® Setup Guide Installation Checklist: Please cut this page out and use it as a guide when installing your printer. 1 Install the Printer h Select a Location (see p. 3) h Unpack (see p. 3) h Check Components (see p. 4) h Record the Serial No. (see p. 4) h Remove Shipping Materials (see p. 5) h Prepare Image Drums (see p. 5) h Install Toner Cartridges (see p. 6) h Load Paper (see p. 7) h Connect to Power (see p. 7) h Print the Demo Page (see p.
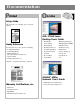
Documentation Printed On-Line Setup Guide The document you’re holding: gets you up and running. OKI® C7000 Series Desktop User’s Guide Handy Reference For help with day-to-day operation, including: • Loading Print Media • Usable Print Media • Walk-up Functions (Proof & Print, Secure Print, etc.) • Operator Panel • Clearing Paper Jams, etc.
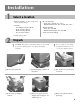
Installation 1 Select a location • Firm, level surface capable of supporting at least 110 lbs (50 kg). • Clearance: - Left & Right: 8 inches (20 cm) - Front: 24 inches (60 cm) - Back: 16 inches (40 cm) - Top: 24 inches (60 cm) • Room temperature: – Ideal: 62.6 to 80.6ºF (17 to 27ºC): – Maximum Permissible: 50 to 89.
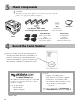
3 Check Components ! CAUTION! The printer weighs 106 pounds. Use more than one person to lift the printer. Use appropriate lifting techniques. Power Cord CD(s) Cyan, Magenta, Yellow & Black Toner Cartridges with LED Lens Cleaners Light-Shield Bags Printer 4 (Used to protect image drums from light when they are removed from printer.) With Drivers & On-Line User’s Guides Documentation (Not illustrated): Setup Guide Handy Reference Warranties, Certifications, etc.
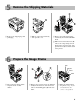
Remove the Shipping Materials □ Remove any shipping tape and packaging. □ Pull up on the release latch (1) and open the cover. □ Remove the cardboard shipping restraint (1) from behind the LED heads. □ Pull forward on the blue lever (2), remove the orange transport lock (3) from the end of the fuser, then push the lever (2) toward the back of the printer. 6 Prepare the Image Drums Cyan Magenta Yellow Black □ Lift out the four image drums and place them on a flat surface.
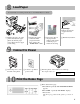
7 Install the Toner Cartridges □ Unpack the black toner cartridge and shake it back and forth. □ Hold the cartridge in a horizontal position and remove the tape. □ Hold the cartridge in the vertical position, with the port (1) on the left and the blue lock lever (2) on the right. Lower the left end of the cartridge into the image drum closest to the front of the printer, so that the tube (1) on the drum slides into the port (2) on the toner cartridge.
8 Load Paper For information on usable print media, see the Handy Reference Guide. Paper Gauge: Indicates the amount of paper left in the tray. □ Pull the paper tray out of the printer and adjust the paper guides (1) and rear paper stopper (2) for the size paper you are using. 9 □ Fan the paper (max. 530 sheets 20-lb. paper) and load it. Keep it below the “PAPER FULL” mark. □ If necessary, lift out the paper media indicator and reinsert it with the proper media size showing □ Push the tray back in.
11 Network Install: Windows & Novell Windows & Novell Network Install Summary The On-Line Network User’s Guide ........................... 8 Network Connection ........................................................ 8 Software Assessment Network Software: What’s Available ....................... 9 What Network Administration Software to Install ...10 Network Administration Software TCP/IP: Windows 2000 & NT 4.0 .........................11 Novell Setup .....................................................
11 Network Install: Windows & Novell (cont.) Network Software: What’s Available The following software is available for installation. See the diagram on the next page for information on which network software should be installed for your particular network system: © Network Utilities, including: OkiNet Utilities Recommended for quick discovery and configuration of the printer server.
11 Network Install: Windows & Novell (cont.) Printer Network Configuration Overview What Network Administration Software to Install: Server-Based Networks: TCP/IP: Windows 2000 & NT 4.0 Use OkiNet to discover and configure the print server and to set up the IP Monitor (see page 11). Novell NDS/Bindery (4.x and 5.x) Use OkiView32 to configure the print server and to add objects to the NDS tree (see page 12). Novell NDPS (5.
Network Install: Windows & Novell (cont.) Network Administration Software, TCP/IP: Windows 2000 & NT 4.0 In this process, you first set the print server’s IP address, subnet, and gateway. You can also enter these settings through the printer’s front panel; see “Network Menu” in the on-line Desktop User’s Guide. ! If DHCP is active, the printer obtains an IP address when it is turned on. If you are using OkiNet Connect IP Monitor, you may not need to set a permanent IP address.
11 Network Install: Windows & Novell (cont.) Default Gateway If your local network is attached to other networks, you can specify the address of your default gateway (format XXX.XXX.XXX.XXX, XXX = number from 0 to 255). This gateway will be selected whenever messages need to be sent to another network. ! If you select an invalid default gateway or the default gateway becomes unavailable, the OkiLAN 6200e may not be able to communicate with non-local networks.
11 Network Install: Windows & Novell (cont.) Client Computers Installing the Drivers on Client Computers Clients with Windows 2000 & Windows NT 4.0: Push Installation □ Copy the driver files from the C7000/C9000 CD (\Drivers\Nt40 or Win2K\English\Pcldrv or Psdrv) to the network directory of your choice. □ At the host computer, open Network Neighborhood, then double-click the client computer on which you wish to install the drivers. □ Double-click the Printers folder, then click Add Printer.
12 USB Install: Windows Windows Drivers Supplied The printer comes with two Windows drivers: Adobe PostScript and PCL. USB Drivers for the following Windows systems are supplied: • Windows 2000 Professional • Windows Me • Windows 98 USB Port Connection ! No USB interface cable is supplied with the printer. Use a USB cable that is compatible with USB specification 1.1. Notes: • A USB interface will only operate using Windows 2000, Windows Me and Windows 98.
12 USB Install: Windows (cont.) USB: Install the Software © Printer Drivers (Adobe PostScript, PCL) © On-Line C7000 Series User’s Guide • Minimum requirements: i486 processor, 16 MB RAM, Microsoft Internet Explorer 4.0 or higher. • Can also be viewed directly from the CD (click the “View User’s Guide” button in the Menu Installer dialog box). © Color Swatch Utility Provides a printout of color samples with RGB settings.
13 Parallel Install: Windows Drivers Supplied The printer comes with two drivers: Adobe PostScript and PCL, for the following Windows systems: • Windows 2000 Professional • Windows Me, 98, 95 • Windows NT 4.0 Parallel Port Connection To Install the Software □ Turn the computer on and wait for it to boot up. □ Turn the printer on and make sure that all software applications are closed. □ With the OKI C Series CD in your CD-ROM drive, click Start ® Run.
14 Network Install: Macintosh Network Connection ! Requires Mac OS 6.x or above, running on a Macintosh computer with EtherTalk interface. The Ethernet cable is not supplied with the printer. Use an Ethernet cable with RJ45 connectors at either end. If the printer will be connected directly into a network port, a crossover-type cable is required. Network: Install the Driver ! Be sure to switch off antivirus software before installing a printer driver.
14 Network Install: Macintosh (cont.) Activate the Duplex Unit and Internal Hard Drive in the Printer Driver If your printer has either the duplex unit or the internal hard drive (both standard on Model C7400dxn), you must enter the driver and activate them. ! This procedure is also used when installing optional memory SIMMs or auxiliary paper trays. See “Accessories” in the on-line C7000 Series Desktop User’s Guide. 1. Activate Chooser from the Apple menu. 2. Select LaserWriter 8. 3.
15 USB Install: Macintosh USB Port Connection ! No USB interface cable is supplied with the printer. Use a USB cable that is compatible with USB specification 1.1. Notes: • Requires Mac OS 9.04 or higher • Printer operation is not assured if another USB compatible device is connected concurrently with it. • If a USB hub is used, it must be connected directly to the computer.
15 USB Install: Macintosh (cont.) Activate the Duplex Unit and Internal Hard Drive in the Printer Driver If your printer has either the duplex unit or the internal hard drive (both standard on Model C7400dxn), you must enter the driver and activate them. ! This procedure is also used when installing optional memory SIMMs or auxiliary paper trays. See “Accessories” in the on-line C7000 Series Desktop User’s Guide. 1. Activate Chooser from the Apple menu. 2. Select LaserWriter 8. 3.
16 Set the Color Balance Why Set the Color Balance? Setting the color balance after shipment ensures that the three primary colors your printer uses are properly balanced. If they are not balanced, one color may dominate, and printed pictures will not be as lifelike as they could be. The color balance should be set • when the printer is installed • any time the print quality seems to have deteriorated • when image drums are replaced • if you switch to a significantly different print media (e.g.
17 Check the Media Settings Default Media Settings Multi-Purpose Tray (MP Tray) The default printer setting for print media is Medium (20 to 24 lb.). Individual Print Jobs If you are using special media for an individual print job, make the temporary media setting changes in the driver as you print the job from your application. Printer Defaults If you consistently use another type of media in Tray 1 or the Multi-Purpose (MP) Tray, change the media settings in the printer menu (see page 25).
17 ! Check the Media Settings (cont.) For information on usable print media, see the Handy Reference Guide. Printing Labels Caution! Printing Transparencies Caution! Use only recommended transparencies: 3M CG3720 or Folex BG67. Print Path • Input: Tray1 or Multi-Purpose (MP) Tray • Output: Rear Exit Only Transparencies can be loaded in either Tray 1 or the Multi-Purpose Tray. The printer automatically detects that transparencies are being used and processes the media differently from standard paper.
17 Check the Media Settings (cont.) Printing Thick Paper (Card Stock, Index Paper) ! The maximum usable paper weight for duplex printing is 28 lb.
17 Check the Media Settings (cont.) Changing Media Settings for Tray1 in the Printer Menu Transparencies Only: Set Media Type □ Press MENU repeatedly until MEDIA MENU appears on the display. □ Press ITEM repeatedly until TRAY1 MEDIATYPE appears on the display. □ Press VALUE (+ or -) repeatedly until TRANSPARENCY appears on the second line of the display. □ Press SELECT to engage the new setting. An Asterisk (*) appears next to the new setting. □ Press ON LINE to save the setting and exit the menu.
18 Check the Printer Settings Duplex Mode ! Power Save Mode The printer is set at the factory to enter the Power Save mode after 1 hour. To change the interval: □ Press MENU repeatedly until SYSTEM CONFIG MENU appears on the display. □ Press ITEM + repeatedly until POWER SAVE DELAY TIME appears on the display. □ Press VALUE (+ or -) repeatedly until the desired setting appears on the second line of the display. □ Press SELECT. An Asterisk (*) appears next to the new setting.
19 Print a Sample File □ Open a file in your software application. □ Click File ® Print. □ In the Print dialog box, select the appropriate OKI C Series printer driver, then click OK. 20 Install the Handy Reference □ Remove the backing from the Velcro® strip on the back of the Handy Reference and apply the Handy Reference to either side of the printer, at the front. OKI, OkiView and OkiLAN are registered trademarks of Oki Electric Industry Company, Ltd.
Oki Data Americas, Inc., 2000 Bishops Gate Blvd., Mt. Laurel, NJ 08054-4620 Tel: (856) 235-2600 FAX: (856) 222-5320 http://www.okidata.com Oki Data Americas, Inc., 2735 Matheson Blvd. East, Unit 1, Mississauga, Ontario, Canada L4W 4M8 Tel: (800) 654-3282 FAX: (905) 238-4427 Oki Data de Mexico, S.A. de C.V., Mariano Escobedo No. 748 - 8 Piso, Col Anzures, e. p. 11590, Mexico, DF Tel: (525) 263-8780 FAX: (525) 263-8785 Oki Data do Brasil, Ltda.