Hard Disk Drive (HDD) Installation Instructions 59393401
© 2007 by Oki Data Americas, Inc. All rights reserved. Document P/N 59383401 Disclaimer Every effort has been made to ensure that the information in this document is complete, accurate, and up-to-date. The manufacturer assumes no responsibility for the results of errors beyond its control. The manufacturer also cannot guarantee that changes in software and equipment made by other manufacturers and referred to in this guide will not affect the applicability of the information in it.
Installation 1. Turn off the printer and detach the power cord from the back of the printer. 2. Detach the interface cable.
3. Open the top cover.
Warning! If the printer has been powered on recently, the fuser will be hot. This area is clearly labeled. 4. Press the release and open the front cover.
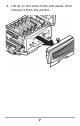
5. Loosen the thumbscrew holding the printer side panel in place.
6. Lift up on the ends of the side panel, then remove it from the printer.
7. Slide the access door in the metal plate and open it. 8. Remove the HDD from its shipping package. Caution! Observe antistatic precautions when installing the hard disk drive.
. Plug the connecting cable (1) firmly into the connector (2) on the printer, then tighten the two thumbscrews (3).
. Close the access cover and slide it to secure it in the metal plate. 11. Replace the side panel on the printer.
12. Use the thumbscrew to secure the panel. 13. Close the front cover.
14. Close the top cover. 15. Attach the interface cable. 16. Plug the power cord into the back and turn on the printer.
Verify the Installation Print the MenuMap 1. Press + one or more times until INFORMATION MENU appears on the display. 2. Press ENTER twice. The MenuMap prints. 3. Look at the top of the printout: “HDD: installed” should appear. If you see “HDD: uninstalled”, repeat the installation steps—checking to be sure that the Hard Disk Drive is firmly seated in the printer connector—until it does.
Activate the HDD in the Driver Windows® Postscript Emulation Driver 1. First Windows Vista a. Click Start → Settings → [Hardware and Sound] Printer. The Printer dialog box opens. Windows XP, Server 2003 a. Click Start → Settings → Printers and Faxes. The Printers and Faxes dialog box opens. Windows 2000 a. Click Start → Settings → Printers. The Printers dialog box opens. 2. Right click the appropriate printer icon. Click Properties. 3. Click the Device Settings tab. 4. Scroll down to Installable Options.
5. Select Installed. 6. Click OK and close the dialog box. PCL Driver 1. First Windows Vista a. Click Start → Settings → [Hardware and Sound] Printer. The Printer dialog box opens. Windows XP, Server 2003 a. Click Start → Settings → Printers and Faxes. The Printers and Faxes dialog box opens. Windows 2000 a. Click Start → Settings → Printers. The Printers dialog box opens. 2. Right click the PCL printer icon. Click Properties. 3. Click the Device Option(s) tab. 4. Click Printer Hard Disk. 5.
3. Click Printer → Setup. 4. Click Configure. 5. Select Hard Disk in the Change drop-down menu. 6. Change the setting of the next drop-down menu to Installed. 7. Click OK twice and close Chooser. Mac OS 10.2, 10.3, 10.4 1. First OS 10.2 a. Activate Print Center: Local Hard Drive → Applications → Utilities → Print Center. OS 10.3, 10.4 a. Activate the Printer Setup Utility: Local Hard Drive → Applications → Utilities → Printer Setup Utility. 2. Highlight the printer name.