Copyright Information Copyright © 2007 by Oki Data Americas, Inc. All Rights Reserved Document Information OkiLAN 7120e Network User’s Guide P/N 59386201, Revision 1.3 February, 2007 Disclaimer Every effort has been made to ensure that the information in this document is complete, accurate, and up-to-date. The manufacturer assumes no responsibility for the results of errors beyond its control.
Table of Contents Configuration . . . . . . . . . . . . . . . . . . . . . . . . . . . . . .5 Introduction . . . . . . . . . . . . . . Specification. . . . . . . . . . . . . Self-diagnostic test . . . . . . . . Configuration utility. . . . . . . . . Available utilities. . . . . . . . . . Using Quick Setup. . . . . . . . . . Using AdminManager. . . . . . . . Installation. . . . . . . . . . . . . . . Interface . . . . . . . . . . . . . . . . File menu. . . . . . . . . . . . . . . Status Menu . . . . . . . . .
Windows 95/98/Me . . . . . Windows NT 4.0 . . . . . . . Windows 2000 . . . . . . . . Windows XP . . . . . . . . . . Novell Netware IPX . . . . . . NetBEUI Protocol . . . . . . . Windows 95/98/Me . . . . . Windows NT 4.0 . . . . . . . Windows 2000 . . . . . . . . Windows XP . . . . . . . . . . Printer driver configuration. . . . . . . . . . . . . . . . . . . . . . . . . . . . . . . . . . . . . . . . . . . . . . . . . . . . . . . . . . . . . . . . . . . . . . . . . . . . . . . . . . . . . . . . . . .
CONFIGURATION Introduction The OkiLAN 7120e is a fast 100BASE-TX/10BASE-T network interface card for a range of Oki printers. This user’s guide explains the functionality of the OkiLAN 7120e. Access for interconnection and producing self-diagnostic test and configuration printouts is provided via an interface panel at the rear of the printer. This network interface card supports IEEE802.2, IEEE802.3, Ethernet-II and SNAP and can detect those frame types automatically.
Specification Frame types IEEE 802.2 IEEE 802.
From this the Ethernet address is: 00:80:92:12:34:56 Restrictions 1. The printer can not receive data from either the Centronics or the USB interfaces with OkiLAN 7120e installed. To use these remove OkiLAN 7120e. 2. Set "Buffer Print" in the printer menu "I-Prime". Missing data or other unexpected problem occurs when anything else ("Invalid" or "Buffer Clear") is selected. 3. When the printer is off-line, the status displayed on WEB/ AdminManager/TELNET may not be correct. 4.
Utility Features AdminManag Configure the OkiLAN 7120e er in detail. System requirements Windows95/98/Me/NT4.0/ 2000/XP (TCP/IP protocol or IPX/SPX protocol should be installed). To create a NetWare queue, NetWare Client 32 or IntranetWare Client should be installed in your system. Web browser Configure the print server and printer by using a Web browser such as Microsoft Internet browser or Netscape Navigator. Microsoft Internet Explorer Version 3.0 and higher or Netscape Navigator Version 3.
This utility must be used on a PC that is located in the same segment as the printer. To create a NetWare queue, NetWare Client 32 or IntranetWare Client should be installed in your system. The following explanation uses Windows 98 as an example. 1. Insert the CD-ROM into the CD-ROM drive. The Setup Utility starts automatically. If it does not start, double-click autorun.exe on the CD-ROM. 2. Select [Optional Utilities]. 3. Select [Install Network Setup Utility]. 4. Select the appropriate language.
To create a NetWare queue, NetWare Client 32 or IntranetWare Client should be installed on to your system. The following explanation uses Windows 98 as an example. Installation 1. Insert the CD-ROM into the CD-ROM drive. The installation starts automatically. If it does not start, double-click autorun.exe on the CD-ROM. 2. Select [Optional Utilities]. 3. Select [Install Network Setup Utility]. 4. Select the appropriate language. 5. Select [OKI Device Standard Setup]. 6.
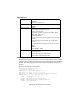
Status Menu In the [Status] menu, the following items can be selected: Item Function Printer Status Current printer status is displayed. System Status Displays current OkiLAN 7120e configuration. Configuration data can be saved as log file. List of Configuration Items Displays current OkiLAN 7120e configuration. Configuration data can be saved as log file.,.
> NetBEUI > SNMP > SMTP > Maintenance > Printer Port The following section explains each tab’s functionality. Depending on your printer, some items in the following explanation may not be displayed. General Tab This allows you to set or change the root password used for Admin Manager and FTP. Location Comments Change root password You can set/change the root password for AdminManager and FTP. TCP/IP Tab This allows you to configure TCP/IP related items.
Location Comments WINS Server... Set IP addresses for WINS primary and secondary servers; set scope ID Netware Tab This is where you can configure NetWare related items. Location Comments Use NetWare Protocol Set NetWare protocol as enabled/disabled. Print Server Name Set Print Server name. Frame Type Set primary NetWare frame type. Operation Mode Set NetWare mode. Check box besides Bindery Setup Check if you want to use the Bindery mode and Bindery Setup button becomes available.
NetBEUI Tab This allows you to configure NetBEUI related items. Location Comments Use NetBEUI Protocol Set NetBEUI protocol to enabled/disabled. Short Printer Name Set a computer name for the print server. Workgroup Set a work group name to which the print server belongs. Comment Set the comments for the print server. SNMP Tab This allows you to configure SNMP related items.
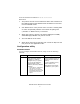
Location Comments Printer Trap Setup . . . By selecting the button, the following dialogue box is displayed: In the dialogue box, the following items can be configured: Printer Trap This community name is assigned to Community Name outgoing printer status traps such as off-line, paper out, etc. TCP#1—5 Set the IP address to which a Trap packet will be sent. You can set up to five IP addresses. Detail . . .
Location Comments Printer Trap Setup . . . Detail . . . Insert JAM Set sending a Trap, enabled or disabled, when an Insert JAM occurs. Park JAM Set sending a Trap, enabled or disabled, when a Park JAM occurs. Paper Lever ALARM Set sending a Trap, enabled or disabled, when a Paper Lever Alarm occurs. Cover Open Set sending a Trap, enabled or disabled, when the printer cover opens. Feed JAM Set sending a Trap, enabled or disabled, when an Feed JAM occurs.
Location Comments Printer Trap Setup . . . Detail . . . Paper Out Set sending a Trap, enabled or disabled, when paper is out. Printer Error Set sending a Trap, enabled or disabled, when the printer error occurs. Exit JAM Set sending a Trap, enabled or disabled, when an Exit JAM occurs. Insert JAM Set sending a Trap, enabled or disabled, when an Insert JAM occurs. Park JAM Set sending a Trap, enabled or disabled, when a Park JAM occurs.
E-mail (Send) Tab In E-mail (Send) tab, you can configure SNMP related items. Location Comments Use SMTP Set sending E-Mail via SMTP, enabled or disabled. Transmit Protocol SMTP Server Address/Name Set IP address or host name of SMTP server. Reply-To Address Set the E-Mail address that is used in the [Reply-To] field in the mail header. E-Mail Address Set the E-Mail address that is used in the [From] field in the mail header.
Location Comments Advanced . . . By selecting the button, the following dialogue box is displayed: In the dialogue box, the following items can be configured: SMTP Port Number Set port number of SMTP. Signature Set up to four signature lines. Signatures added to the bottom of an E-Mail.
Maintenance Tab Location Service Comments Use TCPIP Protocol Set TCPIP Protocol, enabled or disabled. Use NetBEUI Set NetBEUI Protocol, enabled or disabled. Protocol IP Filter Setup… Use FTP Service Set FTP service, enabled or disabled. Use TELNET Service Set TELNET service, enabled or disabled. (Not supported.) Use Web Service Set Web service, enabled or disabled. Use SNMP Service Set Web service, enabled or disabled. Use STMP Service Set Web service, enabled or disabled.
Printer Port Tab Location Comments lP Port BOJ String Set an appropriate command sequence to be sent to the connected printer before printing job when data is sent to lp logical printer port.
Location Parallel Port Detail… Comments Page Width Set page width when data is sent to sjis/euc logical printer port. If the width of one line exceeds this value, Carriage Return and Line Feed are inserted automatically. The options available are from 0 to 255 (default 78). The value 0 means no limitation of the line width. Page Length Set page length when data is sent to sjis/euc logical printer port.
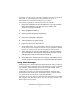
Setup by HTTP This selection opens the printer’s web page. Log in to view and change printer and print server settings. You can also view the printer status and perform certain maintenance functions. The username is [root]. The default web password is the last six characters of the Ethernet (MAC) address (case sensitive: any alphabetical characters must be in upper case).
Option Menu In the [Option] menu, the following item can be selected: Item Function Use TCP/IP Protocol If this item is selected, AdminManager uses TCP/IP protocol to search/configure network interface cards. Use IPX/SPX Protocol If this item is selected, AdminManager uses IPX/SPX protocol to search/configure network interface cards. Environment Setup TCP/IP Tab Set broadcast addresses that are used to search Oki network interface cards using the TCP/IP protocol.
such as Microsoft Internet Explorer Version 3.0 and higher, or Netscape Navigator version 3.0 and higher. No guarantees are offered for other browsers. Refer to the relevant manuals for details of how to launch and use the browser. Web User Name and Password To apply configuration changes using a Web browser, you will be prompted for a username and password.The username is [root]. The default Web password is the last six characters of the Ethernet (MAC) address (any alpha characters must be in upper case).
Netscape Navigator a. Select [Settings] in the [Edit] menu b. Click [Cache] in [Details]. c. Select [Once per session] in [Document in cache is compared to document on network]. d. If you change the window size of the browser immediately after changing the configuration, the [Security information] may be displayed. Uncheck [Display this message next time] in the dialogue. Using SNMP The printer and network card can be managed via standard third-party SNMP management software.
PrintSuperVision’s main functions are: > Maintaining the list of printing devices and organising them in logical groups. > Initially discovering and configuring printers connected to the network. > Locating printers visually on maps. > Monitoring devices over time and saving data for statistical reports. > Sending email alerts when events occur that affects the functionality of printers. > Statistical reports about usage of printers. > Tracking maintenance data related to printers.
Operating System Servic IIS1 e Pack MDAC and .Net Framework Windows XP Professional 1.0 IIS installed as an option. Available in the Windows XP CD. Install IIS before installing .Net framework. MDAC and .Net Framework available for download from Microsoft. MDAC 2.7 and .Net Framework Version 1.0.3705 included as part of PSV install. Windows 2000 Professional 2.0 Internet Service Manager included in the OS. Available in the Windows 2000 CD. Install IIS before installing .Net framework. 2.
Installation To install the Print SuperVision utility WindowsXP/2000/NT4.0 requires administrator privileges. 1. Insert the CD-ROM into the CD-ROM drive. The Setup Utility starts automatically. If it does not start, double-click Autorun.exe on the CD-ROM. 2. Select [Optional Utilities]. 3. Select [Install PrintSuperVision]. 4. Follow the on-screen instructions. In the [Edit Data] screen, you can specify a port number for PrintSuperVision (default 80). 5.
In some cases, an empty [Okidata/PrintSuperVision/] directory may be left behind. Delete the directory manually. Printing utility Oki LPR The Oki LPR Utility is a utility that allows printing data to printers connected to the network via TCP/IP. This utility is for use with Windows XP, Windows 2000, Windows Server 2003, Windows Me, Windows 98, Windows 95 and Windows NT4.0. The utility is for those Oki printers which support TCP/IP and redirects printing data to the lpr port of the specified IP address.
To install the Oki LPR utility The Oki LPR utility requires that the TCP/IP protocol should be installed into your Windows system. To install the TCP/IP protocol into your Windows system consult your Windows manual. Windows XP/2000/NT4.0 requires administrator privileges. 1. Set up the printer driver by designating the output destination to [Local Printer (LPT1:)]. For information on setting up your printer driver, see the printer user manual. 2. Insert the CD-ROM into the CD-ROM drive.
12. Select [Add Printer] on the [Remote Print] menu. 13. Click [Discover…] to search for the IP address of a suitable printer on your network. Highlight the printer you will use and click [OK]. If your printer is not discovered, click [Cancel] and you can type the IP address directly at [IP Address:]. 14. Enter an IP address at [IP Address] and click [OK]. A printer is added to the main window. Refer to the On-line Help for information on how to use the utility. Uninstallation 1. Stop the Oki LPR Utility.
MICROSOFT WINDOWS Overview This section provides guidelines on how to print over the network from various Microsoft Windows platforms. There are numerous ways of printing from Windows and the exact set-up will vary depending upon your environment. There are also numerous versions of Windows, which can be configured as either a client, server or both. Although there are many variants of Windows, the principles of network printing are the same.
Installation of TCP/IP Protocol There are a number of options available when printing using TCP/IP for Windows. The following table lists the options: Windows Version Method Win 95/98/Me Oki LPR Utility NT 4.0 Oki LPR Utility Microsoft LPR1 Windows 2000/ Windows XP Oki LPR Utility Microsoft LPR1 Port 91001 IPP1 1 These functions are built into Windows and are displayed as options when using the Add Printer Wizard.
2. In the [Control Panel] double-click on the [Network] icon. 3. In the [Network] dialogue box click the [Configuration Panel]. 4. If the [Client for Microsoft Networks] is not listed, click the [Add] button. 5. In the [Select Network Component Type] dialogue box, select [Protocol] then click the [Add] button. 6. In the [Select Network Protocol] dialogue box, select [Microsoft] from the list of manufacturers, then select [TCP/ IP] from the list of network protocols, then click [OK]. 7.
1. If the TCP/IP protocol is not listed, in the [Local Area Connection Properties] dialogue box, click the [Install] button. 1. In the [Select Network Component Type] dialogue box, select [Protocol] and click the [Add] button. 2. In the [Select Network Protocol] dialogue box, select [TCP/IP Protocol] and click the [OK] button. 3. Click the [Close] button in the [Local Area Connection Properties] dialogue box. 4. Click the [Close] button in the [Local Area Connection Status] dialogue box.
Connect the printer to the network and turn on. Place the CD-ROM in the CD-ROM drive. The set-up utility starts automatically. If the set-up utility does not start, double-click on autorun.exe in the Windows folder of the CD-ROM. Some steps may not display depending on the network protocols installed. 1. Select [Optional Utilities]. 2. Select [Install Network Set-up Utility]. 3. Select the appropriate language. 4. Click [Next] at Welcome screen. 5.
Consult your network manager to ensure that the NetWare file server is properly installed and working on the network. Make sure that NetWare Client32 or IntranetWare Client is installed on your computer. 10. Click [Next]. 11. On selecting [Yes] you will be asked if [You set-up the queue from the Wizard]? Do you use the NetBEUI protocol? 12. Using NetBEUI makes it easy to manage your Oki product and print within the network environment of Windows. 13. Confirm your configuration.
OkiLPR Please follow the procedure described in the Windows 95/98/Me section on page 38. Microsoft LPR To install this port, the following needs to be carried out. 1. Select [Start], [Settings], [Control Panel] and then select [Printers]. 2. Select [Add Printer] Wizard. 3. Select [My Computer] and then [Next]. 4. Select [Add Port]. 5. Select [LPR Port] and then [OK]. 6. In [Name or address of server providing lpd] type the host name or IP address of the host for the printer you are adding. 7.
5. The Windows NT installation CD-ROM may be required. Follow the remaining dialogue box prompts. Windows 2000 Windows 2000 requires administrator privileges. With Windows 2000, there are four options for printing using TCP/IP. > OkiLPR > Microsoft LPR > Port 9100 > IPP In order to use Microsoft LPR, it must first be installed on your system. OKIL PR Please follow the procedure described in the Windows 95/98/Me section on page 38.
Port 9100 1. Select [Start], [Settings], [Control Panel]. 2. Open the [Printers] folder. 3. Double-click [Add Printer] and then select [Next]. 4. Select [Local Printer], clear the [Automatically detect my printer] check box and then click [Next]. 5. Select [Create a New Port] and select [Standard TCP/IP Port]. 6. Select [Next]. 7. The [Welcome to the Add Standard TCP/IP Printer Port Wizard] will appear. 8. Select [Next] and provide the following information.
3. Double-click [Add Printer] and then select [Next]. 4. Select [Network Printer]. 5. Select [Next]. 6. Type printer URL in text box labelled [Connect to a printer in the Internet or your Intranet], e.g. http://192.168.1.31/ipp/ ip]. 7. Select [Next]. 8. Install printer driver. Windows XP Windows XP requires administrator privileges. With Windows XP, there are four options for printing using TCP/IP.
4. Select [Local printer attached to this computer], clear the [Automatically detect and install my Plug and Play printer] check box, and then select [Next]. 5. Select [Create a New Port] and [Type Standard TCP/IP Port]. 6. Select [Next]. 7. The [Welcome to the Add Standard TCP/IP Printer Port Wizard] will appear. 8. Select [Next] and provide the following information. Enter [Printer name or IP address], for example: 192.168.1.31.
4. Select [Local printer attached to this computer], clear the [Automatically detect and install my Plug and Play printer] check box, and then select [Next]. 5. Select [Create a New Port] and select [Type Standard TCP/IP Port]. 6. Select [Next]. 7. The [Welcome to the Add Standard TCP/IP Printer Port Wizard] will appear. 8. Select [Next] and provide the following information. Enter [Printer name or IP address], for example: 192.168.1.31.
4. Select [A network printer, or a printer attached to another computer]. 5. Select [Next]. 6. Select [Connect to a printer on the Internet or on a home or office network] and type printer URL in text box, e.g. http:// 192.168.1.31/ipp/ip. 7. Select [Next]. 8. Install printer driver. Novell Netware IPX IPX is used with Novell NetWare. The OkiLAN 7120e supports Novell 3, 4, 5 and 6, and allows print jobs to be directed to the appropriate Novell print queue.
Please ensure the NetBEUI protocol has been installed in Windows. This can be confirmed by checking the network settings. If NetBEUI has not been installed please refer to the section below. The relevant Windows installation CD-ROM may be required and you should follow the on-screen dialogue box prompts. Windows 95/98/Me 1. Select [Start], [Settings], and [Control Panel]. 2. In the Control Panel double-click on the [Network icon]. 3. In the Network dialogue box select [Configuration Panel]. 4.
Windows 2000 1. Click the [Start] button, select [Settings] and then click on [Network and Dial-up Connections]. 2. Double-click the [Local Area Connection] icon. In the [Local Area Connection Status] dialogue box, click the [Properties] button. 3. In the [Local Area Connection Properties] dialogue box, if the [NetBEUI Protocol] is not listed, click the [Install] button. 4. In the [Select Network Component Type] dialogue box, select [Protocol] and click the [Add...] button. 5.
Netnbf.inf file and then click [Open]. Now the printer has been configured and NetBEUI has been installed, you can configure Windows to print over the network. Printer driver configuration In the following example, the printer has been configured as follows: Computer Name: OL07DB85 Workgroup: PrintServer Comment: EthernetBoard OkiLAN 7120e 1. Set up the printer driver as the default local printer. 2. In the [Start] menu, select [Settings] then [Printers]. 3.
> Printing cannot be carried out and an error message appears when jobs from other users (including other protocols) are being printed.
NOVELL NETWARE Overview The OkiLAN 7120e supports the Novell NetWare environment. It is necessary to have NetWare Administrator or Supervisor rights to change the configuration. This guide is for NetWare administrators. It should be read in conjunction with the relevant Novell NetWare manual. The latest Novell service packs and Novell client versions should be installed. Supported Versions and Modes NetWare 3.11 + Bindery NetWare 4.
Setup Utilities Use NWAdmin32 or the Pconsole utility to create and setup NetWare printer objects. Please refer to Novell documentation for instructions on how to achieve this. Use the Oki Network Card Setup Utility (AdminManager) or other printer manager software, (Web browser, JetAdmin, etc.) to configure the network interface card. For instructions please refer to the Configuration Utility section and online help. Below is the NetWare configuration page from AdminManager.
> During installation, all files are copied to the SYS:/SYSTEM and SYS:/PUBLIC/WIN32 directories on the NetWare server 1. To set up the OkiLAN 7120e to work with the OKI NDPS Gateway, you should create a NDPS printer object as normal with the nwadmin32 utility. When you get to the [Create Printer Agent] screen, under [Gateway Types] there should now be an option for OKI NDPS Gateway. 2. Select this and click [OK] to continue.
to use the Oki NDPS Gateway. Illustrated here is the Printer Control screen for the completed printer. iPrint iPrint is included in NetWare 6 and is Novell’s next generation of printing software. It is Novell’s implementation of IPP (Internet Printing Protocol). iPrint allows users to install, manage and print to printers through Web browsers regardless of where the printer is physically located or whether they know the printer’s network address.
UNIX Overview The OkiLAN 7120e supports many protocols such as LPD, FTP, TELNET, SNMP and IPP, and works within the UNIX environment. To use the network card within the UNIX environment, the following steps are required: Configuration Network Interface card setting The first step in installing the network card under UNIX is to set up the IP address, Subnet Mask and Gateway. This section explains one way to set them up from a UNIX workstation.
3. Use the ping command to confirm the connection with the card. Example: for IP address 192.168.20.127 # ping 192.168.20.127 If there is no reply, there is a problem with the configuration of the IP address (the IP address has already been set manually or dynamically), or with the network. Reset the network interface card settings to default and try to set a temporary IP address. If you still have the problem after resetting the card, consult your network manager. 4.
3 : Subnet Mask: 255.255.255.0 4 : Gateway address: 192.168.20.1 5 : RARP protocol: DISABLE 6 : DHCP/ BOOTP protocol: DISABLE 7 : DNS Server (Pri.): 192.168.1.2 8 : DNS Server (Sec.): 192.168.1.1 9 : root password: “******“ 10 : Domain: ““ 99 : Back to prior menu Please select (1- 99)? 6. Logout from the network interface card. Turn the printer off and on again to validate the settings.
Operating system configuration This section explains how to configure a printer for major UNIX operating systems. Sun OS 4.x.x (BSD) configuration The following explanation uses Sun OS 4.1.3 and an ML8810 printer as examples. The absolute path of commands and the configuration method may differ between OS versions, so refer to the workstation manuals for more information. If an incorrect IP Address, Subnet Mask or Gateway is entered, the network may go down or other damage may occur.
:lf=/usr/spool/ML8810_lp/ML8810_lp_errs: ML8810_lp The name of the printer queue lp: The name of the device used to connect to the printer. Does not need to be specified for a remote machine. rm: The name of the host of the remote printer. This should be the same as the name added to the /etc/hosts file. rp: The name of the printer on the remote printer. It should be lp. sd: The spool directory. Give the absolute path. lf: The error log file. Give the absolute path. 5.
Sun Solaris 2.8 configuration Admintool is normally used to register remote printers on Open Windows. However, it cannot be used here, as the data recipient and queue have the same name. The procedure below must be used for registering a remote printer. If Sun Solaris is connected to the remote printer for a long period according to the system specifications, errors and forced disconnection may occur.
5. Register the network card as a remote printer server. Example: for host name ML8810 a. Stop the print scheduler. # usr/sbin/lpshut b. Create the printer queue. # /usr/sbin/lpadmin -p ML8810_lp -v /dev/null \ -m netstandard -o dest=ML8810:lp -o protocol=bsd c. Start the print scheduler. # /usr/sbin/lpsched d. Activate the print queue. # /usr/sbin/accept ML8810_lp e.
HP-UX 10.x configuration If an incorrect IP Address, Subnet Mask or Gateway is entered, the network may go down or other damage may occur. Check the address with the network manager. The following example uses HP-UX10.20 and a ML8810 printer as examples. The absolute path and method of configuring commands may differ in other versions of the OS. Refer to the workstation manual for more details. 1. Confirm that the IP address of the printer has been set.
c. Restart inetd # /etc/inetd –c 6. Register the remote printer Example: setting up a queue called ML8810_lp to print to host ML8810 d. Register the remote printer. # /usr/sbin/lpadmin -pML8810_lp -v /dev/null -mrmodel \ -ormML8810 -orplp -ocmrcmodel -osmrsmodel -ob3 e. Activate the print queue. # /usr/sbin/accept ML8810_lp f. Enable the print queue. # /bin/enable ML8810_lp g. Enable the printer spooler.
AIX 4.1.5 configuration The following explanation uses AIX4.1.5 and a ML8810 printer as examples. The absolute path of commands and the method of configuring may differ with the OS version. Refer to the workstation’s manual. If an incorrect IP address is entered, the network may go down or other damage may occur. Configure after consulting the network manager. 1. Log in as [root]. If you do not have superuser rights, the network manager should conduct the configuration. 2.
# smit mkrque b. Select [remote] (the printer connected to the remote host) from [Type of connection]. c. Select [Standard procedure] from Type of remote print. d. Carry out the following settings in [Add a standard remote print queue]. If the configuration differs from below, configure according to environment.
Example: To delete a print job (Job ID 123) on the ML8810_lp # lprm –PML8810_lp 123 Verify the printer status using the lpq command. > The result of lpq may not be displayed correctly depending on UNIX operating system specification. > While the short format of lpq is a UNIX compatible format, the long format is unique to the OkiLAN 7120e. Example of the short format: # lpq –PML8810_lp Example of the long format: # lpq –l -PML8810_lp System V-based UNIX Print using the lp command.
euc must be used for the printing a text file of the EUC Kanji code Logical directory Printer function lp For direct output sjis For Shift JIS Kanji converted output euc For EUC Kanji converted output > jis and euc function only as PostScript printers. > You can not send data to the root directory. 1. Login to the network interface card. When printing with ftp, use any values for name and password. However, if the user name is [root], the password set under TELNET or the utility is required.
Example: changing transfer mode to binary mode and verifying the current mode ftp> type binary 200 Type set to I. ftp> type Using binary mode to transfer files. ftp> 4. Transfer the print data to the network card using the put command. Two methods of file transfer using the put command are available. Example: transferring print data test.prn ftp> put test.prn Example: transferring print data specified by absolute path/users/test/ test.prn ftp> put /users/test/test.prn /lp 5.
TROUBLESHOOTING The network addresses used in this manual are shown for example only. Network addresses used in your installation must be generated from your own network. Self-diagnostic test Printer does not print. Ensure the printer emulation is set to PS or Automatic. NG is printed in the Self-diagnostic test. Flash ROM Check registers NG. Confirm that the network interface card (NIC) is installed correctly and turn the printer off and on again. Initialize the NIC.
TCP/IP Computer cannot find the network interface card. Turn the printer off and on again. Confirm the network interface is enabled on the printer. Check the network cable is correctly connected. The green LED near the network interface should be lit. Otherwise, change the cable and try again. Check there is a response to the PING command. Run the Self-diagnostic test. Check the IP Address, Subnet Mask and Gateway are correct. Check that the TCP/IP protocol is set to Enable.
Check the network cable is correctly connected. The green LED near the network interface should be lit. Otherwise, change the cable and try again. If the standard configuration utility is used, check the NetWare network number in the environment settings. If the NetWare protocol is disabled, set it to Enable. Reset the network interface card to factory default settings. The network interface card is identified by the setup utility but not by the NetWare server.
PostScript error occurs if a Banner Page is printed. A PostScript Banner page cannot be printed in NetWare 3.12 Remote Printer mode. If a PostScript printer is used and a Banner Page is printed, PostScript error is displayed. Turn the banner output Off in the client’s printer settings. NetBEUI The network interface card is not identified. Turn the printer off and on again. Check the network cable is correctly connected. Change the cable and try again.
Glossary NIC Network Interface Card NDS Novell Directory Service NDPS Novell Distributed Print Services iPrint Internet Print IPP Internet Printing Protocol OkiLAN 7120e Network User’s Guide 72