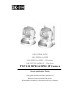
OK-NIP10-A420 OK-NIP10-A420P OK-NIP10-A420G – Wireless OK-NIP10-A420GP – Wireless PTZ X10 MPEG4/JPEG IP Camera Quick Installation Guide This guide describes the basic functions of Network Camera with Pan/Tilt/Zoom. All detailed information is described in the user’s manual.
Warning Before Install Ϩʳ Power off the Network Camera as soon as it is found smoking or smelt unusual. Contact your distributor when such cases happen. Ϩʳ Keep the Network Camera away from the water. If the Network Camera is wet, power off immediately. Contact your distributor when such cases happen. Ϩʳ Do not place the Network Camera around the heat sources, such as television or oven. Ϩʳ Refer to your user’s manual for the operating temperature.
Do not touch the Network Camera when it’s lightening. Ϩʳ Do not disassemble the Network Camera. Ϩʳ Do not drop the Network Camera. Ϩʳ Do not manually pan and tilt the Network Camera when are power is on. Ϩʳ Do not insert any object into the Network Camera, such as needles.
1.
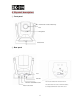
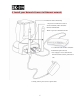
2. Physical description Ϩʳ Front panel Antennas for wireless model only Lens Microphone Status LEDs Ϩ Rear panel A/V out EXT I/O External Mic.. Note the serial number from the label on the unit. Ethernet 10/100 RJ45 socket This serial number is the same as the Ethernet address.
3. Install your Network Camera in Ethernet network Antennas for wireless model only 1. If you have external devices such as sensors and alarms, make connection form I/O terminal block. *Refer to your user’s manual for the I/O 2. Use Ethernet cable to make connection from Ethernet port to the hub. *Use Category 5 Cross Cable when the Network Camera is directly connected to a PC. 3. Finally, connect power cord to a power outlet.
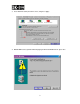
4. Assign IP address 1. Run the “Installer Wizard” under the Software Utility directory from software CD. 2. The program will search the servers or cameras on the same LAN. 3. After searching, the main installer window will pop up. Click on serial number that matches the one you just note from 2. Physical description 4. Click “Link to selected device(s)” to connect the Internet Explorer to the Network Camera.
5. The Internet Explorer Connects to the Network Camera For setup further configuration, please check user’s manual on the software CD.
6. Client Settings (Windows XP/2000/Me/98SE) At the initial access to the “Connection type” page in Windows, the web browser will ask for a new plug-in installation, the plug-in being the Network Camera. This plug-in has been registered for certification and can be used to change the parameters at the client’s site. The user may click on to install the plug-in.
3. Lower down the security level bar to “Low”, and press “Apply” 4. Refresh IE Browser, a question frame will pop-up to ask for download Active-X. press “Yes”.
7. Client Settings (Windows XP SP2) 1. Initial IE browser, select function item “Tools”Ш “Internet Options” 2.
3. Security Settings Ш Download unsigned ActiveX Controls set “Enable” and press “OK” 4.
5. Key-In camera’s IP address and press “OK” on Information Bar. 6. Click the blue bar under the Camera’s IP address in the browser, then choose “Install ActiveX Control” 7. Recover security settings.