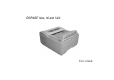
OKIPAGE 14ex, 14i and 14i/n User’s Guide
Preface Every effort has been made to ensure that the information in this document is complete, accurate, and up-todate. Oki assumes no responsibility for the results of errors beyond its control. Oki also cannot guarantee that changes in software and equipment made by other manufacturers and referred to in this guide will not affect the applicability of the information in it. Mention of software products manufactured by other companies does not necessarily constitute endorsement by Oki.
English Table of contents Preface . . . . . . . . . . . . . . . . . . . . . . . . . . . . . . . . . . . . . ii EEC compatibility . . . . . . . . . . . . . . . . . . . . . . . . . . . . ii Energy Star . . . . . . . . . . . . . . . . . . . . . . . . . . . . . . . . . . ii Universal Serial Bus . . . . . . . . . . . . . . . . . . . . . . . . . . . ii Table of contents . . . . . . . . . . . . . . . . . . . . . . . . . . . . . iii Safety instructions . . . . . . . . . . . . . . . . . . . . . . . . . . . . .
Fonts . . . . . . . . . . . . . . . . . . . . . . . . . . . . . . . . . . . . . . 23 What is a font? . . . . . . . . . . . . . . . . . . . . . . . . . . . . 23 Printing a font list . . . . . . . . . . . . . . . . . . . . . . . . . 23 Using fonts . . . . . . . . . . . . . . . . . . . . . . . . . . . . . . . 23 Symbol sets . . . . . . . . . . . . . . . . . . . . . . . . . . . . . . 23 Printer maintenance . . . . . . . . . . . . . . . . . . . . . . . . . . . 24 Maintenance menu . . . . . . . . . . . . . . . .
English Safety instructions This printer has been carefully designed to give years of safe, reliable performance. As with all electrical equipment, however, there are a few basic precautions that should be taken to avoid personal injury or damaging the printer: • Read this setup guide carefully and save it for future reference. • Read and follow all warning and instruction labels on the printer itself. • Disconnect the printer before cleaning. Use only a damp cloth.
2 • The power outlet into which the printer is connected must remain accessible at all times. • The printer has been dropped, or the cabinet is damaged. • Opening any cover may expose hot surfaces. These are clearly labelled. Do NOT touch them. • The printer does not function normally when following the operating instructions. • Do not insert anything into the ventilation slots on the printer; you could get a shock or cause a fire.
English • Small amounts of toner spilled on skin or clothing can be readily removed with soap and cold water. Using heated water will make removing the stain much more difficult. Emergency first aid • IF TONER IS SWALLOWED: Induce vomiting and seek medical attention. Never attempt to induce vomiting or give anything by mouth to a person who is unconscious. • IF TONER IS INHALED: Take the person to an open area for fresh air. Seek medical attention.
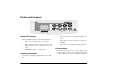
Printer control panel Ready LED indicator • What the printer is doing during normal operation. • When there is a need to add paper or change consumables. • When there is something wrong with the printer. The Ready LED indicator has the following functions: • ON - printer is on-line ready to receive data. • OFF - printer is off-line, cannot receive data. All button functions on the control panel are now active. • BLINKING - printer is receiving data.
English Button functions To access the primary function on a button, press momentarily and release. To gain access to the secondary function, press and hold the button for at least two seconds. MENU 1/Menu 2 When printer is offline: • ENTER/Power Save When in printer menu mode: • When printer is off-line: • Press to access printer menu 1. • Press and hold to access printer menu 2. W/Recover When in printer menu mode: • Press to reverse through items in a menu category.
• Press and hold to print the current Menu Settings. When the display shows MENU HP PCL6, press ENTER. TRAY TYPE/Print Fonts When the printer is off-line: • Press to enter the Tray Type quick menu. • Press and hold to print a sample of all the resident, card and soft fonts present. When the display shows FONTS HP PCL6, press ENTER. FORM FEED/Print Demo Press to print all the remaining data in the printer buffer and eject the page.
English Printer menus It is possible, using the front panel buttons, to change the default configuration of the printer to accommodate software application, specific paper size, method of paper feed and interface connection. The menu structure consists of three levels: Category Each category consists of several items, selected by pressing the MENU 1/Menu 2 button (with the printer off-line). When the required category is displayed, press the ENTER button to display a list of items.
5. The current active parameter is indicated with an asterisk*. To alter the parameter, press the W / Recover and X /Reset buttons. To make a new parameter active, press the ENTER button when that parameter is displayed. 6. To move on to a new item or category, press the MENU 1/Menu 2 button. To exit the menu, press the ON LINE button. The following tables list printer menu selections. Factory default settings are indicated in bold type.
English Level 1 menu settings Category Paper Size Item Manual Tray 2 A4 Size A6 Size Letter Legal 14 A5 Size B5 Size Exec Legal 13 Feeder A4 Size A6 Size Com-9 Monarch C5 Env Exec Legal 13 A5 Size B5 Size Com-10 DL Env Letter Legal 14 Tray 1/ Tray 2 Medium Heavy M Light M Heavy Light Feeder Medium Transpr Light M Heavy Heavy M Light Manual Medium Transpr Light M Heavy Heavy M Light Selects the appropriate print media type.
Level 1 menu settings Category Item Parameter Explanation Copies Copies 1 to 999 Euro Sign Euro Sign Enable Disable Used in certain non-Windows applications to enable printing of the European currency symbol. Font SRC Resident Card Selects the appropriate source for internal printer fonts. If there are no added optional extra fonts, only RESIDENT will appear. Fonts & Symbols Page Layout 1 Page Layout 1 Page Layout 2 Host I/F (14i/n only) 10 Selects the number of copies to be printed.
English Level 2 menu settings Category Item Parameter Explanation Mode 600 300 V1200 (600 x 1200) Autocont Off On The printer can recover from a memory overflow or print overrun automatically after about 15 seconds if set to ON, otherwise Recover key has to be pressed. Auto Operation Wait Time Off 5 sec 90 sec On 6 sec 300 sec Most computer software will send a form feed character at the end of the print job so that the last page is ejected.
Level 2 menu settings Category Parrallel I/F Item I-Prime Off On Frame Auto 802.3 Ether2 802.
English Level 2 menu settings Category Language User’s Guide Item Language Parameter English Francais Castlan Norsk Nederl Portug Deutsch Italian Svenska Dansk Turkce Polski Explanation This settings determines which language is used for LCD messages and menu printing.
Paper Paper and envelope types • The manufacturer of this printer recommends the following guidelines when selecting paper and envelopes for use in your printer: Avoid using paper with perforations, cut outs and ragged edges. • Do not use envelopes with windows or metal clasps. • • Do not use envelopes with self sealing flaps. • Avoid using damaged or curled envelopes. • Paper and envelopes should be stored flat and away from moisture, direct sunlight and heat sources.
English Installing paper 1. 2. Remove the paper tray from the bottom of the printer and place plain paper in the tray, keeping the level of the paper in the tray below the guide marks (1). Adjust the rear paper support (2) to the size of paper being used by lifting up and sliding forwards or backwards as necessary. 3. Adjust the paper guides (3). 4. Replace the tray in the printer. The paper level indicator (4) provides a visual indication of how much paper is left in the tray.
Use the MEDIA TYPE setting in MENU 1 to adjust for different thicknesses of paper. The following table gives the range of paper weight for each media type.
English Toner When to replace toner cartridge Replace the toner cartridge after TONER LOW displays in the control panel LCD. After TONER LOW displays, the printer prints about 100 more pages, then displays TONER EMPTY and stops printing. Printing resumes after a new toner cartridge has been installed. CAUTION: The use of original toner or toner cartridges is highly recommended. Using compatible or counterfeit toner or toner cartridges can seriously damage the printer.
4. Insert the cartridge into the printer, left end (1) first as illustrated. 5. Push the coloured tab (2) forward to release the toner into the toner hopper. 6. Close the top cover and press down to latch it closed.
English Image drum When to replace image drum When the drum reaches 90% of its life, a CHG DRUM message is displayed in the control panel LCD. Change the image drum cartridge when the print becomes faint or begins to deteriorate. Image drum life The life of an image drum depends on a number of factors, including temperature and humidity, the type of paper used, and the number of pages per job. The image drum should last about 20,000 pages of A4 size paper (continuous printing).
3. Install the new image drum (1) into the printer placing the alignment pins on each end into the slots in the printer. 4. Remove the sponge packaging from the image drum and discard. 5. Install a new toner cartridge. Refer to “Replacing toner cartridge”. 6. Close the top cover and press down to latch it closed. 7. Reset the drum counter following the instructions given below.
English Status messages This section expalins the different messages that are displayed on one, or both lines in the LCD of the printer. tttttt = TRAY1, FEEDER, TRAY2 (option). TRAY1 = upper tray TRAY2 = lower tray FEEDER = multi media feeder » Indicates that the second line is a scrolling display. Message Description ON-LINE XXX Indicates the printer is in ON LINE mode. XXX = HP PCL6, FX, PPR, WIN, AUTO. OFF-LINE Indicates the printer is in OFF-LINE mode.
Message ttttt mmm>> PAPER>> REQUEST Description A request for paper of size mmm. tttttt = TRAY1, FEEDER, TRAY2 (option). Memory has overflowed for one of the following reasons. • Too much data on page. MEMORY • Too much macro data. OVERFLOW • Too much DLL data. Press RECOVER to continue. Install extra memory or reduce data on page. The receive buffer memory has overflowed. Press RECBUF RECOVER to continue. The PC ignores printer busy OVERFLOW signal in the interface, check cable pin assignments.
English Fonts What is a font? A font refers to a set of printable characters in a particular typeface of a specific size (e.g. 12 point) and style (e.g. roman, bold or bold-italic). In computer printing, however, this term has been used in a wider context to refer to all sizes and styles of a particular typeface. In printers, fonts may be divided into two basic types: bitmap fonts and scalable (or outline) fonts.
Printer maintenance Maintenance menu Function This menu is used for printer maintenance and setting some operating functions. To enter the maintenance menu: 1. Turn off the printer. 2. Press and hold MENU 1/Menu 2 and turn the printer on. USER MNT displays. 3. 4. 5. Press MENU 1/Menu 2 repeatedly to advance to the category required. Press ENTER to start a function. Press X/Reset button to see other options, then press ENTER to select the option required. Press ON LINE to exit.
English Cleaning LED array Clean the LED array whenever a new toner cartridge is installed; if there is faded vertical areas; light printing down a page. 3. Pull down the manual feed tray (1) and adjust the paper guides to the width of the paper. 4. Insert a sheet of A4 plain paper into the manual feed tray. 5. The LCD shows PRINT CLEANING as the paper is fed. The paper emerges from the printer with grey shading and this sheet of paper may be discarded. 6.
Troubleshooting Paper jams 3. The printer may experience a paper jam in one of three areas. The printer status monitor will indicate which area has caused the jam: Check that the rear paper support has not moved from its paper size setting. 4. Remove any paper from the underside of the printer. • INPUT JAM - paper has failed to leave the selected fed tray and enter the internal paper path of the printer. 5. Replace the paper tray.
English 3. Carefully lift out the image drum, complete with the toner cartridge. Be careful not to touch or scratch the green drum surface. 4. Remove any jammed sheets from the paper path. 5. Re-install the image drum, ensuring that it correctly locates into the slots on each side of the printer. 6. Close the top cover and press down to latch it closed. 7. The printer will warm up and commence printing when ready. The page lost through the jam will normally be reprinted.
Symptom Oblong area of faint print appears on each page. Problem Solution Change paper stocks, Drop out caused by using check paper storage paper exposed to high environment or use a humidity. dehumidifier; check toner level. Toner is low and does not Vertical white distribute properly, or the streaking or faint drum is worn out. areas on page. LED array is dirty. Replace toner cartridge. Check drum and replace the drum, if necessary. Contact service. Hardware problem. Contact service. Fuzzy print.
English Symptom Printer’s output is below rated speed. Size of top margin increases with each page printed. Problem Much of the printing delays will be caused by your application. Sometimes purely text documents will print slowly depending on the selected fonts and how they are transferred to the printer. Solution For maximum speed, use text in your document and use a printer resident font. Many software packages assume 66 lines per page, but your Creeping text. Number printer’s default is 64.
Specifications Printing Process: Power Supply: Voltage: Frequency: Power Cable: Physical: Dimensions: Weight: LED array imaging to organic photoconductive drum. 230V±10% to 240V ±10% AC 50/60Hz ±2% 1.8m separate cable, terminated with country specific plug. 215× 345 × 395 mm (H × W × D) Approx. 10 kg with legal/universal cassette installed. Resolution: LED Head: 600 dpi Max.
English Product life: Duty: 15,000 pages per month maximum.
32 OKIPAGE 14ex, 14i, 14i/n
English Index B I Button functions . . . . . . . . . . . . . . . . . . . . . . . . . . . . . . .5 Image drum Life . . . . . . . . . . . . . . . . . . . . . . . . . . . . . . . . . . . . 19 Replacing . . . . . . . . . . . . . . . . . . . . . . . . . . . . . . . 19 Resetting drum counter . . . . . . . . . . . . . . . . . . . . 20 Input paper jam . . . . . . . . . . . . . . . . . . . . . . . . . . . . . . 26 C Cleaning page . . . . . . . . . . . . . . . . . . . . . . . . . . . . . . . .
Installing. . . . . . . . . . . . . . . . . . . . . . . . . . . . . . . . 15 Label types . . . . . . . . . . . . . . . . . . . . . . . . . . . . . . 14 Paper types . . . . . . . . . . . . . . . . . . . . . . . . . . . . . . 14 Transparencies . . . . . . . . . . . . . . . . . . . . . . . . . . . 14 Paper jams . . . . . . . . . . . . . . . . . . . . . . . . . . . . . . . . . . 26 Printer buttons . . . . . . . . . . . . . . . . . . . . . . . . . . . . . . . . 4 Printer control panel Button functions . . . . .
English OKI SYSTEMS COMPANIES Oki Systems (UK) Limited 550 Dundee Road Slough Trading Estate Slough Berks SL1 4LE Tel: +44 (0) 1753 819 819 Fax: +44 (0) 1753 819 899 http://www.oki.co.uk Oki Systems (Ireland) Limited The Square Industrial Complex Tallaght Dublin 24 Tel: +353 (01) 459 8666 Fax: +353 (01) 459 8840 http://www.oki.ie Hawthorn Business Centre Adelaide Industrial Estate Falcon Road Belfast BT12 6HP Tel: +44 (01232) 572 355 Fax: +44 (01232) 572 350 http://www.oki.
36 OKIPAGE 14ex, 14i and 14i/n