OKIPAGE 8w Lite Setup Guide
Preface Every effort has been made to ensure that the information in this document is complete, accurate, and up to date. Oki assumes no responsibility for the results of errors beyond its control. Oki also cannot guarantee that changes in software and equipment made by other manufacturers and referred to in this guide will not affect the applicability of the information in it. Mention of software products manufactured by other companies does not necessarily constitute endorsement by Oki. © 2000 by Oki.
English Table of contents Preface . . . . . . . . . . . . . . . . . . . . . . . . . . . . . . . . . . ii EEC compatibility. . . . . . . . . . . . . . . . . . . . . . . . . . ii Energy Star . . . . . . . . . . . . . . . . . . . . . . . . . . . . . . . ii Universal Serial Bus . . . . . . . . . . . . . . . . . . . . . . . . ii Table of contents. . . . . . . . . . . . . . . . . . . . . . . . . . . iii Safety instructions. . . . . . . . . . . . . . . . . . . . . . . . . . .
iv OKIPAGE 8w Lite
English Safety instructions This printer has been carefully designed to give years of safe, reliable performance. As with all electrical equipment, however, there are a few basic precautions that should be taken to avoid personal injury or damaging the printer: • Read this setup guide carefully and save it for future reference. • Read and follow all warning and instruction labels on the printer itself. • Disconnect the printer before cleaning. Use only a damp cloth.
plugged into the outlet should not exceed 13 amperes. • The printer has been dropped, or the cabinet is damaged. • The power outlet into which the printer is connected must remain accessible at all times. • The printer does not function normally when following the operating instructions. • Opening any cover may expose hot surfaces. These are clearly labelled. Do NOT touch them. • Do not insert anything into the ventilation slots on the printer; you could get a shock or cause a fire.
English • Small amounts of toner spilled on skin or clothing can be readily removed with soap and cold water. Using heated water will make removing the stain much more difficult. Emergency first aid • IF TONER IS SWALLOWED: Induce vomiting and seek medical attention. Never attempt to induce vomiting or give anything by mouth to a person who is unconscious. • IF TONER IS INHALED: Take the person to an open area for fresh air. Seek medical attention.
Printer features 4 • 8 pages per minute (ppm) output • Genuine 300 dpi print head • 100 sheet universal paper feeder • 2 Mb of memory as standard with enhanced memory management • Manual feed for envelopes, transparencies, etc.
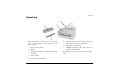
English Unpacking 1 2 3 4 After unpacking the printer and choosing a suitable place to put it, check that you have all the necessary parts to continue: 1. Paper feed and exit tray 2. Printer 3. Image drum cartridge (normally installed inside the printer) 4. Toner cartridge 5. Power cable (not illustrated) Setup Guide 6. Lightproof plastic bag for storing image drum if printer must be shipped (not illustrated) 7. Setup guide (not illustrated) 8.
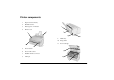
Printer components 1. Paper feed and exit tray 2. Manual feed slot 3. Ready/power on indicator 4. Printer cover 8 1 7 4 6 9. 5 LED array 10. Image drum 11. Toner cartridge 3 2 5. Power switch 6. Power cable socket 7. Parallel interface connector 8.
English Setting up Before connecting this printer to a computer and power supply, the toner cartridge must be installed and paper inserted in the paper tray. Attaching paper input tray 1. Insert the paper tray so that the hooks on the lower edge latch with the printer. CAUTION: Never expose the image drum unit to light for more than 5 minutes. Never expose the image drum unit to direct sunlight. Always hold the image drum unit by the ends.
3. Remove the protective sheet (1) from the image drum (2). 1 2 4. Insert the cartridge into the printer, left end (1) first as illustrated. 1 4. Replace the image drum. 1 Toner cartridge installation WARNING Be careful when handling the toner cartridge. Do not let toner spill on your clothing or other porous materials. 8 1. Remove the tape and shipping insert from the image drum. 2. Shake the toner cartridge to distribute toner evenly. 3.
English Loading paper Note: Please refer to the user guide for the types of paper to use in this printer. 1. Set the left paper guide to the marker for the required paper size and move the right guide to a position slightly wider than your paper width. Printer connection CAUTION: Make sure the printer is disconnected from the power supply and the computer is turned off. The printer can be connected to a computer using one of two methods: • Parallel port connection for Windows.
• Connect the interface cable to the printer first, then connect to the computer. Parallel data connection 1. Connect the interface cable to the parallel socket (1) on the printer. 2. Connect the Type A (small, flat) connector on the other end of the cable to the host computer’s USB port. See ‘Printer driver installation’ for further information on printer installation. Power connection 1. Connect the power cable into the power socket (3) on the printer, then into a grounded outlet. 2.
English Printer driver installation A printer driver is software that accepts data from software programs and applications. It then converts this data into a format that the printer can understand to produce one or more printed pages. Note: Check the Readme file on the disk before carrying out installation of the printer driver. This file may contain information that is required during installation of the printer driver.
10. From the File menu, select Page Setup. Choose the required page size and orientation, then click on the OK button. 3. Click Next and follow on-screen instructions. 4. Insert the CD into the CD-ROM drive. Click Next, then select the CD-ROM drive to search for a USB driver. 5. Click on Next again to install the USB driver following the on-screen instructions. 6. After installing the USB driver, Windows will report that it has detected a new Okipage printer. Windows Parallel connection 1.
English Index C Component identification . . . . . . . . . . . . . . . . . . . . . 5, 6 Connection Parallel interface . . . . . . . . . . . . . . . . . . . . . . . . . .10 Power cable . . . . . . . . . . . . . . . . . . . . . . . . . . . . . .10 USB interface . . . . . . . . . . . . . . . . . . . . . . . . . . . .10 F Features. . . . . . . . . . . . . . . . . . . . . . . . . . . . . . . . . . . . . .4 P Paper Loading . . . . . . . . . . . . . . . . . . . . . . . . . . . . . . . . . .9 Paper types . . . .
OKI SYSTEMS COMPANIES Oki Systems (UK) Limited 550 Dundee Road Slough Trading Estate Slough Berks SL1 4LE Tel: +44 (0) 1753 819 819 Fax: +44 (0) 1753 819 899 http://www.oki.co.uk Oki Systems (Ireland) Limited The Square Industrial Complex Tallaght Dublin 24 Tel: +353 (01) 459 8666 Fax: +353 (01) 459 8840 http://www.oki.ie Hawthorn Business Centre Adelaide Industrial Estate Falcon Road Belfast BT12 6HP Tel: +44 (01232) 572 355 Fax: +44 (01232) 572 350 http://www.oki.