
Printer Developer's Guide
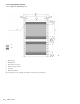

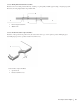
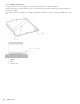
Table Of Contents
- Contents
- 1. Setting Up the Printer
- 1.1. Select a Location
- 1.2 Where to install your printer
- 1.3 Unpacking
- 1.4 Installing the Printer
- 1.5 Installing the Paper
- 2. Using the Printer
- 3. Maintenance
- 4. Troubleshooting and Repair
- 5. Specifications
- 5.1 Introduction
- 5.2 General Specifications
- 5.3 Communication Interface Specifications
- 5.4 Physical Characteristics
- 5.5 Logical Characteristics
- 5.6 Printer Performance
- 5.7 Media Specifications
- 5.8 Paper Feed Specifications
- 5.9 MICR Specifications (Only with MICR type)
- 5.10 Auto Cutter Specifications
- 5.11 Ribbon Specifications
- 5.12 Reliability
- 6. Command Description
- 7. Using the Unitool Printer Driver
- 1. Setting Up the Printer

88
OKIPOS 425D
|
5.7.5.3.7 Binding Holes
Do not use a paper with punched holes. It may invalidate your warranty.
If you choose to use punched paper, be sure to test it thoroughly. Follow these guidelines:
1 Do not print within 5 mm of the hole center.
2 Make sure that paper dust is not left on the paper.
3 If a hole passes over the paper sensor, a false paper end signal may result.
4 Make sure that the edges of holes are even with the paper surface. If they stick up, the printhead may not move
smoothly.
5 The positions of holes should be as illustrated in the figure below.
OP425_26.eps
1 10 or more
2 o 10 (shaded area) Do not print.
3 Binding hole
4 Unit: mm
1
1
11
2
3
4