User’s Guide 80p3gb.
Every effort has been made to ensure that the information in this document is complete, accurate, and up-to-date. Oki assumes no responsibility for the results of errors beyond its control. Oki also cannot guarantee that changes in software and equipment made by other manufacturers and referred to in this guide will not affect the applicability of the information in it. Mention of software products manufactured by other companies does not necessarily constitute endorsement by Oki.
Safety Instructions .......................................................... 4 About the OKIPOS 80 Plus III Printer ........................ 5 What Is in This Book? ............................................. 5 Description of the OKIPOS 80 Plus III Printer ...... 6 Setting Up the Printer ................................................... 8 Unpacking the Printer .............................................. 8 Choosing a Location for the Printer .................... 10 Connecting the Power Cable .......
Safety Instructions Your Oki printer has been carefully designed to give you years of safe, reliable performance. As with all electrical equipment, however, there are a few basic precautions you should take to avoid hurting yourself or damaging the printer: • • Read the setup instructions in this handbook carefully. Be sure to save it for future reference. • Read and follow all warning and instruction labels on the printer itself.
This book also provides some general and technical information about the printer, so you’ll know what the features are, how reliable it is, and what its printing capabilities are. What Is in This Book? Where Can You Find More Information? Who Is It For? This book is an operator’s guide intended for new and experienced operators. If you are going to set up, use, or maintain the OKIPOS 80 Plus III Printer with any point-of-sale system, then this book is for you.
Description of the OKIPOS 80 Plus III Printer • 4.0 inch (approx. 10cm) diameter thermal paper roll, 420 feet (approx. 128m) per roll The OKIPOS 80 Plus III Printer is a stand-alone, 40-column, thermal printer.
Print Characteristics The optional features either replace a standard feature or enhance the operation of the printer. All optional features are installed at the factory and must be selected when the printer is ordered. The OKIPOS 80 Plus III Printer prints characters in a variety of pitches. All pitches are scaleable up to eight (8) times horizontally or vertically.
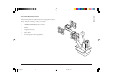
Setting Up the Printer Follow the instructions in this chapter to quickly set up the OKIPOS 80 Plus III Printer. We recommend that you check it out first before you connect it to your system to make sure everything is working properly. You should have it ready to hook up to your system in just a few minutes. Unpacking the Printer Be sure to save the box and packing materials in case you need to send the printer to be serviced. 1.
English Check That All Items Are Present The following items are packed in the box and supplies envelope. If any items are missing, contact your dealer. • OKIPOS 80 Plus III Operator’s Guide • Printer • Supplies Envelope • Paper Roll • Power Supply Unit (if applicable) User’s Guide 80p3gb.
Choosing a Location for the Printer Environmental Conditions The OKIPOS 80 Plus III Printer is designed to be placed on point-of-sale terminals, counter tops, or any other flat stable surface that can support the weight of the printer (about 1.8kg). Please refer to the dimensions when selecting the best possible location. Be aware of the environmental conditions of the location where you place the printer. Generally, the environment in any store is suitable for operating the printer.
The external power supply and AC power cable are ordered and shipped separately. 2. Connect the power cable to the external power supply. 3. Plug the power cable into an earthed three-pin power socket. The printer must be earthed through the three-pin power connector. DO NOT use any ground defeating adapter. 1. Connect the external power supply cable to the power supply connector located on the back of the back of the printer.
Loading and Removing Paper This section describes how to load and remove paper. Change the paper when the Status LED flashes. This indicates that the paper is low. The printer will stop. You must change the paper for the printer to resume operating. 2. Place the paper roll so the paper unwinds from the bottom (front). 3. Close the cover firmly. Put in the New Paper Roll Follow these instructions for loading paper. If this is a new installation, a receipt roll is supplied with the printer. 1.
English Testing the Printer You can test the printer to ensure that it is running properly. The sample on the following page shows what a printout of the test may look like. The test pattern varies depending on the printer model and the character set selected when the printer was ordered. Run the test after loading the paper, but before connecting it to a host system. If the characters do not print properly, check to make sure the paper is installed correctly, and that suitable thermal paper is being used.
Connecting the Cables Refer to the Appendix for information on the serial cable requirements. Now that you have set up and tested the printer, you are ready to connect it to the point-of-sale system. 3. Connecting the Communication Cable Depending on the interface your system uses, connect either the serial or parallel communication cable to the appropriate connector on the back of the printer. Connect the Parallel Cable 1.
Setup Checklist 1. Unplug the AC power cable from the earthed three- pin power socket. Did you follow all of the steps to set up the printer? Here they are again for you to check off. 2. Connect the cash drawer cable to the connectors located on the back of the printer. • Unpack the printer. • Choose a location for the printer. • Check the environmental conditions and the airflow around the printer. • Connect the power cord. • Load the paper. • Test the printer.
Operating the Printer Once the printer has been setup, there is very little that you need to do during daily operation because most functions are controlled by the host system.
English Cleaning the Thermal Printhead Under normal conditions the thermal printhead does not need cleaning. If the print characters are not printing correctly, wipe the thermal printhead with alcohol and a lint free cloth. Do not get any alcohol on any of the other parts of the printer mechanism or the casing. User’s Guide 80p3gb.
RS-232C Communication Appendix The RS-232C interface uses the following protocol and communication characteristics: Cash Drawer Pin Assignments Function Drawer Drive + Drawer Drive Status Signal Status Ground Frame Ground Drawer 1 Pin 4 Pin 5 Pin 2 Pin 3 Pin 6 Drawer 2 Pin 4 Pin 1 Pin 2 Pin 3 Pin 6 • Up to 19.
Parallel Cable The following cable configurations are for different host requirements. Cable Requirements English Serial Cable Configurations The OKIPOS 80 Plus III Printer requires a 25-pin male D-Shell connector at the printer. To connect the printer to most PC’s use a 25-pin male to 25-pin male parallel interconnect cable. 9-pin Serial Cable Pin Assignments Use this cable for OKIPOS 80 Plus III printers connected to PCs or PS/2s with 9-pin serial ports.
Index B buttons ....................................................... 16 C cables connecting ........................................... 14 cash drawer connector pin assignments ................................... 18 character pitch ............................................ 7 character set sample printout ................................... 13 cleaning ..................................................... 16 D dimensions of printer ............................... 10 E environment of printer ........