
Fifty Six manual

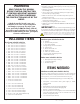


Page 4 www.oldschoolmodels.com Construction Manual
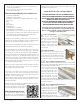
n n Step 3 - Wing Assembly (front spar)
Locate another SP2 from BP1
and this is now glued on top of
the SP1 you just installed. This
will allow the lower and upper
scarf joints to overlap, rather
than be aligned. Again, make
sure that this SP2 is glued to
the SP1 (and the overlapping portion of SP2) below it, as well as
where it contacts the basswood strip. Make sure this joint is straight
as shown here.
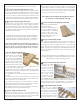
n n Step 4 - Wing Assembly (front spar)
Now locate another SP1 and glue
in place, aligning the laser-cut scarf
joints and making sure it is properly
positioned as the glue cures.
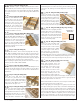
n n Step 5 - Wing Assembly (front spar)
To complete this spar, locate another
of the 1/4” square basswood strips.
Glue this to the edge of the spar
assembly, to the edges of the SP1
and SP2 pieces as shown here. Make
sure it’s flat and straight along it’s
entire length.
n n Step 6 - Wing Assembly (front spar)
Once the glue has cured in the spar assembly, remove it from the
building board and lightly sand it’s surfaces to make sure they are
flat and smooth, removing any glue bumps that may have formed
during the assembly and curing. Don’t go overboard - just make
sure that you have a piece that is flat on all sides so it will slide
smoothly into the ribs during the upcoming steps.
n n Step 7 - Wing Assembly (rear spar)
Now locate two of the 1/8”
square basswood strips, one
SP3 and one SP4 from BP1.
Using these pieces you’ll
make the rear spar, using the
same techniques as you did
for the front spar. Start by
gluing the long edge of SP3
to the basswood strip, making sure it’s straight along it’s length.
Then glue SP4 in place, lining up the scarf joint. Follow it all up with
the other length of basswood glued to the exposed edges of SP3
and SP4. Lightly sand it flat in preparation for the upcoming steps.
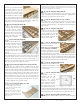
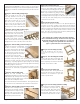
n n Step 8 - Wing Assembly (wing ribs)
Now locate one complete set of
wing ribs. Stack them up in order
by referring to the plans. Starting
at the root: R1, R2, R2, R3, R4,
R4, R5, R5, R4, R4, R4, R4, and
R6. Make sure you align them
correctly with the under-side tabs
all in the same direction. Double,
triple, and quadruple check that you have them in the correct
order, then when satisfied, push the front spar into the larger
rectangular hole in each rib. The rear spar is pushed through the
smaller rectangular hole towards the rear of the ribs.
n n Step 9 - Wing Assembly (wing ribs)
Now place this “assembly”
onto the wing plan on your
building board and start to
carefully space the ribs apart so
they align with the plans. Take
your time and use a light touch
so you don’t break off any of
the underside tabs, or crack any of the ribs. They don’t need to
be perfectly aligned yet, but get them close. Double check that
all the ribs are in the right order one more time as in the next step
everything is locked in place, making this the last time you’ll be able
to easily fix any mix-ups. It’s worth one more look now - trust me.
n n Step 10 - Wing Assembly (wing ribs)
Starting at the tip rib (R6), it’s
time to start gluing things in
place. I like to put a small drop
of medium CA on the bottom of
the underside tabs of this rib to
help lock it in place to the waxed
paper (or you can use pins if
that’s your thing). Also make sure
to use the enclosed triangle that you should have at hand from the
first steps of this build. This ensures that this rib is perfectly aligned
at 90° to the building surface.
Also make sure that the front and rear spar protrude a little from
R6 - maybe an 1/8” or so.
When satisfied, glue the two spars to R6.
n n Step 11 - Wing Assembly (wing ribs)
Now, slowly and methodically work your way towards the root rib,
one rib at a time. Make sure each rib is precisely aligned - the
spars are aligned, and that you firmly glue each rib to both spars.
As you go along, you also might want to place a drop of glue on
the underside tabs on every third or fourth rib to keep everything
aligned with the plans. Continue with this until you have glued the
innermost R4 in place. Stop there and move on to the next step.
n n Step 12 - Wing Assembly (SPACER)
Locate SPACERs from LP1 and LP4. These are just as the name
implies - simply spacers and should NOT be glued into the airframe
at any point.
Notice that the pre-cut rectangular spars holes in R3, both R2’s
and R1 are wider than the spars that are in them. This is to allow
for the dihedral braces that will be attached later on. But you need
to make sure the spacing is correct when gluing the spars in place,
hence the use of the SPACERs.
Use one SPACER piece as a substitute for the front dihedral brace
first, by sliding it into the holes on the R1, R2 and R3 ribs. This
should push the spar towards the rear of the pre-cut slots. Then
do the same with the other SPACER for the rear spar holes - again
pushing the spar towards the rear of the cutouts in each rib.