4oz Popcorn Popper P400/P450 INSTRUCTION MANUAL Page | 1
WARNING Misuse of this machine may result in serious injury. READ ALL INSTRUCTIONS BEFORE USING YOUR POPCORN MACHINE. RETAIN THIS MANUAL FOR FUTURE REFERENCE. • This is not a toy. Please keep away from children. • Use only on a grounded outlet. • Do not use popper for anything other than its intended purpose. • Take proper safety precautions when using this machine. • Do not use outdoors or near water. • Do not leave machine unattended while powered on. • Do not touch hot surfaces.
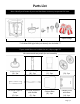
Parts List Note: Identify and locate all parts and hardware necessary to operate this item. Main Unit Kettle Popcorn Accessories Popcorn Bags ** 60‐Watt R20 Light Bulb (not shown) also included. ** If your model does not include the cart, skip to page 10. We recommend two people for cart assembly.
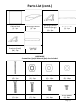
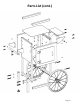
Parts List (cont.) Cabinet Back (I) ‐ 1pc Working Platform (J) ‐ 1pc Handrail Brackets (Small) (M) ‐ 2pc Handrail (N) ‐ 1pc Working Platform Brackets (Large) (K) ‐ 2pc Push Handle (L) ‐ 1pc HARDWARE Screwdriver (1pc) & Wrench (2pc) also included.
Parts List (cont.
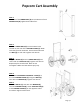
Popcorn Cart Assembly STEP 1: Screw one of the RUBBER FEET (A) into the bottom of each SUPPORT LEG (B). Tighten both rubber feet. STEP 2: Insert one WHEEL BOLT (O) into the bottom holes located on each side of the SUPPORT STAND (C). NOTE: Insert bolt from the inside out. Secure wheel bolts with one NUT (Q) on each side. Tighten with wrench. STEP 3: Hang one WHEEL (D) onto one WHEEL BOLT (O) and secure with one NYLOC NUT (P). Tighten with wrench. Repeat step for second wheel. Note: Do not overtighten.
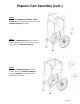
Popcorn Cart Assembly (cont.) STEP 6: Insert both HORIZONTAL SUPPORTS ‐ WITH SCREWS (F) into the grooves at the ends of each SUPPORT STAND (C), as shown. STEP 7: Insert the CABINET BASE (G). Note: Place the lipped side facing down. Line the cabinet base up between the SUPPORT STANDS (C). STEP 8: Confirm the CABINET BASE (G) is locked in place. Secure the SUPPORT STANDS (C) using the SCREWS (V), as shown. Tighten screws with screwdriver.
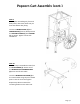
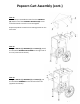
Popcorn Cart Assembly (cont.) STEP 9: Note: Before assembling the front and back panels, determine which side you want the cabinet door facing. Insert the CABINET FRONT (H) and CABINET BACK (I). Secure both panels to the SUPPORT STANDS (C) with SCREWS (V), as shown. Tighten screws with screwdriver. STEP 10: Remove the pre‐assembled screws from the PUSH HANDLE (L). Attach one of the WORKING PLATFORM BRACKETS (K) to one end of the handle.
Popcorn Cart Assembly (cont.) STEP 11: Remove the pre‐assembled screws from the HANDRAIL (N). Attach one of the HANDRAIL BRACKETS (M) to one end of the handle. Insert the screw and tighten. Repeat step above to attach the remaining bracket on the other side. STEP 12: Using four BOLTS (U), WASHERS (R) and NUTS (Q), install the assembled WORKING PLATFORM on the right side of the cart (same side as wheels).
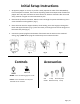
Initial Setup Instructions 1. Set popcorn popper on a level, dry surface. Gently squeeze the sides of the Olde Midway front metal panel to detach, then remove all packing material and wipe inside of kettle and popper with a dry cloth. DO NOT use harsh cleaners or abrasive chemicals. After the initial setup, maintain a regular care and maintenance plan. 2. Place kettle top onto the brackets. Slide the stirrer through the spacer and kettle top, then screw clockwise into the gearbox. (Fig. 1) 3.
Operating Instructions Press KETTLE Button Add Oil Add Kernels Dump Kettle STEP 1: Plug into a grounded 120v electrical outlet only. If using an extension cord, make sure it’s out of the way to prevent tripping. STEP 2: Push WARM switch on. Push KETTLE switch on. Lift lid up with the handle and attach to magnet on the ceiling. Immediately add oil (1 Tbsp per ½ cup kernels), and up to 1‐1/2 kernel scoops (3/4 cup) of popcorn kernels. Close lid. Allow to heat for 3‐4 minutes.
Seasoning Recipes It is recommended that the machine and kettle be cleaned after each use when the popper has cooled. However, waiting to clean after a few popping sessions is acceptable. • Make sure all controls (WARM, KETTLE) are OFF and the popcorn machine is unplugged and cool. • Clean all surfaces with a dry or damp cloth or sponge. NEVER immerse the kettle or any other part of the machine in water. • Do not use abrasive chemicals or cleaners on any part of the machine.
Seasoning Recipes Mix measurements suggested for 8-16 cups popped corn, according to taste. Bacon Parmesan 1/2 cup iodized salt 1/4 cup cooked bacon bits 1/4 cup grated parmesan cheese Combine and sprinkle over popcorn, then toss. Pizza 1 tablespoon Parmesan cheese 1/2 teaspoon dried oregano 1 pinch of red pepper flakes. Sprinkle over popcorn, mix well.