User Manual Doosl Mini Video Projector W13-M
WARNINGS 1. Do not look directly into the projector light. 2. Don't touch the project lens. 3. Mains adapter is used as disconnect device and it should remain readily operable during ntended use. In order to disconnect the apparatus from the mains completely, the mains plug should be disconnected from the mains socket outlet completely. 4. Use of controls or adjustments or performance of procedures other than those specified may result in hazardous radiation exposure. 5.
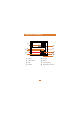
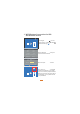
PRODUCT OVERVIEW ʘ ʙ ʖ ʕ ʓ ʔ ʓ ʒ ʓ ʗ ʒ On/of ʓ Arrow Keys ʔ Ok ʖ Set Up ʗ Return ʘ Focusing Ring ʙ Keystone Correction ʕ Model 2
PRODUCT OVERVIEW ʚ ʚ DC Power Socket ʛ ʛ USB1 AV HDMI Port 3.
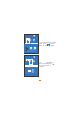
REMOTE CONTROL Power Mute Play/Pause Forward Backward Move Left Move Right Move Up Move Down Input Source Menu Return Volume Down Volume Up STARTING PROJECTOR 1. Connect the projector to the DC power adapter,then turn on the power supply of the adapter, the power indicator light of the body will be on, and the projector will enter the standby state. 2. Start: Press the “ ” button on the projector or the remote control.
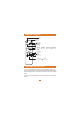
Focusing Ring Keystone Correction Keystone Correction In different angel you put the projector, the projection will Deformation like a trapezoid,use the keystone correction to make it correctly. CONNECTING Press " " of the remote control, enter signal source menu. Use the arrow keys " " and the "OK" to select the signal source.
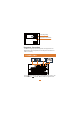
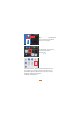
1. Wifi Wireless Connection for IOS and Android device Airpaly Miracast Network settings Click "Signal source " on the remote control, select "MCAST >Network settings " Network Information Network On SSID None Status Enable IP Address MAC Address 0.0.0.0 Select "Wireless" to choose your home wireless network. 94-A4-08-A0-10-74 Network Off Wireless Connected To... SSID ChinaNet-JvA9 Mode None Password Connected Enter the password to connect.
W13-M Airpaly Network settings Miracast If you use an IOS device, please choose "Airplay ", and then wait for the device connection. 6FUHHQ 0LUUHULQJ 6FUHHQ 0LUUHULQJ 0DUVE\WH ;;;; ! " # ! $ % W13-M Airpaly Miracast Networ
W13-M Make sure that your IOS/Android device connect with the same network your projector. For IOS device, open Control Center and tap Screen Mirroring .
Looking for devices that can be mirrored on. Waiting for the connection.Select W13-M on the list. Operation on the projector Signal source >MCAST >Network settings >Wireless> Connect the WIFI>Select Airplay (IOS) /Select Miracast (Android) Operation on the IOS/ Android device connects with same WIFI>Control Center>Screen Mirroing >Waiting connection> Select W13-M What devices can use the wireless connection? 1. IOS devices are only suitable for iPhone, and Ipad; 2.
2. Connect HDMI Devices Using the HDMI cable in the package to connect with projector. (HDMI connection is recommended for projecting movies, videos, and other files which need to be HD.) 1 Turn on your laptop and the projector. 2 Connect the HDMI cable to your laptop's HDMI port. 3 Connect the other end to any available HDMI port on your projector. 4 Press " Source. " of remote control to enter the interface of Input 5 Select HDMI source to project any files on your computer.
The user of windows 7 or over windows 7. Simply press the +P, select “Duplicate” to connect. If the operation above is invalid, Please update the computer graphics driver. 3.
Note: 1. Please kindly note that the adapter was not included in the package. 2. Please also make sure to choose HDMI as the input source after connection. 3. Because there are different versions of Micro USB/ Type C / Lighting to HDMI adapter cable and different models of smartphones, the Micro USB/Type C / Lighting to HDMI adapter cable may not be compatible with your smartphone, and there is a problem that it cannot be connected. Has nothing to do with the projector,you can try another adapter cable. 4.
4. Connect the USB Drive 1 Different from other devices, when you connect a USB drive, directly select the file you want to play on the main menu. 2 To play a video stored in a USB drive, select "Movie" on the main menu, and press the "OK". 3 To play a picture, music stored in a USB drive, select "Photo"/ "Music" on the main menu, and press the "OK". Note: The chip of this projector is not compatible with files stored in a USB stick in PPT format.
PROJECTOR SETTING 1.PROJECTION SETTINGS 1. Click "Menu" of the projector remote control or " " of the projector, enter the setting menu. 2. "PICTURE"/" SOUND"/" TIME"/" OPTION" can be set manually. After you select the properties (PICTURE/SOUND/TIME/OPTION) you want to set, please press "<" or ">"on the operation panel to select the setting range of the properties.
2.
3.
4. OPTIONS RELATED TO "TIME" ARE SET ON THIS SCREEN Sleep Timer Off/10min/20/min/30/min,etc 5.
OPTION MENU OSD Language MODE English, France, Italian, Spanish, etc. Restore Factory Default FUNCTION SSet up the language displayed in the operation Reset the projector Adjust the transparency of menu interface Blending Off, Low, Middle, High OSD Duration Off, 5Sec, 10Sec, 15Sec Adjust the duration of keeping the menu interface Software Update(USB) Update Software Update the projector's software version TROUBLESHOOTING Problems listed below might occur during the operation of your projector.
2. How can I do if the image is up side down? You can use the remote control to find the "FLIP" key, one-click fiip; Or enter Menu-Picture-Projection Direction to fiip the projection image accordingly. 3. How should I do if there are small dots on display? It may be caused during installing or shipping, please contact Seller Support to get the video about how to clean it. 4. How can I do if the image is blurry or out of shape? Adjust focus ring/keystone.
Warning 6tatement This device complies with part 15 of the FCC Rules. Operation is subject to the following two conditions: (1) This device may not cause harmful interference, and (2) this device must accept any interference received, including interference that may cause undesired operation. Any Changes or modifications not expressly approved by the party responsible for compliance could void the user's authority to operate the equipment.