OLIMEXINO-85 Arduino-compatible board USER’S MANUAL Revision B, January 2014 Designed by OLIMEX Ltd, 2013 All boards produced by Olimex LTD are ROHS compliant
OLIMEX© 2014 OLIMEXINO-85 user's manual DISCLAIMER © 2014 Olimex Ltd. Olimex®, logo and combinations thereof, are registered trademarks of Olimex Ltd. Other product names may be trademarks of others and the rights belong to their respective owners. The information in this document is provided in connection with Olimex products. No license, express or implied or otherwise, to any intellectual property right is granted by this document or in connection with the sale of Olimex products.
OLIMEX© 2014 OLIMEXINO-85 user's manual Table of Contents DISCLAIMER............................................................................................................. 2 CHAPTER 1: OVERVIEW........................................................................................5 1. Introduction to the chapter.......................................................................................................5 1.1 Features..........................................................................
OLIMEX© 2014 OLIMEXINO-85 user's manual 7.3 Useful web links and purchase codes...................................................................................20 7.4 Product support.....................................................................................................................
OLIMEX© 2013 OLIMEXINO-85 user's manual CHAPTER 1: OVERVIEW 1. Introduction to the chapter Thank you for choosing the OLIMEXINO-85 from Olimex! This document provides a user’s guide for OLIMEXINO-85. As an overview, this chapter gives the scope of this document and lists the board’s features. The document’s organization is then detailed. The OLIMEXINO-85 development board enables code development of applications running on the AVR ATtiny85 microcontroller, manufactured by Atmel Corporation, USA.
OLIMEX© 2013 OLIMEXINO-85 user's manual 1.3 Board variants There are two major board variants named: OLIMEXINO-85-ASM and OLIMEXINO-85-KIT. The difference between the two versions is that the KIT one comes with no components soldered. The already soldered version is called ASM (short from “assembled”). It is possible that the board or the kit you own has either mini USB connector or USB type B, connector. This might alter the recommended cable.
OLIMEX© 2013 OLIMEXINO-85 user's manual CHAPTER 2: SETTING UP THE OLIMEXINO-85 BOARD 2. Introduction to the chapter This section helps you set up the OLIMEXINO-85 development board for the first time. Please consider first the electrostatic warning to avoid damaging the board, then discover the hardware and software required to operate the board. The procedure to power up the board is given, and a description of the default board behavior is detailed. 2.
OLIMEX© 2013 OLIMEXINO-85 user's manual 2.3 Powering the board The usual way to power OLIMEXINO-85 would be to connect it to your computer via USB cable. The OLIMEXINO-85 has either a USB type B or mini USB connector (based on revision, older revisions have the smaller one) mounted so make sure your cable is suitable. There are two ways of powering OLIMEXINO-85 - either using the default USB powering or by supplying 2.7V to 5V to the GND and the VCC pins of the header. 2.
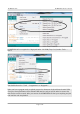
OLIMEX© 2013 OLIMEXINO-85 user's manual OLIMEXINO-85 is recognized as “Digispark 8mhz - NO USB (Tiny Core)” under “Tools → board” You should also set the “Tools → Programmer” to “Digispark”. When you have a program ready to upload you need to disconnect the board from the mini USB! Then press the upload button in the Arduino IDE interface and you will be asked to connect the board in the next 60 seconds.
OLIMEX© 2013 OLIMEXINO-85 user's manual 2.5 Examples and libraries tested by OLIMEX There are number of examples that show different applications of OLIMEXINO-85. They might be downloaded from the software section of the OLIMEXINO-85's own web-page here: https://www.olimex.com/Products/Duino/AVR/OLIMEXINO-85-ASM. 2.6 Reprogramming the ATtiny85 During your work you might accidentally delete the bootloader on the microcontroller or even worse – you might burn the ATtiny85 microcontroller.
OLIMEX© 2013 OLIMEXINO-85 user's manual CHAPTER 3: OLIMEXINO-85 BOARD DESCRIPTION 3. Introduction to the chapter Here you get acquainted with the main parts of the board. Note the names used on the board might differ from the names used below to describe them. For the actual names check the OLIMEXINO85-ASM board itself. 3.1 Layout (top view) The picture below shows top layout of the initial revision of OLIMEXINO-85-ASM. 3.
OLIMEX© 2013 OLIMEXINO-85 user's manual CHAPTER 4: ATMEL AVR ATTINY85 4. Introduction to the chapter In this chapter is located the information about the heart of OLIMEXINO-85 – its microcontroller. The information is a modified version of the datasheet provided by its manufacturers. 4.
OLIMEX© 2013 OLIMEXINO-85 user's manual 8-pin PDIP, 8-pin SOIC, 20-pad QFN/MLF, and 8-pin TSSOP (only ATtiny45/V) Operating Voltage 1.8 - 5.5V for ATtiny25V/45V/85V 2.7 - 5.5V for ATtiny25/45/85 Speed Grade ATtiny25V/45V/85V: 0 – 4 MHz @ 1.8 - 5.5V, 0 - 10 MHz @ 2.7 – 5.5V ATtiny25/45/85: 0 – 10 MHz @ 2.7 - 5.5V, 0 - 20 MHz @ 4.5 – 5.5V Industrial Temperature Range Low Power Consumption Active Mode: 1 MHz, 1.8V: 300 µA Power-down Mode: 0.1 µA at 1.
OLIMEX© 2013 OLIMEXINO-85 user's manual If your AVR programmer has only 10-pin ICSP you can convert it to 6-pin ICSP following the schematic below: Page 14 of 22
OLIMEX© 2013 OLIMEXINO-85 user's manual CHAPTER 5: CONNECTORS AND PINOUT 5. Introduction to the chapter In this chapter are presented the connectors that can be found on the board all together with their pinout and notes about them. Jumpers functions are described. Notes and info on specific peripherals are presented. Notes regarding the interfaces are given. 5.1 USB connector The USB is usually used to establish connection with the Digispark Arduino IDE.
OLIMEX© 2013 OLIMEXINO-85 user's manual GPIO-1 connector Pin # Signal name Processor pin 1 0 5 2 1 6 3 2 7 4 3 2 5 4 3 6 #RST 1 7 GND 4 8 VCC 8 5.3 Jumper description The board has no hardware jumpers. 5.4 Additional hardware components The components below are mounted on OLIMEXINO-85 but are not discussed above.
OLIMEX© 2013 OLIMEXINO-85 user's manual CHAPTER 6: SCHEMATICS 6. Introduction to the chapter In this chapter is located information about the schematics describing logically and physically OLIMEXINO-85. 6.1 Eagle schematic Search-able OLIMEXINO-85 schematics and sources may be found at the device's web page at our web-site: https://www.olimex.com/Products/Duino/AVR/OLIMEXINO-85-ASM/. An image of the schematic might be found on the next manual page for quicker reference.
OLIMEX© 2013 OLIMEXINO-85-ASM user's manual Page 18 of 22
OLIMEX© 2013 OLIMEXINO-85 user's manual 6.2 Physical dimensions Note that all dimensions are in inches. The highest element on the board is capacitor C1 with 0.5 inches of height (includes the PCB height).
OLIMEX© 2013 OLIMEXINO-85 user's manual CHAPTER 7: REVISION HISTORY AND SUPPORT 7. Introduction to the chapter In this chapter you will find the current and the previous version of the document you are reading. Also the web-page for your device is listed. Be sure to check it after a purchase for the latest available updates and examples. 7.1 Document revision Revision, date Changes Modified page A, 27.11.13 Initial manual release All B, 31.01.
OLIMEX© 2013 OLIMEXINO-85 user's manual A place for general questions, FAQ or friendly talk: https://www.olimex.com/forum/. You may may join our IRC channel #olimex @ freenode.net (http://webchat.freenode.net/? channels=olimex).
OLIMEX© 2013 OLIMEXINO-85 user's manual 7.4 Product support For product support, hardware information and error reports mail to: support@olimex.com. All document or hardware feedback is welcome. Note that we are primarily a hardware company and our software support is limited. Please consider reading the paragraph below about the warranty of Olimex products. All goods are checked before they are sent out.