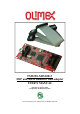
TMS320-XDS100v3 DSP and ARM emulator and adapter USER’S MANUAL Revision E, January 2014 Designed by OLIMEX Ltd, 2013 All boards produced by Olimex LTD are ROHS compliant
OLIMEX© 2012 TMS320-XDS100v3 user's manual DISCLAIMER © 2014 Olimex Ltd. Olimex®, logo and combinations thereof, are registered trademarks of Olimex Ltd. Other product names may be trademarks of others and the rights belong to their respective owners. The information in this document is provided in connection with Olimex products. No license, express or implied or otherwise, to any intellectual property right is granted by this document or in connection with the sale of Olimex products.
OLIMEX© 2012 TMS320-XDS100v3 user's manual Table of Contents DISCLAIMER............................................................................................................. 2 CHAPTER 1 OVERVIEW......................................................................................... 4 1. Introduction to the chapter.......................................................................................... 4 1.1 Features..................................................................................
OLIMEX© 2013 TMS320-XDS100v3 user's manual CHAPTER 1 OVERVIEW 1. Introduction to the chapter Thank you for choosing the TMS320-XDS100v3 emulator from Olimex! This document provides a user’s guide for the Olimex TMS320-XDS100v3. As an overview, this chapter gives the scope of this document and lists the board’s features. The differences between the members of the TMS320XDS100v3 family are mentioned. The document’s organization is then detailed.
OLIMEX© 2013 TMS320-XDS100v3 user's manual 1.2 Target market and purpose of the board The main purpose of the board is programming Texas Instrument's DSP (digital signal processing) chips AND ability to program high-speed ARM targets. The board can also act as adapter to existing scan controllers. The design of the board follows the suggestions and the schematics provided by Texas Instruments. 1.
OLIMEX© 2013 TMS320-XDS100v3 user's manual CHAPTER 2 SETTING UP THE TMS320-XDS100v3 2. Introduction to the chapter This section helps you set up the TMS320-XDS100v3 emulator/adapter for the first time. Please consider first the electrostatic warning to avoid damaging the board, then discover the hardware and software required to operate the board. The procedure to power up the board is given, and a description of the default board behavior is detailed. 2.
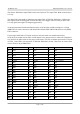
OLIMEX© 2013 TMS320-XDS100v3 user's manual The Olimex XDS100v3 14pin JTAG has the exact layout of TI's 14pin JTAG. Both connector have 0.1'' step. The 20pin JTAG that might be found near the 14pin JTAG of TMS320-XDS100v3. It follows the same signal layout of the original TI XDS100v3 but it uses bigger connector with pin holes with 0.1'' step again (the original TI design suggests 0.05''). As already mentioned boards manufactured after 01.02.
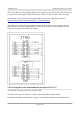
OLIMEX© 2013 TMS320-XDS100v3 user's manual *The entries NA means the standard signal was not routed (was not used for the JTAG connection). It is important to keep signal 6 (TDIS by default) to GND, else the board won't detect the target. A useful table for the relations of the signals might be found at the following web address: http://processors.wiki.ti.com/index.php/JTAG_Connectors#Pinout You might want to trace the above signal connection in the schematic that is located on the next page.
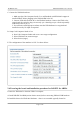
OLIMEX© 2013 TMS320-XDS100v3 user's manual C. Connect the XDS100 hardware 1. Make sure the Code Composer Studio 5.1.x and EmuPack with XDS100v3 support is installed FIRST before plugging in the XDS100 HW to the PC. 2. Connect USB cable from the PC to the XDS100 hardware. Connect the JTAG to the target board (be careful to plug it in correctly: pin 1 should go to pin 1. Red strip usually indicates the side of pin 1) 3.
OLIMEX© 2013 TMS320-XDS100v3 user's manual “C:\Program Files (x86)\IAR Systems\Embedded Workbench for ARM 6\arm\drivers\ti-xds” C. Load a demo project and right-click over the project in the “Workspace” window. Select “Options” and click the “Debugger” group then choose “TI XDS100” from the drop-down menu. Then in the tab under the “Debugger” group go to “TI XDS100” and from the emulator menu select “TI XDS100v3 USB Emulator”. D.
OLIMEX© 2013 TMS320-XDS100v3 user's manual CHAPTER 3 TMS320-XDS100v3 DESCRIPTION 3. Introduction to the chapter Here you get acquainted with the main parts of the board. Note the names used on the board differ from the names used to describe them. For the actual names check the TMS320-XDS100v3 board itself. 3.
OLIMEX© 2013 TMS320-XDS100v3 user's manual CHAPTER 4 INTERFACES AND HARDWARE 4. Introduction to the chapter In this chapter the connectors function will be pointed, the LEDs will be explained, as well as the jumpers. 4.1 Connectors There are five connectors on this board. 3 of them are explained below. The USB connector is type mini and the small testpads for CT-RXD-GND-RTS-RXD-3/30V is named at the silk. Note that both JTAG layouts follows the TI specification (which is different than ARM JTAG).
OLIMEX© 2013 TMS320-XDS100v3 user's manual 4.2 LEDs There are four LEDs on TMS320-XDS100v3. Two for indicating power input and power output and two for the current board-mode. 4.2.1 Power LEDs The PWR_LED shows whether the board is powered. The PWR_EN shows whether the board can power the target. 4.2.2 D3 and D4 The D3 and D4 LEDs show the state of, respectively, J4 and J5 jumpers. 4.3 Jumpers There are two PTH jumpers on TNS320-XDS100v3. They are responsible for the emulation – adapter configuration.
OLIMEX© 2013 TMS320-XDS100v3 user's manual CHAPTER 5 REVISION HISTORY AND SUPPORT 5. Introduction to the chapter In this chapter you will find the current and the previous version of the document you are reading. Also the web-page for your device is listed. Be sure to check it after a purchase for the latest available updates and examples. 5.1 Document revision Revision Changes Modified page# A, 10.09.12 Initial creation B, 25.09.12 Fixed several problems with links.
OLIMEX© 2013 TMS320-XDS100v3 user's manual 5.2 Useful web links and purchase codes The web page you can visit for more info on your device is https://www.olimex.com/Products/DSP/Emulators/TMS320-XDS100-V3/. ORDER CODES: TMS320-XDS100v3 – completely assembled and tested JTAG emulator How to order? You can order to us directly via our internet shop or from any of our distributors. Check https://www.olimex.com/ for more info.
OLIMEX© 2013 TMS320-XDS100v3 user's manual 5.3 Product support For product support, hardware information and error reports mail to: support@olimex.com. Note that we are primarily a hardware company and our software support is limited. Please consider reading the paragraph below about the warranty of Olimex products. Warranty and returns: Our boards components.