Q U I C K S TA RT G U I D E OLIVE O6HD www.oliveHD.
THANK YOU! Congratulations and thank you for the purchase of your Olive O6HD music server, designed for Audiophiles. We have hand-built this O6HD personally for you, so you can enjoy your music the way it was supposed to be heard. Welcome to the exclusive circle of O6HD owners. !"#$%$&'!"#$%"&'#&()*+,#"+#'$-$./#0"#01/#2+"'*304#25/$6/#+/$'#$55#"2/+$0&(.# &(60+*30&"(6#&(#01&6#.*&'/#$('#01/#6$7/0,#&(7"+-$0&"(#5&60/'#&(#01/#3"-25/0/#86/+# 9*&'/#&(#01/#6*22"+0#6/30&"(#$0#:::;"5&%/<=;3"-#>/7"+/#*6&(.
Contents 1 2 2.1 2.2 2.3 3 3.1 3.2 4 4.1 4.2 4.3 4.4 4.5 4.6 5 6 7 7.1 7.2 7.3 8 8.1 8.2 8.3 8.4 8.5 8.6 Package Contents ......................................... 6 Setup & First Steps ....................................... 6 Connecting your O6HD Music Server .............. 6 Navigation Basics .......................................... 9 Connecting to your Network ........................... 13 Importing Music ............................................ 15 Ripping CDs ...................................
1 Package Contents Your Olive O6HD comes with the following items: 1. User Guide 2. Power Cable 3. WiFi Antenna (2X) 4. Remote Control & Batteries Your O6HD may come with a protective film applied to the aluminum shell. Please remove it before you turn on your O6HD. 2 Setup & First Steps 2.
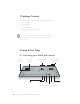
Your O6HD comes with a wide range of connections to integrate into your home entertainment system and network: 1. AUDIO Connect the analog or digital outputs on your O6HD to the corresponding inputs on your receiver. If you have an amplifier with balanced inputs we recommend this connection as it provides the best possible audio performance. 2.
4. USB Connect a USB hard drive to backup and restore your music library (please see Section 8.3 for more info). 5. IR INPUT For connecting an external IR Receiver in case your O6HD is inside a cabinet. 6. POWER Connect the power cord to the O6HD power connector and to the power outlet on your wall. We highly recommend a UPS system to protect your O6HD from power surges and blackouts. Once everything is connected turn on the power switch and your O6HD will start up.
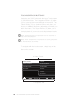
2.2 Navigation Basics 1 Touchscreen 2 Navigation Buttons 4 Player Buttons 5 Sleep/Wake Button 3 Select Button ACCESSING THE MENU Once the Startup Screen appears, tap on the touchscreen (1) or press the Sleep/Wake Button (5) to get to the main menu. We recommend using the Sleep/ Wake Button to put your O6HD to sleep (or wake it). Only switch off your O6HD with the Power Switch on the backside if you do not intend to use it for an extended period of time (e.g. going on vacation).
TOUCHSCREEN OR BUTTONS? Navigate your O6HD with both the huge Touchscreen (1) and the buttons. The Navigation Buttons (2) allow you to move up/down and left/right in the menu. The Select Button (3) is a dynamic button and gives you access to different functions depending on where you are in the menu. The Player Buttons (4) allow you to start playback of your music and skip between tracks. Keep the play/pause button pressed for a few seconds to stop the music playback.
NAVIGATION CONCEPT The user interface on the touschscreen is split into three areas: two Menu Panels (6) and the Navigation Bar (7). The Left Menu Panel shows the main categories, the Right Menu Panel displays the items that can be found under each category. Select an item in the left panel to see what can be found in each category. Select an item in the right panel and the navigation will shift to the left to reveal the items that can be found in the selected category.
A white network logo indicates you have network connection and internet access. An orange network logo indicates you are connected to the network, but have no internet connection. For more information about connecting to your network please refer to Section 2.3. THE MAIN MENU Here is what you will find in each main category: MUSIC LIBRARY Access all the music that is stored on your O6HD. Browse by genre, album, artist, track or playlist.
2.3 Connecting to your Network To start the network setup wizard simply tap on the network logo in the lower right corner of the Navigation Bar or go to SETTINGS > NETWORK SETTINGS > NETWORK SETUP. Please follow these simple steps: 1. CHOOSE YOUR NETWORK CONNECTION Select wired or wireless and the setup mode (automatic or manual). We recommend using the automatic mode as it covers most of the network scenarios. 2.
In rare instances the network login can take several minutes and can happen after the network confirmation window appears (indicating first that the network connection has failed). What if the O6HD does not connect to the network? Here are a few things to consider: DISTANCE The Olive O6HD should not be more than 20 to 30 feet away from your router (wireless connection only). ANTENNA Make sure to connect both WiFi antennas and position them upright.
3 Importing Music 3.1 Ripping CDs To import CDs into your Olive HD Music Server please follow these simple steps: 1. SELECT THE AUDIO FORMAT Go to SETTINGS > CD SETTINGS > CD IMPORT QUALITY and select the quality of the encoding. We recommend FLAC as it preserves the original CD quality while reducing the storage requirement to about 50% of uncompressed music (WAV). Once you set the quality, it will apply to all CDs that you rip. 2.
Your Olive HD Music Server needs to be connected to the internet in order to get album artwork. If album artwork is not available, an Olive logo will appear as a placeholder. The Olive HD Music Server only supports regular Audio CDs. SA-CD and DVD Audio is not supported. 3. RIP THE CD Tap on the IMPORT button and the CD will be ripped. You can check the import status under SETTINGS > SYSTEM SERVICES > RUNNING SERVICES.
3.2 Importing Music from a PC or MAC WHAT YOU NEED 1. Please make sure the PC is connected to the same network as the O6HD. We recommend a wired connection if you are transfering large music libraries. 2. Note the IP address of your O6HD (SETTINGS > NETWORK CONNECTION > NETWORK INFO). IMPORTING FROM A PC (Windows Operating System) 1. Press the WINDOWS + R keys on your keyboard. 2. Enter “\\” into the pop-up window, followed by the O6HD IP address you noted above. !"" # #$#$#$## ! 3.
IMPORTING FROM A MAC 1. Go to GO > CONNECT TO SERVER in the main menu on your desktop (or press COMMAND + K). 2. Enter the IP address of your O6HD, preceded by “smb://” into the pop-up window and click OK. !%&'())# #$#$#$## 3. An “Import” folder will pop-up. Drag and drop your complete music folder from your PC/Mac into the Import folder. Once the music is copied over into the Import folder, the O6HD will import it into the local library and categorize it. This can take several hours for large libraries.
4 Music Library 4.1 Finding Music Select MUSIC LIBRARY from the main menu and browse your music alphabetically by genre, artist, album, track, or album artwork. Choose the SEARCH function in each category and simply enter H ML^ SL[[LYZ VM [OL ^VYK L N ¸*(3 ¹ MVY ¸/V[LS *HSPMVYUPH ¹ ;OL 6 /+ ^PSS UV^ VUS` KPZWSH` T\ZPJ that includes the search term. 4.2 Play Modes Pressing the play/pause button allows you to play your music in different ways depending on where you are in the navigation.
4.3 Playlists To create a playlist simply follow these steps: 1. ADD PLAYLIST Go to MUSIC LIBRARY > PLAYLISTS > ADD PLAYLIST and enter the name of your playlist. 2. PLAY TRACK Play the track you want to add to the playlist and press the SELECT Button. 3. ADD TO PLAYLIST Select ADD TO PLAYLIST in the pop-up window. Choose the playlist you created in step 1 and press SAVE. 4. REPEAT STEPS Choose the next track and repeat step 2 and 3 until your playlist is complete.
4.4 Deleting Music To delete music simply play the track and press the SELECT Button. Choose DELETE in the pop-up window and then select to delete the track or the complete album. To delete a playlist simply highlight the specific playlist and press the SELECT Button. Choose DELETE in the pop-up window. 4.5 Burning CDs You can burn CDs both from albums as well as playlists. To burn an album to CD play a track and press the SELECT Button. Choose BURN ALBUM and insert a blank CD when prompted.
4.6 Editing Music Information To edit the metadata of your music (album title, artist, tracks, artwork etc.) the O6HD features a special web-interface called Maestro. To access this interface please launch the webbrowser on your PC/Mac and enter the following address: http://xx.x.x.xx/maestro.php (Replace the xx.x.x.xx with the Olive HD Music Server’s IP address). Visit the support section at www.oliveHD.com for more details on the Maestro application. Your PC/Mac must be in the same network as your Olive.
5 Internet Radio Internet radio will appear as a separate category in the main menu if the O6HD is connected to the internet. Stations are categorized into genre, region and public & info. To add a station to your FAVORITES you have to play the station, then press the SELECT Button and choose OK in the pop-up window. You can also add your own radio station. Select ADD NEW STATION, enter the station name and then the web address. The stream must be in .pls, .mp3 or .m3u format.
6 Remote Control Your O6HD comes with a standard infrared remote control to allow you to control key functions conveniently from your couch.
7 Music Streaming 7.1 Network Music Player Olive offers its own network music player to allow streaming of music from the O6HD to additional rooms. Therefore, 3rd party network players are not actively supported. 7.2 Streaming from a PC/MAC/NAS to the O6HD The O6HD incorporates local storage to allow quick and reliable access to your music content. Therefore we recommend consolidating your music onto the O6HD’s hard drive, where it is safe from usual computer problems (malware/viruses etc.).
8 Support 8.1 Software Updates Olive constantly updates the software for your product so check regularly if a new update is available. Simply go to SETTINGS > SYSTEM SERVICES and select SOFTWARE UPDATE. If you do not have internet access at home you can also upload the software update via a USB stick. 8.2 Recovery A recovery erases the hard drive of your O6HD and installs the operating system and CD database from scratch.
8.4 Restore The restore process will erase all music on your O6HD and will overwrite it with the music from your backup. Go to SETTINGS > SYSTEM SERVICES and select RESTORE. Follow the on-screen instructions and connect the USB hard drive only when prompted. A pop-up window will confirm when the restore has started. Never unplug the USB hard drive during backup or restore. It can damage your O6HD and erase your music.
WHEN PLANNING NOT TO USE YOUR OLIVE for long periods of time (e.g. vacation, etc.) disconnect the Power Cable from the wall outlet. Always grab the plug, never the cable itself. NEVER PUSH OBJECTS of any kind through the product openings. Never spill liquid of any kind on the product. Contact Olive support if something drops into the case. DO NOT CLEAN YOUR OLIVE WITH aerosol sprays, chemical solvents, alcohol or abrasives. Do not remove dust with air pressure. 8.
Notices Regulation USA This equipment has been tested and found to comply with the limits for a Class B digital device, pursuant to part 15 of the FCC Rules. These limits are designed to provide reasonable protection against harmful interference in a residential installation. This equipment generates, uses and can radiate radio frequency energy and, if not installed and used in accordance with the instructions, may cause harmful interference to radio communications.
(Attention. En France, l’utilisation en intérieur est limitée à la bande de fréquences 2,454-2,4835 GHz.). RF EXPOSURE REQUIREMENTS To comply with FCC and EU exposure essential requirements, a minimum separation distance of 20cm (8 inches) is required between the equipment and the body of the user or nearby persons. Disclaimer DATA LOSS The manufacturer of this device shall not be liable for damage or loss of data including but not limited to music recorded to storage devices.
Layer-3 audio coding technology licensed from Fraunhofer IIS and Thomson.
Warranty For consumers, who are covered by consumer protection laws or regulations in their country of purchase or, if different, their country of residence, the benefits conferred by this warranty are in addition to all rights and remedies conveyed by such consumer protection laws and regulations. This warranty does not exclude, limit or suspend any rights of consumers arising out of non-conformity with a sales contract.
for a particular purpose are limited in duration to the duration of this warranty.