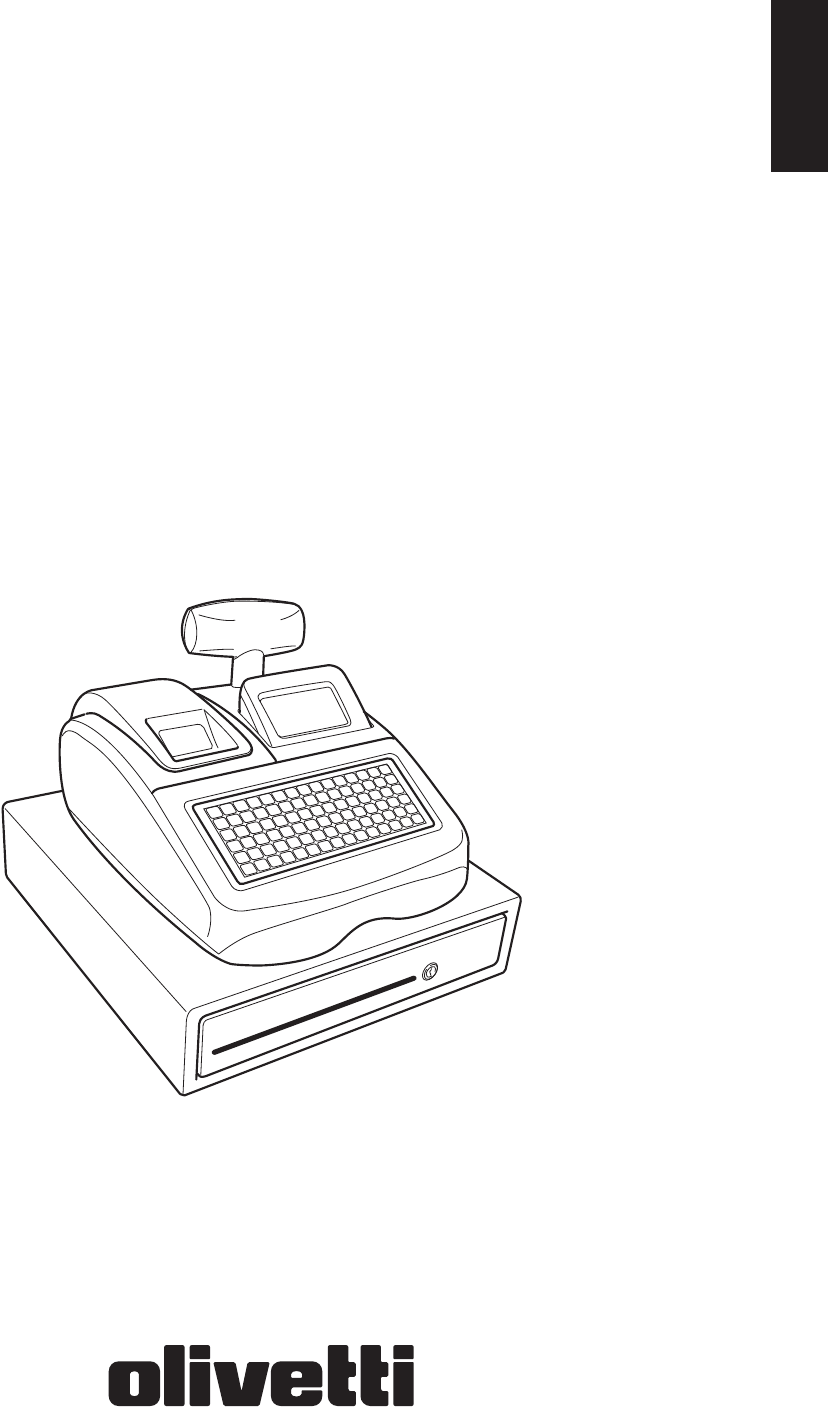
ECR 8220 S USER'S GUIDE ENGLISH Cash Register
PUBLICATION ISSUED BY: Olivetti S.p.A. www.olivetti.
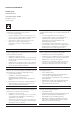
FIGURES - IMAGES ABBILDUNGEN - FIGURAS AFBEELDINGEN - FIGURAS FIGURER - BILDER 3 2 Menu 1 PLU list 1 PLU list 2 12 10 PLU list 3 PLU list 4 PLU list 5 4 receipt on/off PLU alt 6 PLU code 7 PO RA hold recall on/off 5 10 15 20 25 30 35 Price 1 paym Table # new bal 4 9 14 19 24 29 34 Price 2 3 8 13 18 23 28 33 PLU page 1 7 12 17 22 27 32 36 PLU page 2 Table change Table review 9 35 34 33 extra invoice 8 guest # 31 Table 30 separate X/Time 29 EJ
FIGURES - IMAGES ABBILDUNGEN - FIGURAS AFBEELDINGEN - FIGURAS FIGURER - BILDER 3 4 5
SAFETY INFORMATION INFORMATIONS DE SECURITE SICHERHEITSVORSCHRIFTEN INFORMACIÓN DE SEGURIDAD VEILIGHEIDSINFORMATIE INFORMAÇÃO SOBRE SEGURANÇA SIKKERHEDSFORANSTALTNINGER SIKKERHETSINFORMASJON 1 2 3 4 5 1 2 3 4 5 1 2 3 4 5 1 2 3 4 5 1 2 3 4 5 1 2 3 4 5 1 2 3 4 5 1 2 3 4 5 Connect the power cord to an electrical outlet that is near the product and easily accessible. Install your cash register on a flat and stable surface, at a location where no one can step on or trip over the power cord.
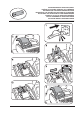
HOW DO I PROCEED? COMMENT JE DOIT PROCEDER? VORGEHENSWEISE ¿QUÉ DEBO HACER A CONTINUACIÓN? HOE GA IK TE WERK? O QUE DEVO FAZER? FREMGANGSMÅDE? HVORDAN GÅR MAN FREM? 1. Plug the cash register into a electrical outlet and insert the batteries. 2. Load the paper. 3. Proceed with Quick Start Programming. 4. Perform basic sales transactions. 5. Get to know your cash register in depth. 1. Brancher la caisse enregistreuse à la prise électrique et insérer les batteries. 2. Charger le papier. 3.
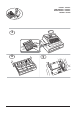
INSERTING MEMORY BACKUP BATTERIES INSÉRER LES BATTERIES TAMPONS DE LA MÉMOIRE BATTERIEN ZUR SPEICHERSICHERUNG EINSETZEN INSERCIÓN DE LAS BATERÍAS DE RESPALDO DE LA MEMORIA INSTALLEREN VAN DE BATTERIJEN VOOR NOODVOEDING INSERIR AS PILHAS DE BACKUP DA MEMÓRIA INDSÆT HUKOMMELSE BACKUP BATTERIER INSTALLERE MINNETS BACKUPBATTERIER
LOADING THERMAL PAPER INSTALLATION DU PAPIER THERMIQUE EINLEGEN VON THERMOPAPIER CARGA DEL PAPEL TÉRMICO THERMISCH PAPIER PLAATSEN COLOCAR PAPEL TÉRMICO ISÆTNING AF TERMOPAPIR LADE TERMISK PAPIR 2 1 3 3 4 57 mm.
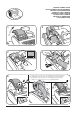
DAILY JOB OPERATIONS OPÉRATIONS QUOTIDIENNES TÄGLICHE ARBEITEN OPERACIONES COTIDIANAS DURANTE EL TRABAJO DAGELIJKSE TAKEN OPERAÇÕES DIÁRIAS DAGLIGE ARBEJDSOPERATIONER DAGELIGE ARBEIDSHANDLINGER Morning startup Démarre du matin Einschalten zu Geschäftsbeginn Puesta en marcha al iniciode la jornada Morgens opstarten Arranque da manhã Oppstart på morgenen Sales transactions Transactions de ventes Verkaufsvorgänge Transacciones de venta Verkooptransacties Transacções de vendas Salgstransaktioner Salgstransaks
NEDERLANDS ESPAÑOL DEUTSCH FRANÇAIS ENGLISH | READ THIS FIRST | À LIRE AVANT DE COMMENCER | | BITTE DIES ZUERST LESEN | | LEA ESTO EN PRIMER LUGAR | EERST LEZEN | IMPORTANT NOTICE FOR THE USER Thank you for purchasing this state-of-the-art cash register.You can program your cash register in one of two ways: by directly using the keypad, as explained in theUser Guide, or by using a specifically designed and intuitive ECR Programming Utility running on acomputer that you connect to your cash register.
NORSK DANSK PORTUGUÊS | LEIA PRIMEIRO | LÆS FØRST HER | | LES DETTE FØRST | AVISO IMPORTANTE PARA O UTILIZADOR Agradecemos a sua preferência na aquisição desta caixa registadora com a mais recente tecnologia.A sua caixa registadora pode ser programada de duas formas: directamente usando o teclado, conformeexplicado no Guia do Utilizador, ou utilizando um Utilitário de Programação ECR intuitivo e foiespecificamente criado para esse fim que é executado num computador que será ligado à caixaregistadora.
CONTENTS Programmable Features .................................... 1 Cash Register Components ............................... 2 Removable Cash Drawer and Box ...................................... 2 Inserting Memory Card Storage Device ............................. 2 Operator and Customer Displays ..................... 2 Short Captions ................................................................ 32 Long Captions ................................................................
Overwriting a Preset PLU Price Associated with a Barcode ...44 Voiding a Complete Sales Transaction .............................44 Voiding the Previous Entry in the Middle of a Sale ........... 45 Refunding Multiple Items .................................................45 Registering Multiple Void and Refund Transactions ..........45 Registering Money Received on Account .........................45 Registering Negative Department Transactions ................45 Registering Product Quantity Transactions ..
• • • • • • • • • • • • • • • • • • • • • • • • • • • • • • • • • • • • • • 99 departments that can be grouped into up to 10 merchandise categories; Up to 3,000 Price Look-Ups (PLU) with the possibility of associating a department and tax status to each; 15 clerk numbers to monitor the sales of individual employees with programmable Clerk security system; Maximum 12,000-line internal Electronic Journal memory, substantially expandable via SD card; Thermal printer with journal record or receipt printing cap
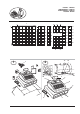
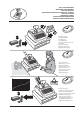
CASH REGISTER COMPONENTS With reference to figures 1 and 2: REMOVABLE CASH DRAWER AND BOX 1. RJ45/USB cable for connecting a PC or barcode reader to the cash register. 2. Customer display. 3. Operator display. 4. Keypad. 5. Cash drawer and box. 6. Cash drawer lock and slot. 7. Item deposit drawer. 8. Power cord. 9. Storage Device (SD) - under printer compartment cover. 10. Printer compartment cover with receipt output window. 11.
REGISTRATION MODE Ref. C.D. (3) n/a Receipts off - no receipts are issued until (3) n/a (Clerk Id.) PROGRAMMING MODE - Operator Display Meaning Ref. (1) is pressed again. Ref. (1) EJ nearly-full condition. Ref. (1) n/a If the Clerk System is active, the clerk number/name is displayed after logon at top left. (Dept name) (Dept Indicates dept number (CD) or no.) dept name (OD) entered. Cash CA Indicates a sales transaction paid by cash. Ref. (2) Ref. (5) Ref. (2) Navigation Mode.
CASH REGISTER FUNCTIONS The cash register functions available on the keypad are described below. Note that not all the functions provided with the cash register are available as actual keys. Some functions are provided in pop-up lists only, while others are not provided at all by default on the keypad, but can be mapped on if required using the Free Key Layout option in “Advanced Settings”. The unmapped functions are described later in the dedicated section (“Unmapped Functions”).
- Pop-up list (1) allowing direct/percent discounts and add-on operations: As the 1% or 2% key, when appropriately programmed, applies a preset percentage reduction or add-on to the price of an item or to the sales total. As the 1 +/- or 2 +/- key, subtracts or adds an amount from/to an item or sales total. 12. - Holds and then recalls a sales transaction so that a second transaction can be performed in the meantime. 13. - Deletes the last incorrect sales item entered. 14.
25. - As the [TOTAL] key totals exact cash transactions, computes change and totals transactions that are split tendered with check, credit card and/or cash. Pressed a second time, prints one or more copies of the last receipt, depending on how multiple receipts are programmed (see “Receipt Printing Mode”). When table tracking is being used, a single copy only of the invoice can be reprinted.
, - These functions can be used to select PLU codes in the ranges 1-35, 201-235 and 301-335, ENGLISH , 36. respectively. PLU codes must be programmed before they can be used for a sales transaction (see the section “Programming PLUs”). To enter one of these codes, press the related [PLU Page x] key and then the [PLU x] key. NOTE: The PLU ranges associated with the [PLU Page x] keys can be modified. 37. - Enters the sales item corresponding to the PLU key.
Entering Department Numbers 1. [DEPT 1] to [DEPT 16] - Enters the department of the corresponding number. 2. [DEPT SHIFT&CODE] - When a [DEPT x] key is pressed after [DEPT SHIFT&CODE], it enters a department number respectively in the range 17 to 32. You can use this key in combination with the numeric keypad to enter any department number from 01 to 99 as follows: [DEPT SHIFT&CODE] (number) [DEPT SHIFT&CODE] where (number) is the department number entered using the numeric keys.
Navigation Keys ENGLISH MENU NAVIGATION MODE Description Turns the operator display on when it is off. Displays the Main menu at any time. NOTE: You must terminate any sales operation first before pressing error will be signaled. Press otherwise an to clear the error. Use these arrow keys to move upwards or downwards through a menu: the symbol >> appears in the right column to indicate a menu. Highlight the option you want and confirm your selection by pressing .
• To enter a space between characters, press • If the same key has to be used for successive letters of a caption, press • Any incorrect character can be canceled by pressing SP . SP between the two letters. which provides the typical backspace function of the PC environment. • To toggle between capital letter ON/OFF, press • Confirm your final caption by pressing • To exit Data Entry mode, press EXIT ENTER CAPS . . . B Example: Enter the word BOOKS.
This section allows you to program basic cash register features so that you can start to work right away with your new product. Programs and transaction information for management reports are stored in the memory of the cash register which is protected by back-up batteries. CAUTION: Remember to Insert Batteries.
SETTING THE DATE FORMAT 1. Press to activate the menu system. 2. Select Programming Mode -> Configuration Setup -> Initial Setup -> Date FORMAT. 3. Press 4. Press until the date format you require is displayed. . SETTING THE DATE 1. Press to activate the menu system. 2. Select Programming Mode -> Configuration Setup -> Initial Setup -> Date setup. 3. Type the current date in the format you have selected. 4. Press . NOTE: The date format can be changed at any time.
PROGRAMMING MODE MENU ENGLISH For how to use the Programming Mode submenus, refer to the following sections: • Sales Programming - "Sales Programming" • Configuration Setup - "Configuring Your Cash Register" • Programming Dump - "Printing Programming Reports" • Training Mode On/Off -"Activating Training Mode" • SD Maintenance -"Using the Memory Storage Device (SD)" • System Initialization - "Setting Your Language and EJ/PLU/table tracking Requirements". SALES PROGRAMMING All sales programming is optional.
PROGRAMMING DEPARTMENTS A department can be programmed using the following options. Remember that department keys can be mapped onto the keypad using the Free Key Layout option in the Advanced Settings menu. A total of 99 departments can be programmed. Select Programming Mode -> Sales Programming -> Department. Navigate to the field you want to personalize and enter its data (see “Data Entry Mode” for the keys to use).
Up to 3000 PLUs can be programmed. You can associate a specific sales item with each PLU code, specifying its name, price (that can be fixed or overridable), VAT rate and department. When programming a PLU you can either type in the numeric code or, if you have a barcode reader, you can scan the barcode of the article to input the code automatically rather than typing it in.
PROGRAMMING PERCENTAGE DISCOUNT/ADD-ON KEYS Two functions %1 and %2 are present in and can each be programmed to apply either a percent discount or a percent add-on to a sale. A default rate can also be programmed: either a fixed rate or one that can be overridden at transaction time; and applicable either to an individual item or to the sales transaction total. If no rate is programmed, it must be entered during the sales transaction.The procedure is the same for both keys.
You can program up to four different foreign currency exchange rates. The foreign currency value is displayed when is selected during a sales transaction. Select Programming Mode -> Sales Programming -> Foreign Currencies. Navigate to the field you want to personalize and enter its data (see “Data Entry Mode” for the keys to use). At the end, you can press to return to the Main menu, to return to the previous menu or to skip to the next form in sequence.
CREATING A RECEIPT HEADER AND FOOTER By default your cash register prints a header on all customer receipts. The default personalizable receipt header consists of up to 10 lines of 24 characters each. The cash register can also print a personalized footer which also consists of 10 lines of 24 characters each. You can change the cash register's default header or footer using the keypad and/or Character Table (see Figure 12 at the back of the manual) to enter the characters you want.
An invoice is issued automatically when a transaction involving table tracking is finalized with a payment. The caption INVOICE appears on the receipt together with the Invoice message. You can print a single additional copy of the invoice key, the caption INVOICE COPY appearing on the second invoice. See "Invoice Printing Mode" for by pressing the more details. To modify the Invoice message: 1. Select Programming Mode -> Sales Programming -> INVOICE MESSAGE. 2.
INITIAL SETUP Select Programming Mode -> Configuration Setup -> Initial Setup. Navigate to the field you want to personalize and enter its data (see “Data Entry Mode” for the keys to use). At the end, press to return to the Main menu or to return to the previous menu. Menu Item Possible Values Description DATE FORMAT DDMMYY, MMDDYY Choose the date format from the two possibilities available. DATE SETUP (Current date) Enter date using the format specified for DATE FORMAT above.
Possible Values Description VAT Calc Mode VAT, ADD-ON Tax rate to apply to calculations: ADD-ON - Add-on tax rate, VAT - Value Added Tax. Tax1 Rate (Numeric) Enter a 5-digit number to represent the VAT rate to associate with Tax Rate 1 - THREE digits come after the decimal point. Tax2 Rate (Numeric) The same criteria apply as for entering Tax 1 rate. Tax3 Rate (Numeric) The same criteria apply as for entering Tax 1 rate. Tax4 Rate (Numeric) The same criteria apply as for entering Tax 1 rate.
RECEIPT PRINTING MODE You can program the type of information you want the cash register to print on the customer receipt according to your business or country’s requirements. Select Programming Mode -> Configuration Setup -> Receipt Printing Mode. Navigate to the field you want to personalize and enter its data (see “Data Entry Mode” for the keys to use). At the end, you can press to return to the Main menu or to return to the previous menu.
Sample Receipts The following receipt is a typical receipt issued by the cash register. Printing VAT Information on Customer Receipts Receipt with Sales Total with VAT - Total Taxable option enabled. Time Date Machine number Consecutive receipt number Clerk number or assigned name Item price with department VAT rate identifier Overall sales total with VAT Receipt with Sales Totals Without VAT - T Txbl W/O Tax option enabled.
INVOICE PRINTING MODE When using table tracking, an invoice is issued when a sale is finalized and optionally a business receipt (see "Creating Automatic Business Receipts"). For the invoice, you can program the font, header/footer and if the ABR should be issued automatically afterwards. Select Programming Mode -> Configuration Setup -> Invoice Printing Mode. Navigate to the field you want to personalize and enter its data (see “Data Entry Mode” for the keys to use).
You can program what you want to see in reports and the fonts to be used. Select Programming Mode -> Configuration Setup -> Report Printing Mode. Navigate to the field you want to personalize and enter its data (see “Data Entry Mode” for the keys to use). At the end, you can press to return to the Main menu or to return to the previous menu.
INDIVIDUAL CLERK With the Clerk System active, you can assign an operational status to each clerk that defines whether the clerk can perform certain types of transaction. You can then also define a 3-digit password that the clerk must enter to operate the cash register. Listed in the table below are the activities that you can enable or disable for each clerk. Select Programming Mode -> Configuration Setup -> individual Clerk.
Possible Values Description EJ System STNDARD, DYNAMIC, ON SD Set operation mode for EJ: STNDARD - Standard Mode - data is registered sequentially with memory nearly-full condition signaled (an indicator appears at bottom left of display). See below for further details. DYNAMIC - Dynamic Mode - data is registered cyclically in memory, starting again from the first line when memory is full. No memory full condition is signaled.
FUNCTION KEY SETUP You can program various parameters that affect how these function keys operate: • CASH, CHECK, CHARGE, CREDIT1, CREDIT2, CREDIT3, CREDIT4, CREDIT5, CREDIT6 • PO/RA • #/NS Select Programming Mode -> Configuration setup -> Function key setup. Navigate to the field you want to personalize and enter its data (see “Data Entry Mode” for the keys to use). At the end, you can press menu or to return to the Main to return to the previous menu.
You can set up manager passwords, change how the keys are configured on the keyboard, program key sequences and report printing. Select Programming Mode -> Configuration Setup -> Advanced settings. Navigate to the field you want to personalize and enter its data (see “Data Entry Mode” for the keys to use). At the end, press to return to the Main menu or to return to the previous menu.
Menu Item Description Popup List Function The cash register has four [POPUP LIST x] keys for sales functions: , , , . A fifth key, [POPUP LIST 5], is available and can be mapped onto a key if required. In Registration mode, when one of the [POP-UP LIST] keys is pressed, a list of operations is displayed allowing you to select one to execute. From Popup List Function, you can reprogram the operations displayed in the list by specifying the operations for each list.
Select Programming Mode -> Configuration Setup -> Advanced settings->Manager Passwords. Navigate to the field you want to personalize and enter its data (see “Data Entry Mode” for the keys to use). At the end, you can press return to the Main menu or to to return to the previous menu. Menu Item Possible Values Description PRG & Z Mode 0000 to 9999 4-digit password to protect access to PRG & Z mode. Default: 0000 (not activated).
COUNTER SETTINGS Select Programming Mode -> Configuration Setup -> Counter Settings. Navigate to the field you want to personalize and enter its data (see “Data Entry Mode” for the keys to use). At the end, you can press menu or to return to the Main to return to the previous menu. Menu Item Possible Values Description Receipt Number 1 to 9999999 Max. 7-digits to specify from which number to start sequentially numbering receipts. Invoice Number 1 to 9999999 Max.
LOGGING ONTO THE SYSTEM The programming manager should keep a track of all passwords set up on the system so as to be able to provide users with them when they need to access the system. For the clerk login to be necessary, the Clerk System must be active (see "Clerk System”). MANAGER LOGONS 1. Press to activate the Main menu. 2.
PRINTING PROGRAMMING REPORTS This section explains how to print the different reports that show how your cash register is programmed. All programming reports can be requested from Main menu -> Programming Mode -> Programming dump. Make sure you have enough paper in the printer to print the report. NOTE: To interrupt printing, press and hold down . 1. Select Programming Mode -> Programming dump. 2. Use 3. Press to navigate to the report you want to print. to select the report.
ACTIVATING AND DISACTIVATING TRAINING MODE ENGLISH Training mode can be activated in one of these three ways: • from Programming mode • from Registration mode • when a Training clerk logs on. Programming mode: 1. Select Training Mode On/Off. 2. The prompt appears: Now off, turn on? Use or to highlight YES and press . Training mode is now active and you can log on either as a Clerk or the Manager and perform sales transactions and programming in Training mode.
SYSTEM INITIALIZATION This section explains how to set system initialization parameters. This procedure is also described in the “Quick Start Programming”. Select Main menu -> Programming Mode -> System Initialization. Navigate to the field you want to personalize and enter its data (see “Data Entry Mode” for the keys to use). At the end, select YES for the prompt Are you sure? and press . Press to return to the Main menu or to return to the previous menu.
X mode prints the accumulated transaction information and RETAINS ALL TOTALS IN MEMORY. Take this report any time of the day to print periodic reading of the transactions performed (some users call the X report a mid-day report). X reports include the PLU Report, Clerk Report, and the X1 and X2 Financial Reports.
Menu Item Description Open Table Report This report provides information regarding the tables that are still open and therefore not yet invoiced. Current subtotals are provided for each open table so that you can keep track of the sales underway. EJ Report An EJ report executed in X mode does not clear the electronic journal memory (and therefore all transaction data is retained).
EXAMPLE CLERK SALES REPORT Time Consecutive receipt number X counter X report identifier Clerk 1 number or assigned name Consecutive receipt number X report identifier Sales total of clerk 1 Department 1 activity counter Department 1 sales total Department number or assigned name Department 1 ratio % Summary of clerk 1 activities Sales total for all departments Total amount VAT 1, 2, 3 and 4 Coupon (-) total Add-on total Percent discount total Percent add-on total Net sales total in local currency
SALES TRANSACTION EXAMPLES As [DEPTx] keys and [DEPT SHIFT&CODE] keys are not present by default on the keypad, before trying the examples in this section where these department keys are used, you must first map them onto the keypad as described for the option Free Key Layout. N.B. For convenience, the abbreviation [DEPTS&C] is used in this section to refer to the [DEPT SHIFT&CODE] key. 3. Press S. Total invoice to display and print the current balance due in the Local Currency.
for the foreign currency programmed as number 1 and press . 3. Press S. Total invoice . 4. Press ENGLISH 5. Press . 6. Type the amount tendered in the foreign currency and press . The change due to the customer is displayed. REGISTERING A CHARGE CARD TRANSACTION Example: Register a £2.50 item to Department 1 and a £3.00 item to Department 2 as an exact charge card transaction. CHECK TENDER Example: Register a £70.00 item paid by check to Department 4. [DEPT4]. 1. Press -> CHECK then 2.
5. Press for foreign currency number 1 5. Type the discount (previously programmed as Euro), and press to display the balance due in the foreign currency. 6. Type the amount tendered by check in the foreign currency -> -/+1 followed by . 6. Press . then press -> CHECK . The change due in the local currency is displayed. DISCOUNTING TOTAL SALE USING A PROGRAMMED DISCOUNT RATE Example: Register a programmed 10% discount to an entire sales transaction. Compute the change tender.
S. Total invoice 5. Press . 6. Press S. Total invoice . 6. Press . The change due to the customer is displayed. DISCOUNTING INDIVIDUAL ITEMS USING PROGRAMMED AND RANDOM DISCOUNT RATES Example: Register a £2.50 item to Department 1, apply the programmed discount to a £3.50 item of Department 23 and apply a discount rate of 5% to a £5.00 item of Department 2. Compute change tender. . The change due to the customer is displayed.
REGISTERING A SALES TRANSACTION USING THE PLUS ASSIGNED TO THE PLU PAGE LEVELS To use this feature, all functions mentioned must be appropriately programmed beforehand. Example: Register the sale of PLU 201 and multiply 3 times 1. Press . 2. Press and then PLU 1 at its first price. 3. Press PLU 202 using and the sale of PLU 5 using 1. Press . . The display indicates that the cash register is in the PLU Page 2 mode. 2. Press to to register the sale of PLU 201 assigned .
Example: Void a £2.50 entry erroneously made to Department 2, then register a £3.00 item to this same Department. Void an incorrect £10.00 entry. End the transaction with an exact cash tender. [DEPT2]. 1. Press 2. Press 1. Press . ENGLISH VOIDING THE PREVIOUS ENTRY IN THE MIDDLE OF A SALE [DEPT1]. 2. Press 3. Press [DEPT2]. 4. Press -> VOID . . 5. Press [DEPT2]. 3. Press . [DEPT2]. 4. Press 5. Press [DEPT7]. 6. Press -> VOID -> VOID 6. Press [DEPT1]. -> REFUND 7. Press [DEPT2]. 7.
REGISTERING PRODUCT QUANTITY TRANSACTIONS Example: Register the sale of 1.5 Kg of apples costing £3.00 per kilogram to Department 3. 1. Press [DEPT3]. 2. Press . ISSUING A COPY OF THE LAST SALES RECEIPT OR AN INVOICE You can print one or more copies of the last receipt issued. For this feature to be operational, the multiple receipts option must be set, see "Receipt Printing Mode" for details.
and press [DEPT4] , then type and [DEPTS&G]. -> CREDIT2 5. Press to finalize the second transaction. A beep sounds to remind you to conclude the transaction that you previously put on hold. 6. Press press , type and then . The cash drawer opens and the cash back amount due to the customer is displayed. 4. Start the second transaction. Type press [DEPTS&G] 3.
CUSTOMER OR TABLE MANAGEMENT Customer account operations allow you to associate expenses to specific customers. You have the possibility of opening and managing a total of 100 accounts (or tables) to which you can associate the items sold. You can review the intermediate sales of each account with review or proforma invoices. You can also make use of a Tray management feature that keeps track of individual sales and incorporates these in a single final balance.
18. Print invoices (with invoice caption) for each of the 3. Press 3 guests: . to apply the department's alternative VAT rate. 4. Finalize the transaction by pressing . 19. Finalize the transaction of table 1 by pressing a tender key . 20. Split the bill among the two guests at table 1: . 21. Print an extra invoice for 2 guests, each paying £10.00: extra invoice . TRAY TRACKING OPERATIONS This feature allows you to divide a transaction total among the different customers.
ERROR CONDITIONS Clearing an Error Press to clear an error. The key tone ends, the displays clear and the keypad unlocks, allowing you to continue with the transaction. If an error condition cannot be cleared by pressing reset operations. , reset the cash register by performing one of the cash register Out-of-Paper When the paper runs out, the message OUT OF PAPER appears on the operator display. Load the paper and press to clear the error.
ENGLISH CASH REGISTER RESET OPERATIONS If the cash register does not function, for example while programming and the error signal cannot be stopped by pressing , reset the cash register in Off mode. There are four reset operations; be very careful when choosing the one to perform since you could unnecessarily cancel report data and cash register programming data. • Partial Reset - just clears the cash register's working memory.
52
CAPTION TABLE Line 2 3 4 5 6 7 8 9 10 11 12 13 14 15 16 17 18 19 20 21 22 23 24 25 26 27 28 29 30 31 32 33 34 35 36 37 38 39 40 41 42 43 44 45 46 47 48 49 50 51 52 53 54 55 56 57 58 59 60 61 62 63 64 65 66 67 68 69 70 71 72 73 74 75 76 77 78 79 Description COUPON TOTAL COUPON ADD ON TOTAL ADD ON DISCOUNT CHARGE TOTAL CHARGE VOID/CORRECTION TOTAL VOID/CORRECTION SUBTOTAL CHANGE CASH TOTAL CASH AMOUNT CHECK TOTAL CHECK TOTAL TOTAL PLU NO SALE TOTAL NO SALE RECEIVED on ACCOUNT TOTAL RECEIVED on ACCOUNT PAID
CAPTION TABLE Line 2 3 4 5 6 7 8 9 10 11 12 13 14 15 16 17 18 19 20 21 22 23 24 25 26 27 28 29 30 31 32 33 34 35 36 37 38 39 40 41 42 43 44 45 46 47 48 49 50 51 52 53 54 55 56 57 58 59 60 61 62 63 64 65 66 67 68 69 70 71 72 73 74 75 76 77 78 79 Description COUPON TOTAL COUPON ADD ON TOTAL ADD ON DISCOUNT CHARGE TOTAL CHARGE VOID/CORRECTION TOTAL VOID/CORRECTION SUBTOTAL CHANGE CASH TOTAL CASH AMOUNT CHECK TOTAL CHECK TOTAL TOTAL PLU NO SALE TOTAL NO SALE RECEIVED on ACCOUNT TOTAL RECEIVED on ACCOUNT PAID
PRINT CAPTIONS Line English Description Spanish 1 E.J. USED LINE PRINT E . J OU RNA L USED L DI A E LEC U S ADO L 2 E.J. FREE LINE PRINT E . J OU RNA L FREE L DI A E LEC L I BRE L 3 REFUND R E F U N D - - - - - - - - - - - - - - - - - - R E EMB O L S O - - - - - - - - - - - - - - - 4 CLERK REPORT HEAD CLERK 5 HOURLY REPORT HEAD HOU R L Y 6 E.J. REPORT HEAD E LECTR I C 7 E.J. CLEAR PRINT E .
PRINT CAPTIONS Line French Description German 1 E.J. USED LINE PRINT EL J UT I L I SE L E . J OU RN E IN L 2 E.J. FREE LINE PRINT EL J D I S P ON I B L E L E . J OU RN FRE I L 3 REFUND R E T OU R - - - - - - - - - - - - - - - - - - RÜC K Z AH L UNG - - - - - - - - - - - - - 4 CLERK REPORT HEAD RAPPORT V ENDEUR 5 HOURLY REPORT HEAD RAPPORT HORA I R E 6 E.J. REPORT HEAD J OU RNA L 7 E.J.
PRINT CAPTIONS Line Dutch Description Portuguese 1 E.J. USED LINE PRINT E . J O U R N . GE BRU I K T R J E LECTR . U S ADO L 2 E.J. FREE LINE PRINT E . J OUR N . VR I J R J E LECTR . L I VRE L 3 REFUND R E T O U R - - - - - - - - - - - - - - - - - - R E EMB O L S O - - - - - - - - - - - - - - - 4 CLERK REPORT HEAD ME D E W E R K E R 5 HOURLY REPORT HEAD UUR 6 E.J. REPORT HEAD ELE K T R 7 E.J. CLEAR PRINT E .
PRINT CAPTIONS Line Danish Description Norsk 1 E.J. USED LINE PRINT E . J . L I NI ER B RUG T L ' , $47-6' 2 E.J. FREE LINE PRINT E . J . L I NI ER FR I : L ' , (4+' 3 REFUND RETUR 4 CLERK REPORT HEAD 5 HOURLY REPORT HEAD 6 E.J. REPORT HEAD 7 E.J. CLEAR PRINT 8 TAKE OUT 9 PLU REPORT -#55'4'44#22146 X T I ME - A K T I V I T E S RAP P . X 6+/ 4#22146 E L E K T R O N I S K J OU RNA L X '.'-6410+5- ,1740#. NU L S T I L E . J OU RNA L 07..56+.. ,1740#.
ENGLISH CASH REGISTER SPECIFICATIONS Technical Characteristics Listed below are the technical characteristics of this cash register model. Type: Displays: Electronic cash register with clamshell thermal printer, 10 department groups, 99 departments, 15 clerks, up to 3,000 PLU settings. Max. 12,000line Electronic Journal internal memory, expandable via memory storage device. Removable cash drawer.
DEUTSCH REGISTRIERKASSE: TECHNISCHE EIGENSCHAFTEN ESPAÑOL DESCRIPCIONES Y SEGURIDAD DE LA CAJA REGISTRADORA Technische Eigenschaften Características Técnicas Im folgenden sind technischen Eigenschaften dieses Registrierkassenmodells zusammengestellt. Se han incluido a continuación las características técnicas de este modelo de caja registradora. Typ: Elektronische Registrierkasse mit Klappendrucker Klapp-Thermodrucker, 10 Abteilungsgruppen, 99 Abteilungen, 15 Kassierern, bis zu 3.
NEDERLANDS SPECIFICATIES PORTUGUÊS ESPECIFICAÇÕES DA CAIXA REGISTADORA Technische eigenschappen Características Técnicas Hieronder vindt u de technische eigenschappen van dit model kasregister. Abaixo estão descritas as características técnicas deste modelo de caixa registadora. Type: Elektronisch kasregister met inklapbare thermische printer, 10 omzetgroepen, 99 warencategorieën, 15 medewerkers, max. 3.000 PLU instellingen. Intern geheugen Elektronisch Journaal max. 12.
DANSK NORSK KASSEAPPARATETS SPECIFIKATIONER KASSAAPPARATETS SPESIFIKKER Tekniske specifikationer Tekniske karakteristikker Nedenfor finder de kasseapparatets tekniske specifikationer. Nedenfor følger tekniske karakteristikker for dette kassaapparatet modell. Type: Displays: Elektronisk kasseapparat med termisk Clamshell ™ printer-mekanisme, 10 varegrupper, 99 varebetegnelser, 15 ekspedientnumre, op til 3.000 PLU opsætninger. Max 12.
FIGURES - IMAGES ABBILDUNGEN - FIGURAS AFBEELDINGEN - FIGURAS FIGURER - BILDER 7 6 AMOUNT 5 0.
FIGURES - IMAGES ABBILDUNGEN - FIGURAS AFBEELDINGEN - FIGURAS FIGURER - BILDER FREE KEY LAYOUT - PRG TOUCHE AU CLAVIER - FREIE TASTENANORDNUNG - DISEÑO TECLAS LIBRES VRIJE TOETS KEY LAYOUT - LAYOUT TECLAS LIVRE - LEDIG TASTE LAYOUT - FRI NYCKELLAYOUT CHARACTER TABLE - TABLEAU DES CARACTÈRES - ZEICHENTABELLE - TABLA DE CARACTERES TEKENCODETABEL - TABELA DE CARACTERES - KARAKTERKODE TABEL - TEGNTABELL
FIGURES - IMAGES ABBILDUNGEN - FIGURAS AFBEELDINGEN - FIGURAS FIGURER - BILDER CHARACTER TABLE - TABLEAU DES CARACTÈRES - ZEICHENTABELLE - TABLA DE CARACTERES TEKENCODETABEL - TABELA DE CARACTERES - KARAKTERKODE TABEL - TEGNTABELLE
Code: 577500