Ink Jet Fax Fax-Lab 100/120 Fax-Lab M100 Fax-Lab S100/S120 INSTRUCTIONS
PUBLISHED BY: Editors: Olivetti I- Jet S.p.A. Località Le Vieux 11020 ARNAD (Italy) Olivetti Tecnost, S.p.A. Via Jervis, 77 - 10015 IVREA (TO) ITALY Copyright © 2004, Olivetti All rights reserved Manufacturer: Olivetti Tecnost, S.p.A. con unico azionista Gruppo Telecom Italia Direzione e coordinamento di Telecom Italia S. p. A. Via Jervis, 77 - 10015 IVREA (TO) ITALY The manufacturer reserves the right to make any changes to the machine described in this manual, at any time, and without prior warning.
TABLE OF CONTENTS - FIRST SECTION BEFORE YOU START RECEPTION I CONSULTING THE MANUAL ........................................................ I ENVIRONMENTAL RECYCLING .................................................... I SAFETY PRECAUTIONS ............................................................... I ABOUT THE INSTALLATION AND SETUP PARAMETERS ............ I TO CHOOSE THE RECEPTION MODE ..................................... XIII MANUAL RECEPTION ....................................................
BEFORE YOU START CONSULTING THE MANUAL This manual describes various models of fax machine of which some have a built-in telephone answering device and others do not. In the description that follows, whenever a distinction is to be made between these models, reference will be made to: "Base models" and "Models with a built-in TAD".
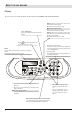
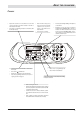
ABOUT THE FAX MACHINE CONSOLE The specific keys of the models with TAD are described under the item “MODELS WITH A BUILT-IN TAD ONLY”. Blinking, indicates that the memory contains documents that have not been printed. Off, indicates that the memory is empty. MODELS WITH A BUILT-IN TAD ONLY On, indicates that there are messages or memos in the memory that have already been played. Blinking, indicates that the memory contains documents that have not been printed, messages or memos that have not been played.
ABOUT THE FAX MACHINE CONSOLE • Adjusts the resolution of the documents to be sent and copied (only with the document inserted in the ADF or manual document feeder). • Puts the line on hold during a telephone conversation (with the handset raised). • • • Unloads a document from the ADF or manual document feeder. • Turns off the " • Returns the fax machine to the stand-by mode. • Stops the programming, transmission, reception or copying operation in progress.
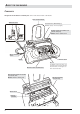
ABOUT THE FAX MACHINE COMPONENTS The figure shows the external and internal parts common to the various models of fax machine. PAPER SUPPORT EXTENSION CONNECTION SOCKETS PLAIN PAPER FEED COMPARTMENT (ASF) Maximum capacity: 40 sheets (80gr/m2). AUTOMATIC FEEDER FOR DOCUMENTS TO BE SENT AND COPIED (ADF) MAXIMUM CAPACITY: 5 SHEETS OF A4 BUILT-IN TELEPHONE HANDSET OPERATOR SPEAKER CONSOLE DISPLAY RECEIVED OR COPIED DOCUMENT OUTPUT The display consists of two lines of 16 characters each.
HOW TO GET STARTED QUICKLY This section provides a basic description of the fax machine, explaining how to install it and get started quickly, using its basic functions only. For a more comprehensive use of the fax machine, see the corresponding section. As this section is designed to give you a gradual and systematic approach to the fax machine, we recommend you read the topics in the order in which they are presented.
HOW TO GET STARTED QUICKLY If a voltage drop or power failure occurs, it may be useful to use an emergency telephone. IMPORTANT To connect the emergency telephone directly to the fax machine, remove the cover from the socket for connecting to the external line and then insert the plug of the emergency telephone in this socket (see figure opposite).
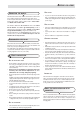
HOW TO GET STARTED QUICKLY note 3. To confirm the setting, press the key: The display shows a country of destination, for example: ITALIA If you subsequently want to change these settings, press + and repeat the procedure from the start, remembering always to 4. To select the desired country, press the keys: / The display shows, for example: confirm the settings made by pressing the button. U.K.
HOW TO GET STARTED QUICKLY 10. To confirm the setting, press the key: ALL THAT IS MISSING NOW IS YOUR NAME AND FAX NUMBER The date and time setting procedure has been completed. The new date and time will be updated automatically and will be printed on each page sent. 11. To return the fax machine to its initial stand-by mode, press the key: Once set, the name (max. 16 characters) and number (max.
HOW TO GET STARTED QUICKLY Now enter the fax number as indicated below: 4. Press the key until the display shows: TO SET YOUR FAX NUMBER HEADER INSIDE 5. To select the alternative parameter, press the keys: 1. Press the key: / The display shows: TYPE YOUR NUMBER The display shows: HEADER OUTSIDE 6. To confirm the setting, press the key: 2. To enter your fax number, press the keys: 3. To leave a space, press the keys: 7.
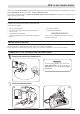
HOW TO GET STARTED QUICKLY SETTING UP THE FAX MACHINE Feed the print paper into the machine A B IMPORTANT If you add sheets (max. 40) to the ASF, make sure you place them under and not on top of those already present. The fax machine has a memory that enables it to receive up to 19 pages even if you do not add any paper.
HOW TO GET STARTED QUICKLY C D E IMPORTANT Once the print head provided with the machine is worn, remember only to use original print heads (see code printed at the end of the manual). If, after the print head has been installed, the "CHECK PRINT HEAD" message appears again, try removing it and then reinserting it, pressing it more firmly into position.
HOW TO GET STARTED QUICKLY TRANSMISSION If you follow the procedures described below, you can immediately use the fax machine to carry out simple transmission operations. In any case, if these procedures are not enough for you, see the "Transmission and reception operations" chapter, which provides a detailed description of all the transmission modes and other dialling procedures (one-touch and speed dialling, etc.) for which the fax machine has to be set up (see "To set one-touch and speed dialling").
HOW TO GET STARTED QUICKLY TO HEAR THE DIALLING TONE WHEN TO SEND A DOCUMENT WITH THE RECEIVER SENDING A DOCUMENT RAISED If these diagrams are not enough: è If these diagrams are not enough: è è see "To send a document", section "Transmission and reception operations". è è è see "To send a document", section "Transmission and reception operations".
HOW TO GET STARTED QUICKLY RECEPTION IN "PHONE/FAX" MODE The behaviour of the fax machine in this mode depends on who is calling and whether you are in or not when the fax is received. The following diagram will help you: After the programmed number of rings. PHONE/FAX enabled. A FAX MACHINE is calling. Your fax machine is set to receive automatically. A TELEPHONE is calling. Your fax machine beeps for 20 seconds (set value). The display shows "LIFT HANDSET".
HOW TO GET STARTED QUICKLY USING THE TELEPHONE When you engage the line by lifting the telephone handset, you may use all the telephone functions available on ordinary telephones sold on the market. key) which provides access to the special services made These also include the R function (REGISTER RECALL, activated by pressing the available by the company that manages the telephone network.
HOW TO GET STARTED QUICKLY TO REDIAL ONE OF THE LAST 20 INCOMING NUMBERS OR ONE OF THE LAST 10 OUTGOING 3. To display the other available option, "OUTGOING CALLS", press the keys: / 4. To confirm your choice, press the key: NUMBERS Do not place the document in the ADF or the manual document feeder. 5. To find the telephone number or name of the correspondent you wish to call on the list of the last 20 incoming calls or on the list of the last 10 outgoing calls, press the keys: 1.
HOW TO GET STARTED QUICKLY 9. To confirm your choice, press the key: The display shows: CONTRAST:NORM. 10. To display the other two types of contrast available, "CONTRAST: LIGHT" or "CONTRAST: DARK", press the keys: / 11. To confirm your choice, press the key: The display shows the values that you have just selected. At this point, simply choose the resolution you want and set the number of copies you want to make: 12. To choose the desired resolution setting, "TEXT" or "PHOTO", press the key: 13.
TABLE OF CONTENTS - SECOND SECTION TO SET IT UP FOR THE TELEPHONE LINE 1 TROUBLESHOOTING GUIDE 26 TO CONNECT IT TO A PUBLIC LINE ........................................... 1 WHAT HAPPENS IF THERE IS A POWER FAILURE ................... 26 TO CONNECT IT TO A PRIVATE LINE (PBX) ............................... 1 WHAT HAPPENS IF THE PAPER OR INK HAS RUN OUT ......... 26 TRANSMISSION AND RECEPTION OPERATIONS 3 TO SEND A DOCUMENT ..............................................................
TO SET IT UP FOR THE TELEPHONE LINE 1. Press the key TO CONNECT IT TO A PUBLIC LINE until the display shows: INSTALLATION The fax machine is set up to be connected to a public line. In any case, it is a good idea to check that: 2. Press the key: • • The "PUBL.LINE (PSTN)" parameter is selected. The dialling mode (tone or pulse) is compatible with the public telephone exchange that manages the line to which you have connected the fax machine.
YOU WANT TO CHANGE THE DIALLING MODE TEMPORARILY If the fax machine is set up for pulse dialling (decadic) and you want to change it to tone dialling (multifrequency): Press the key, before dialling the fax or telephone number, to change the dialing mode temporarily. At the end of transmission, the fax machine always restores the dialling mode set up on it.
TRANSMISSION AND RECEPTION OPERATIONS 1 TO SEND A DOCUMENT WHAT DOCUMENTS MAY BE USED Dimensions IN THE AUTOMATIC DOCUMENT FEEDER (ADF) • Width 210 mm • Length • Unit weight or 2 105 mm - 600 mm 70 - 90 gr/m2 (max. 5 sheets) IN THE AUXILIARY MANUAL DOCUMENT FEEDER • Width • Length 148 mm - 216 mm 105 mm - 600 mm • Unit weight 70 - 110 gr/m2 (1 sheet at a time) NEVER USE 2. Insert the document in the automatic document feeder (ADF - fig. 1) with the side to be sent facing downwards.
4. Press the key 3. To start sending the document, press the key: until the display shows: CONTRAST: NORMAL If the document is sent correctly, once this operation has been completed, the display will show the message "TX COMPLETED" for a few seconds. 5. To view the other available options: "DARK" and "LIGHT", press the keys: / 6. To confirm your choice, press the key: 7.
TO SEND A DOCUMENT WITH THE RECEIVER RAISED TO 1. Insert the document in the ADF or the manual document feeder. The display shows on the top line: 1. Insert the document in the ADF or the manual document feeder. The display shows on the top line: DOCUMENT READY DOCUMENT READY and on the bottom line, the default contrast value: "NORMAL". and on the bottom line, the default contrast value: "NORMAL".
TO CHANGE/REPEAT/DELETE A TRANSMISSION FROM THE TO CHOOSE THE RECEPTION MODE MEMORY THAT IS ALREADY SET 1. Press the key until the display shows: 1. Press the key RECEPTION MODE until the display shows: 2. Press the key: MEMORY TX The display shows: 2. Press the key: AUTOMATIC 00 The display shows: 3. To view the other available options, "MANUAL", "PHONE/ FAX" and "TAD/FAX", press the keys: ALREADY ENTERED 3. Press the key: / The display shows: 4.
- If the caller is a telephone, after two rings, the fax machine emits an acoustic signal for about 20 seconds and the display shows "LIFT HANDSET". If you do not lift the receiver within 20 seconds, the fax machine automatically prepares to receive a document. If you lift the receiver before the fax machine connects to the telephone line and you hear the dialling tone, proceed as follows: 1. Press the key: 6. Dial your correspondent’s telephone or fax number (max. 64 digits).
SPEED 5. To clear the entire name, press the key: DIALLING Using codes (01-50) you can assign other fax numbers, telephone numbers and names which will be automatically dialled by pressing the key and typing the code. Follow the first two steps of the one-touch dialling procedure, then: 1. Press the key 6. Enter the new name (max. 16 characters). To do this, press the keys: 7. To confirm the setting, press the key: until the display shows: CODED SPEED DIAL 8.
TO TO PRINT REPORTS AND LISTS SEND A DOCUMENT WITH ONE-TOUCH OR SPEED DIALLING FROM THE PHONE BOOK If you do not remember the one-touch dialling key or speed dialling code to which you assigned a given fax number, you can start sending the document from the phone book, as follows: 1. Insert the document in the ADF or the manual document feeder. The display shows on the top line: DOCUMENT READY and on the bottom line, the default contrast value: "NORMAL". The initial resolution value is: " " (standard).
FAILED TX REPORT - the fax machine will automatically print a report only after each failed transmission. TX REPORT:ALWAYS - the fax machine will automatically print a report after each transmission irrespective of the result. TX REPORT: OFF - the fax machine will not print any report. 5. To view the other available options, press the keys: HOW TO READ THE REPORTS • Act. N. Progressive number of the transactions (transmission/reception) carried out. • Type Type of transaction: TX for transmission.
TO 5. To view the other available options, "PRINT:BLACK LIST" and "MENU EXIT", press the keys: PRINT THE TRANSMISSION, ACTIVITY, BROADCAST TRANSMISSION AND CALLER ID REPORTS ON REQUEST / 6. To confirm your choice, press the key: 1. Press the key until the display shows: note PRINT OUT REPORT 2. Press the key: If you chose "PRINT INSTALL." or "PRINT:BLACK LIST", when the fax machine has finished printing, it returns automatically to its initial The display shows: stand-by mode.
THE TELEPHONE ANSWERING DEVICE If you have purchased one of the models of fax equipped with a builtin telephone answering device you can perform the same functions as those performed by external telephone answering devices.
TO CHANGE OR DELETE THE TAD ACCESS CODE The TAD access code may also be used to: • prevent unauthorized subscribers from playing the messages sent to you, in locale mode. • prevent unauthorized subscribers from modifying the TAD configuration parameters that you have set. 1. Press the key until the display shows: TAD SET-UP 2.
TO LISTEN TO OUTGOING MESSAGE 1 TO RECORD OUTGOING MESSAGE 1 1. Press the key 1. Press the key until the display shows: until the display shows: TAD SET-UP TAD SET-UP 2. To confirm the setting, press the key: 2. To confirm the setting, press the key: The display shows: The display shows: ICM ON SPEAKER ICM ON SPEAKER 3. Press the key 3. Press the key until the display shows: until the display shows: PLAY OGM #1 RECORD OGM1! 4. To listen to message 1 recorded previously, press the key: 4.
TO LISTEN TO INCOMING MESSAGES AND TO RECORD MEMOS As mentioned previously, the telephone answering device may be used to record one or more memos, which are handled in the same way as incoming messages. MEMOS If there is one or more incoming messages or memos in the memory of the telephone answering device that have not 1.
TO DELETE THE MESSAGE OR MEMO YOU ARE LISTENING TO TO TRANSFER MESSAGES AND MEMOS TO A REMOTE TELEPHONE 1. To start listening to the messages or memos, press the key: The display shows: If you wish, you can program the TAD to call you on a remote telephone at a given time to let you know that there are new messages on the telephone answering device. In addition to the time and number at which you wish to be called, you can program the way in which the transfer is to be made (once only or once a day).
notE If you have already recorded a transfer message, the display will show the message "PLAYING" and the TAD will play it back to you. To change it for another one, see "To record the transfer message". Now that you have programmed the TAD to transfer new messages to a remote location, you can listen to them by operating the TAD in the way as in the "To operate the telephone answering device from a remote location" section below.
OUTGOING MESSAGE ONLY SILENT RECEPTION OF INCOMING MESSAGES Using this function you can receive messages confidentially. In other words, the TAD receives messages without playing them over the speaker so that any other persons present cannot hear your messages. Using this function, whenever an incoming call is received, the TAD plays the OGM 1 but does not record any incoming messages.
MORE SOPHISTICATED OPERATIONS 5. To choose one of the other available settings, "SURPLUS:OFF" or "SURPLUS:ON", press the keys: OTHER USEFUL RECEPTION SETTINGS / TO REDUCE THE PRINTING AREA OF A DOCUMENT RECEIVED 6. To confirm your choice, press the key: 1. Press the key 7. To return the fax machine to its initial stand-by mode, press the key: until the display shows: FAX SET-UP 2. Press the key: NOTE The display shows: DATE AND TIME 3. Press the key until the display shows: PRINTER PARAMET. 4.
6. To confirm your choice, press the key: 6. To confirm your choice, press the key: 7. To return the fax machine to its initial stand-by mode, press the key: 7. To return the fax machine to its initial stand-by mode, press the key: note NOTE The daily silent reception setting ("SILENT RX: DAILY") is cancelled by a power failure. With this function enabled, if a power failure occurs and the date and time are lost, they will be restored when the next call is received.
4. Press the key 6. To confirm your choice, press the key: until the display shows: The display shows: RING VOLUME:HIGH 5. AUTODETECT. RING To view the other available options, "RING VOLUME:LOW", "RING VOLUME: MED" and "RING VOLUME:OFF", press the keys: 7. Call the fax machine with the desired frequency so that the fax machine detects it. The display shows: RING DETECTED / 6. To confirm your choice, press the key: 8. To return the fax machine to its initial stand-by mode, press the key: 7.
TO OTHER USEFUL TRANSMISSION SETTINGS CHANGE THE REMOTE CONTROL CODE If the fax machine is connected to an extension that operates in tone dialling mode and is set up for manual reception, whenever there is a call from a correspondent wishing to send you a document, you can set it to receive the document by typing the code * * on the extension.
4. Press the key TO REGULATE THE BUZZER VOLUME until the display shows: The buzzer indicates particular operating conditions and faults or errors. The volume of the buzzer may be set to three levels, "High", "Medium" and "Low", or may be turned off altogether. 1. Press the key RETRANS.DOC.:OFF 5. To view the other available option, "RETRANS. DOC.: ON", press the keys: / 6. To confirm your choice, press the key: until the display shows: FAX SET-UP 2. Press the key: 7.
5. To view the other available values, "TX SPEED 9.6" and "TX SPEED 4.8", press the keys: RECEIVING A DOCUMENT IN POLLING MODE 6. To confirm your choice, press the key: FIRST / 7. To return the fax machine to its initial stand-by mode, press the key: TO It is a transmission request that a fax machine makes to another fax machine so that the latter sends the document requested automatically.
note You can cancel the polling reception setting by pressing the button. TO CHANGE/DELETE A POLLING RECEPTION THAT HAS BEEN SET 1. Press the key until the display shows: POLLING RX 2. Press the key: The display shows: ALREADY ENTERED 3. Press the key: The display shows: CHANGE PARAM.? You can choose any of the following options: CANCEL SETTING? - To cancel the setting. The fax machine returns to its initial stand-by mode. CHANGE PARAM.
TROUBLESHOOTING GUIDE WHAT HAPPENS IF THERE IS A POWER FAILURE If there is a power failure, the fax machine keeps the following data in the memory: the numbers set for one-touch and speed dialling and the reports, while the documents present in the memory will be lost. The date and time will also be lost so they will have to be reset by carrying out the procedure described in the "To set the date and time" section of the "How to get started quickly" chapter.
ERROR CODES The error codes printed both on the transmission report and the activity report consist of two digits indicating the cause of the error. To save space, the two-digit code without any message is printed on the activity report. CODE MESSAGE CAUSE OF ERROR WHAT TO DO OK No message. Operation performed successfully. 02 IMPOSSIBLE CONNECTION The fax machine does not detect any Check that the fax machine is correctly dialling tone or receives an irregular signal.
COVER OPEN SIGNALS AND MESSAGES You forgot to close the print head compartment cover: close it. Any problems that may arise are generally indicated by acoustic signals (accompanied, in some cases, by visual signals: error LED " " indicator on) or by error messages on the display. The fax machine also emits acoustic signals and shows messages on the display, which do not indicate an error condition.
SYSTEM ERROR NN POLL RX: HH:MM A fatal error has occurred on the fax machine: turn the fax machine off and then on again. If the error persists, turn off the fax machine and call the Customer Engineering Service. PRINTING The fax machine is printing a report or a list. TX ERROR The document was not sent correctly: press the You have made a transmission request (Polling reception). RX COMPLETED key to turn off the " " error LED indicator and clear the message from the display, and then send it again.
MAINTENANCE OPERATIONS TO REPLACE THE PRINT HEAD 9. Push the print head until it clicks into place (fig. 9). 10. Close the operator console and put the handset back on its support. note If you have replaced the print head because the ink ran out, when the operator console is closed, the fax machine will automatically recognize that the print head has been replaced and the display will show the message "NEW PRINT HEAD? 1 = YES, 0 = NO". Set the value 1.
5. To confirm the setting, press the key: The display shows: CLEANING: ON The fax machine cleans the print head and tests the nozzles, printing out the result of the diagnostic test. Examine the diagnostic test result and consult "Insert the print head", chapter "How to get started quickly". NOTE The procedure may be aborted at any time, if desired, by pressing the key.
TO REMOVE JAMMED DOCUMENTS During transmission or copying, a document could get jammed (this condition is signalled by the display showing the message: "RE"). MOVE DOCUMENT, PRESS 1. Lower the handset and place it on a stable surface (fig. 1). 2. Open and lift the operator console as indicated by the arrows (fig. 2). 3. Move the print carriage to the left-hand edge of the fax machine (fig. 3). 4. Release the paper feed roller by pressing the lever, as indicated by the arrow (fig. 4). 5.
NOTE If you cannot manage to remove the jammed document or sheet of paper after performing the removal operations, it may be trapped inside the fax machine. If this is the case, proceed as follows: 1. Lower the handset and place it on a stable surface (see fig. 1 of procedure "To clean the optical reader"). 2. Open and lift the operator console (see fig. 2 of procedure "To clean the optical reader"). 3. Move the print carriage to the left-hand edge of the fax machine (see fig.
TECHNICAL GENERAL DATA CHARACTERISTICS Model ........................... Desktop transceiver Display .......................... LCD 16 + 16 char. Capacity memory ......... 19 pages (*) Dimensions Width ............................. 340 mm Depth ............................ 220 mm - 235 mm (**) Height ............................ 133 mm - 272 mm (**) Weight ........................... ca. 2.5 Kg COMMUNICATION CHARACTERISTICS Telephone network ...... Public/private Compatibility .................
INDEX A F Acoustic signals 29 Automatic redial 5 Feeder for documents automatic (ADF) IV manual IV B I Buzzer volume 23 Integrated telephone answering device 12 C L Casing cleaning 32 Connection connection sockets IV of the telephone handset V to power supply V to the telephone line V Console II, III Contrast adjustments 3 Copy contrast and resolution values XVI copy setting XVI to abort the copy XVII to make a copy XVI what documents can be copied XVI D Date and time to change the date and time VIII
P Package package contents V Paper jammed paper 26 paper has run out 26 plain paper feed compartment (ASF) IV to feed the print paper X to remove jammed sheets of paper 32 Polling polling reception 24 to change/delete a polling reception 25 what polling is 24 Power supply power failure 26 Print head cleaning the print head and testing the nozzles XI, 30 to clean the electrical contacts 31 to install the print head X to replace the print head 30 R Reception automatic reception XIII, 6 with recognition of th
Monochrome print head Model: FJ31 Code: B0336F
256595X