
Specifications


7
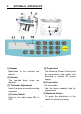
4. MACHINE OPERATION
BEFORE TURN ON THE MACHINE, PLEASE MAKE SURE THE POWER
CORD IS GOOD CONNECTION AND PROPER GROUNDING!
Turn the Power Switch ON.
Ensure the Hopper is empty. Turn the Power Switch ON, the Currency
Counter
will automatically start running for about 1 Second, (providing no
banknote is in the Hopper), upon finishing machine self-diagnostic tests, the
machine will show ‘0’ in the 4-digit display area and ‘100’ in the 3-digit
display – These show that the machine is ready to begin counting.
If an Error does occur, the machine will display the relative Error Message,
(see page 11 for details), although this is most often caused by a blocked
optical sensor. Principle causes for this blockage are by a piece of paper, or
dust accumulation. Please refer to the Cleaning and Maintenance section,
page 10, to follow the actions required. Whenever completed cleaning,
please restart the machine again.
Check the two note Density (Double Detection) level and select an
optimum setti
ng.
Three Density (Double Detection) levels are available with this machine, all
of
which are manually selected. Be sure to select an appropriate density
level to ensure the machine work normally.
The density level settings that you selected will be memorized, in the unit,
and will be restored as the last settings when power is restarted
Change the Density level by pressing the DEN Level Key as follows in case
the error message "Ed" is displayed frequently.
--- For notes that are stained or printed dark, set the level indicator to
illuminate in the darker position.
--- For notes that are new, or lightly printed, set the indicator to
illuminate in the lighter position.
MISCOUNTING IS POTENTIALLY POSSIBLE IF YOU DO NOT HAVE THE
CORRECT
DENSITY SETTING LEVEL SELECTED.