OLY MPIA CM 910 / 911 / 912 Operating Instructions Programming Instructions SINCE 1903 www.olympia-vertrieb.
Cash Register CM 910 / 911 / 912 Declaration of Conformity CM 910 / 911 / 912 GB The manufacturer hereby declares that the equipment complies with the stipulations defined in the following guidelines and standards: DE The manufacturer hereby declares that the equipment complies with the stipulations defined in the following guidelines and standards: FR Le fabricant déclare par la présente que l'appareil est conforme aux règlements et normes en vigueur: ES Por medio de la presente, el fabricante de
Cash Register CM 910 / 911 / 912 Dear Customer, Congratulations! We are pleased that you decided on purchasing the Olympia CM 910 / 911 / 912 cash register. The CM 910 / 911 / 912 is a high-quality cash register that implements the latest technologies to satisfy your needs in the best possible way. Please read the operating instructions/programming instructions to ensure you learn to use the cash register functions properly.
Cash Register CM 910 / 911 / 912 Intended Use This cash register is exclusively intended for processing cash register business indoors. Any other use is considered unintended use. General Information / Safety Notes ● ● ● ● ● ● ● ● Ensure that the mains power supply corresponds to that specified on the rating plate located on the rear side of the cash register. This cash register is a highly sophisticated piece of equipment. Never attempt to repair it yourself.
Cash Register CM 910 / 911 / 912 Table of Contents Declaration of Conformity.................................................................................................................................................... 2 Intended use .......................................................................................................................................................................... 4 General Information / Safety Notes................................................................
Cash Register CM 910 / 911 / 912 5.7 5.8 5.9 5.10 5.11 5.12 5.13 5.14 5.15 5.16 5.17 5.18 5.19 5.20 6 Programming tender media identification......................................................................................................... 29 Programming a surcharge as an amount......................................................................................................... 30 Programming a discount as an amount ..............................................................................
Cash Register CM 910 / 911 / 912 6.14 Printing a receipt on/off .................................................................................................................................... 56 6.15 Printing a copy of the receipt............................................................................................................................ 56 7 Training Mode ....................................................................................................................................
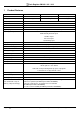
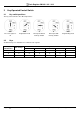
Cash Register CM 910 / 911 / 912 1 Product Features Feature Cash drawer Weight CM 910 CM 911 CM 912 No Yes (small) Yes (large) 2.1 kg 5.1 kg 8.0 kg No. of departments 42 No. of PLUs 1,250 No. of clerks 8 No.
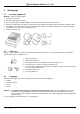
Cash Register CM 910 / 911 / 912 2 Starting Up 2.1 Inserting a paper roll Attention: Only use thermal paper! 1. Remove the printer lid. 2. Pivot the paper transport unit up. 3. Insert a thermal paper roll with a width of 57 mm wide and a maximum diameter of 70 mm. 4. Draw the leading edge of the paper over the tear-off edge and pivot the paper transport unit down, locking it in place. 5.
Cash Register CM 910 / 911 / 912 3 Key-Operated Control Switch 3.1 Key switch positions The key can be turned to five different positions: OFF REG X Z PRG The cash register is off Registration mode Print report without memory deletion Print report with memory deletion Programming mode 3.2 Keys Six different keys are available for use with the cash register: Key identification No.
Cash Register CM 910 / 911 / 912 4 Keyboard In its standard form, the cash register leaves the factory with English labels on the keyboard. It is possible to apply labels in different languages on the keys. Keyboard sheets in various languages are enclosed with the cash register for this purpose. 4.1 Changing the key labels Proceed as follows: 1. Remove the transparent cap from the key. If it is easier for you, carefully remove the entire key beforehand. 2.
Cash Register CM 910 / 911 / 912 4.4 Explanation of the key functions Key %# '# (# # &# # )# *# Explanation Press and hold the FEED key to continue feeding the receipt or journal paper until the key is released. The RA key is used to record payments made into the cash register. The total amount received on account is recorded in the financial report. The PO key is used to record amounts removed from the cash drawer. The total amount registered appears separately in the financial report.
Cash Register CM 910 / 911 / 912 - Continued - # # The Department keys serve to register departments. "# !# # # # # ,# .# 0# -# /# 1# 2# 3# Olympia 2011 The and keys are used to scroll up and down in the display. The Receipt ON/OFF key is used to switch printout of the receipt off or on. The Receipt ISSUE key is used to print a copy of the receipt. The CHECK key is used for transactions made with a cheque.
Cash Register CM 910 / 911 / 912 5 Programming 5.1 Basics for programming ● ● 5.1.1 To programme the cash register, the key switch must always be set to PRG. When the key switch is set to PRG, the Programming menu appears in the display. The 2-digit programming number is followed by a description of what can be programmed. Programme menu Display content - German Display content - English Significance 90.DRUCK PRG LISTE 90.PRINT PROG DUMP Print programmed data 01.WARENGRUPPEN 01.
Cash Register CM 910 / 911 / 912 5.1.2 Initiate programming Proceed as follows to programme one of the menu options: 5.1.3 1. 2. Set the key to PRG Select the menu option you want to program: ● ● Use the and keys to scroll through the Programme menu to the required position. Or: Enter the programme number using the digit keys. 3. Confirm your entry by pressing the CASH key. Conclude programming Press the SUB-TOTAL key to conclude programming and skip one level back in the menu. 5.
Cash Register CM 910 / 911 / 912 5.2.2 Procedure to enter text Entering digits, letters and special characters 1. All the characters assigned to a key appear when the key is pressed. 2. Digits, letters and special characters are entered in the same way as for a mobile phone. Example: ● To enter an A, press the 8 ABC key once. ● To enter a B, press the 8 ABC key twice. ● To enter a C, press the 8 ABC key three times. ● etc.
Cash Register CM 910 / 911 / 912 5.2.3 Keys for text input Key Meaning # Press the relevant key the necessary number of times in order to enter the required digits, letters # and special characters. # # Press to enter digits and special characters. # Press to enter digits and special characters. # Press to enter a space. # Press to delete the last character entered. # Press to delete the entire input. 5.2.
Cash Register CM 910 / 911 / 912 5.3 Changing the language The texts in the display and on the receipt can be made in four different languages: English, German (default setting), French and Dutch.
Cash Register CM 910 / 911 / 912 5.4 Programming departments A maximum of 42 departments can be programmed. Note: 5.4.1 On leaving the factory, departments 1 to 8 are already assigned VAT rate 1 at 19% and departments 9 to 14 are assigned VAT rate 2 at 7%. All the departments are set up as an itemised department with free pricing. If these settings correspond with those you need, no adjustments to the programme are necessary at this point.
Cash Register CM 910 / 911 / 912 5.4.2 Department programming ● ● Set the key to PRG Select programme number 01 (refer to Chapter 5.1.2). ● Confirm by pressing the CASH key Programming a department name: ● Use the and keys to move to the input area for the department name. ● Confirm by pressing the CASH key. ● Use the CLR key to delete the old department name. ● Enter the required text (max. 18 characters) (refer to Chapter 5.2).
Cash Register CM 910 / 911 / 912 Example: Department 1 should be a positive itemised department with a fixed price of € 3.99, identified by "ABC" and assigned the reduced VAT rate 2 of 7%. Input Display Initiate department programming: =DEPARTMENT [ Dept01 3 0.00 1 – 1= ] PRICE 1 TAX GROUP 5 STATUS Programming a department name: 3# # 1x then 3# 2x then 3# 3x then 3# 3# Programming a department fixed price: # 3# [ Dept01 ] A AB ABC [ABC ] [0.00 PRICE] 3.
Cash Register CM 910 / 911 / 912 5.5 Programming the PLU (price look up) A maximum of 1250 PLUs can be programmed. 5.5.1 Programmable contents The following points must or can be programmed or defined for each PLU: PLU Number There are 1250 memory locations available. EAN bar codes with up to 13 digits can be read via a bar code scanner. PLU caption You can programme individual PLU names (max. 18 characters). This programming step is optional.
Cash Register CM 910 / 911 / 912 5.5.2 Programming PLUs ● ● Set the key to PRG Select programme number 03 (refer to Chapter 5.1.2). Confirm by pressing the CASH key. The first PLU programmed is always displayed. Select PLU: ● Use the and keys to move to the input area for the PLU number. ● Use the digit keys to define which PLUs to be programmed. ● Confirm by pressing the CASH key The cash register automatically switches to the next programming step.
Cash Register CM 910 / 911 / 912 Navigating in the programmed PLU ● Use the and key to move to the top line and then press the CASH key several times to switch between the memory locations for the programmed PLU. ● Press the DP SHIFT key to access the same position for the next programmed PLU. Example: PLU no. 22 is a positive PLU (PLU status 0) and should be identified by "ABCl". PLU no. 22 should have a fixed price of € 9.99 and be assigned to Department 30.
Cash Register CM 910 / 911 / 912 - Continued Input Display Programme PLU fixed price: # 3# 0.00 PRICE 9.99 PRICE Assign department: # 3# 1 LINK DEPT 30 LINK DEPT Define PLU status: 3# 0 STATUS Enter inventory: 3# 100 STOCK Save and end programming the PLU: # 3# 2# 5.5.3 SAVE… Deleting a PLU ● ● Set the key to PRG Select programme number 03 (refer to Chapter 5.1.2). ● Confirm by pressing the CASH key.
Cash Register CM 910 / 911 / 912 5.6 Clerk system The clerk system serves to assign cash register transactions to the individual clerks. When the clerk system is active, clerks must log on to the cash register with their respective password. When the machine leaves the factory, the clerk system is not active. 5.6.1 Programming clerks A maximum of 8 clerks can be programmed. A name and password can be programmed for each clerk.
Cash Register CM 910 / 911 / 912 Input ● ● Enter a new 6-digit password in the [ ] NEW CODE input area. Confirm by pressing CASH. The cash register automatically switches to the next input area. ● ● Repeat the new password entry in the [ ] Confirm CODE input area. Confirm by pressing CASH. The cash register automatically switches to the next clerk memory location. To select another clerk memory location: ● Use the and keys to move to the top line.
Cash Register CM 910 / 911 / 912 5.6.2 Activating/Deactivating the clerk system The clerk system is activated/deactivated via system option 8 (refer to Chapter 5.13). ● ● Set the key to PRG Select programme number 13 (refer to Chapter 5.1.2). ● Confirm by pressing CASH. ● Use the digit keys to enter 8. ● Use the and keys to access the input area. ● Enter the status number 1 in order to activate the clerk system.
Cash Register CM 910 / 911 / 912 5.7 Programming tender media identification The tender media defines the method of payment for a purchase. There are five different tender media.
Cash Register CM 910 / 911 / 912 5.8 =Programming a surcharge as an amount This function programs a fixed amount for the surcharge. Note: When the cash register is in its default setting, the key for the fixed amount surcharge is not set up on the keyboard. The way in which to program the keyboard is described in Chapter 5.20. Example: A fixed surcharge of € 6.- must be programmed. ● ● Set the key to PRG Select programme number 09 (refer to Chapter 5.1.2). ● Confirm by pressing CASH. ● ● 5.
Cash Register CM 910 / 911 / 912 5.10 Programming a surcharge as a percentage This function programs a surcharge as a percentage value. Note: When the cash register is in its default setting, the key for the percentage surcharge is not set up on the keyboard. The way in which to program the keyboard is described in Chapter 5.20. Example: A percentage value of 10% must be programmed for the surcharge. ● ● Set the key to PRG Select programme number 10 (refer to Chapter 5.1.2).
Cash Register CM 910 / 911 / 912 5.12 Programming the machine number The cash register can be assigned a 4-digit machine number which is then printed on all receipts and reports. Note: If the machine number is 0000, no number is printed. Example: 5555 should be programmed as the machine number. ● ● Set the key to PRG Select programme number 12 (refer to Chapter 5.1.2). ● Confirm by pressing CASH. ● Use the and keys to move to the input area [ ].
Cash Register CM 910 / 911 / 912 5.13.2 Overview of system options Note: The default settings appear in bold print. Note: Generally speaking, the system options need not be changed when the cash register is used normally. System option 1 Status 0 1 2 3 0 2 3 4 1 6 7 8 9 10 11 12 Olympia 2011 Decimal point position: 0 (no point) Decimal point position: 0.0 Decimal point position: 0.00 Decimal point position: 0.
Cash Register CM 910 / 911 / 912 System option Status Setting Rounding always occurs after pressing the SUB-TOTAL and CASH keys.
Cash Register CM 910 / 911 / 912 System option Status 27 Reserved 28 Reserved 29 Reserved 30 0 1 Reserved Receipt counter is only reset to 0 after deleting the electronic journal.
Cash Register CM 910 / 911 / 912 5.13.3 Printing the system options ● ● ● Set the key to PRG Program number 90 is selected automatically (refer to Chapter 5.1.2). Confirm by pressing CASH. Input Display =SETTINGS 3 -90 90. PRINT PROG DUMP The display shows what can be printed. =PRINT PROG DUMP PR 1K DEPARTMENT # PLU CLERK TENDER MEDIA … ● ● Olympia 2011 Use the and keys to select P REGISTER. Confirm by pressing CASH.
Cash Register CM 910 / 911 / 912 5.14 Programming the date and time Example: 17.06.2011 should be programmed as the date. 13:30 should be programmed as the time. ● ● Set the key to PRG Select programme number 14 (refer to Chapter 5.1.2). ● Confirm by pressing CASH. Input Display =Date & Time 3 Date: - 1= DD/MM/YYYY 00/00/2000 Time: HH/MM 00-00 The input area for the day is already selected. # ● Enter the day's date.
Cash Register CM 910 / 911 / 912 5.15 Programming foreign currencies A maximum of 2 foreign currencies can be programmed. Note: If you want to work with a second foreign currency, you must programme FC 2 on the keyboard (refer to Chapters 5.20 and 5.20.2).
Cash Register CM 910 / 911 / 912 - Continued Input ● Use the and keys to move to the input area Native: Enter the local currency. ● Confirm by pressing CASH. ● Conclude programming by pressing the SUB-TOTAL key. ● 5.16 Display # # 3# 2# Native: 0 Native: 1 Native: 1 Programming tax rates A maximum of 4 tax rates can be programmed. Note: When the machine leaves the factory, VAR rate 1 is already pre-programmed to 19% and VAT rate 2 to 7%.
Cash Register CM 910 / 911 / 912 5.17 Programming logo messages The logo message, printed at the top of the receipt, can contain up to 4 lines and a maximum of 32 characters per line. Four logo lines are already pre-programmed. Note: If you do not want to print a logo message, you can delete the pre-programmed logo message lines. Note: Refer to Chapter 5.2 for information on entering text. Note: Text lines which are not programmed are not printed.
Cash Register CM 910 / 911 / 912 5.18 Programming the end lines The end lines on the receipt can contain up to 3 lines and a maximum of 32 characters per line. Three end lines are already pre-programmed. Note: If you do not want to print end lines, you can delete the pre-programmed end lines. Note: Refer to Chapter 5.2 for information on entering text. Note: Text lines which are not programmed are not printed. End lines are programmed analogue to programming logo messages.
Cash Register CM 910 / 911 / 912 Figure 1 Olympia 2011 Page 42 Specifications subject to change without notice!
Cash Register CM 910 / 911 / 912 5.20 Programming the keyboard You can reprogramme the keyboard according to your wants and needs. 5.20.1 Programmable keys The following keys can be programmed: ● Function keys ● Tender media keys (method of payment) ● Foreign currency keys Code numbers Each function has a code number which identifies it uniquely. The code number is required for programming.
Cash Register CM 910 / 911 / 912 - Continued ● Confirm by pressing CASH. The display switches to the next input area [ ] KEY BE ASSIGNED ● Press the CASH key. ● Now press the key to be assigned the new function. The display shows: The code number of the new function is displayed in input area [ ] KEY BE ASSIGNED ● Note: 5.20.3 Conclude programming by pressing the SUB-TOTAL key. Input Display 3# 3# # # ## [ 0] KEY BE ASSIGNED Pls Input Redefine Key Save...!! Please Continue...
Cash Register CM 910 / 911 / 912 6 Operation The cash register must be operated when set to Registration mode, REG. Note: The information below applies for the following subchapters: the cash register is always programmed to 2 decimal places (default setting). ● Set the key to REG Display 19-01-2011 17:30:30 0.00 6.
Cash Register CM 910 / 911 / 912 6.2 Registering departments No decimal point is set when entering prices. The cash register sets the decimal point automatically according to system option 1 (decimal point position). 6.2.1 Example: Single DP registration 100.50 EUR should be registered to Department 1. ● ● ● Note: 6.2.2 Example: Set the key to REG Enter the price (without decimal point, with decimal places). Press the relevant department key.
Cash Register CM 910 / 911 / 912 6.3 Registering PLUs Items (PLUs) are registered by means of PLU numbers. PLUs can only be registered with fixed prices. Note: The cash register can be used to process EAN-8 and EAN-13 bar codes. 6.3.1 Example: Registering a single PLU An item with PLU number 100 should be registered. ● Note: 6.3.2 Example: ● Set the key to REG Enter the PLU number. ● Press the PLU key.
Cash Register CM 910 / 911 / 912 6.4 Registering departments and PLUs together and registering identical goods It is possible to register departments and PLUs together on one receipt. If identical goods are registered, the registration of them can be abbreviated in the case of departments (same department, same price) because price input can be omitted. Example: The following are sold: an item from department 1 at a price of € 12.
Cash Register CM 910 / 911 / 912 6.5 Concluding receipt / Method of payment Payment can be made in various ways: ● CASH ● CHECK ● CARD ● Credit The tender media keys are available on the keyboard (refer to Chapter 5.7) or can be programmed on the keyboard (refer to Chapter 5.20). 6.5.1 Paying with cash and displaying the change ● ● Set the key to REG Complete all the registrations. ● Produce the subtotal by pressing the SUB-TOTAL key (optional process).
Cash Register CM 910 / 911 / 912 6.5.3 Payment by credit card ● ● Set the key to REG Complete all the registrations. ● Produce the subtotal by pressing the SUB-TOTAL key (optional process). ● ● The amount due for payment appears in the display. Enter the amount received from the customer (optional process). ● Press the CARD key.
Cash Register CM 910 / 911 / 912 6.6 Payment in a foreign currency The cash register can operate using two foreign currencies. The cash register automatically converts the price of the registration in the currency selected and back. if necessary. 6.6.1 Example: Paying in a foreign currency with the exact amount A bill totalling € 37.04 in department 1 is paid to the exact amount in USD. ● ● ● ● Set the key to REG Produce the subtotal. Enter the foreign currency memory location. Press the FC key.
Cash Register CM 910 / 911 / 912 Note: Please note that rounding differences can occur during the conversions. Note: In the financial report, the change in the local currency is deducted from the CASH amount in "TOTAL DRAWER". The total of the foreign currency is printed in an extra line. 6.7 Registering surcharges and discounts It is possible to define ● amount-related or ● percentage surcharges and discounts. They can be applied to ● individual PLUs or ● a subtotal.
Cash Register CM 910 / 911 / 912 6.7.2 Registering percentage surcharges and discounts Example: A percentage discount of 10% is assigned to an item with PLU number 100. The subtotal is then produced to which a percentage surcharge of 25% is added. ● ● ● ● Set the key to REG Register the goods to which a percentage surcharge or discount is to be granted. Enter the percentage surcharge or discount. Press the %- or %+ key.
Cash Register CM 910 / 911 / 912 6.9.2 Void If an item has been registered by mistake but the receipt has not yet been concluded by pressing a tender media key, the incorrect registration can be cancelled by means of a void. The void process is used when other items were registered after the item to be cancelled. Example: Three items have been registered: € 10.00 for department 1, € 20.00 for department 2 and € 30.00 for department 3. The second item needs to be cancelled (€ 20.00 for department 2).
Cash Register CM 910 / 911 / 912 6.9.4 Refunds Refunds (retours) must be registered when a customer returns an item after it has been sold and the receipt concluded. Example: € 10 is refunded from department 1. Input Note: 6.10 ● Set the key to REG ● Press the RETOUR key. # ● Register the returned item in the normal way. ● Press the CASH key. Receipt Dept01 # # 3# Refund 1 -10.00 -10.00T1 ---------------------------------------------------TAX1 19,00% -1.60 TOTAL VAT EXCL -8.
Cash Register CM 910 / 911 / 912 6.12 Printing numbers A freely selectable, 8-digit number can be printed on the receipt, e.g. a customer or voucher number. Example: 6.13 The customer number 87654321 should be printed on the receipt. ● Set the key to REG ● Enter the number, maximally 8 digits. ● Press the #/NS.
Cash Register CM 910 / 911 / 912 7 Training Mode Activate Training mode to practice using the cash register. It is important to activate Training mode when practising to ensure the actual sales figures are not falsified. When Training mode is active, all the operating functions can be accessed, the difference to Registration mode being that the entries and transactions are not recorded in the cash register reports.
Cash Register CM 910 / 911 / 912 8 Electronic Journal (EJ) The electronic journal records every entry made on the cash register in the way the input is recorded on the receipt. ● The electronic journal is active when the cash register leaves the factory. It can be deactivated by means of system option 26 (refer to Chapter 5.13). ● Approx. 16,000 (receipt) lines can be stored.
Cash Register CM 910 / 911 / 912 8.1.2 Printing the EJ with totals only ● ● Set the key switch to position X or Z. Select EJ.SUM REP.: Use the and keys to scroll through the Programme menu to the required position or use the digit keys to enter 9 and 7. ● ● Confirm the input by pressing the CASH key; the electronic journal appears in the display. Input Display = X Report # 01.FINANCIAL REP. 3#02.FINA. REP. MON. 03.DEPT. REP. # 04.DEPT. REP. MON. 3# 05.PLU REP. - 1= 06.PLU REP.
Cash Register CM 910 / 911 / 912 8.2 8.2.1 Deleting the electronic journal (EJ) Printing and deleting the EJ Delete the electronic journal by printing the electronic journal in Z-mode (refer to Chapter 8.1). 8.2.2 Deleting the EJ without printing ● ● Set the key to PRG Select programme number 80 (refer to Chapter 5.1.2). ● Confirm by pressing CASH The information which can be deleted appears in the display. ● Use the and keys to move to E-JOURNAL AREA.
Cash Register CM 910 / 911 / 912 9 Cash Register Reports You are obliged to keep the daily Z reports for submission to the revenue authorities. Otherwise, estimations of sales figures may be used within the scope of tax audits. Note: Keep all documents which record how your cash register is programmed for tax audits. Note which documents are required by the financial authorities. 9.1 Types of report Reports can be printed in X or Z mode. X-mode / X-reports The key is set to position X.
Cash Register CM 910 / 911 / 912 9.4 Printing reports ● ● ● Set the key switch to position X or Z. Select the report to be printed: Use the and keys to scroll through the menu to the required position or use the digit keys to enter the report number. Confirm by pressing CASH. The report first appears, together with the totals, in the display. ● ● Press the and keys to view all the report totals in the display. Press the CASH key to start printout.
Cash Register CM 910 / 911 / 912 9.5 Example of a day's Z-report ● ● ● Turn the key switch to Position Z. The cash register is automatically set to 01.FINANCIAL REP. Press the CASH key. The report first appears, together with the totals, in the display. ● Press the and keys to view all the report totals in the display. ● Press the CASH key to start printout.
Cash Register CM 910 / 911 / 912 10 Deleting Cash Register Data This function is used to deleted data stored in the cash register. This includes the report memory, electronic journal or cash register programme, for example. Note: Pay attention to the obligations in respect of providing proof and preserving records for the revenue authorities before starting any deleting functions! Deleted data cannot be restored! ● ● Set the key to PRG Select programme number 80 (refer to Chapter 5.1.2).
Cash Register CM 910 / 911 / 912 11.2 Printer malfunction 1. 2. In the event of a printer error, switch off the cash register immediately and disconnect the power plug. Check that the paper roll is inserted correctly or whether there is a foreign body in the printer mechanism. Remove it, if present. Attention: Remove the foreign body very carefully. Do not use a knife, screwdriver or anything similar! Never use force! This could damage the printer mechanism. 3.
Cash Register CM 910 / 911 / 912 Note: 12.2 During transfer, PLEASE WAIT appears in the display. Never interrupt this process! Bar code scanners A bar code scanner can be used to read 8 and 13-character EAN codes. 12.
Cash Register CM 910 / 911 / 912 12.4 Rechargeable battery Part number 947990002 When the battery is fully charged, it can operate the cash register for a maximum of 5 hours without the need of a power cable. Note: The runtime of the cash register by the battery depends on the quantity and length of the receipts printed. 5 hours can be achieved when approx. 50 receipts with just 15 text lines are printed. When the battery capacity is too low, L (Low) appears in the cash register display.
All Rights Reserved