
Operation Manual


Cash Register CM 980-SF / 980-F / 960-SF / 962-SF
Olympia
2012 Page 34 All Rights Reserved!
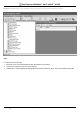
5.7.2 Transferring individual data files from the PC to the cash register
1. Select the content to be transferred in the selection window and display it on the monitor screen (see Chapter 5.5).
2. Click on Update To ECR.
Note: Please note that when using Update To ECR, only the current screen contents are transferred!
While the data is being transferred to the cash register, the ONLINE STATUS message appears in the cash register dis-
play.
Note: If you attempt to transfer a PLU file, a dialogue box appears in which the cash register asks if only new PLUs
should be transferred or all PLUs (including all modifications) should be replaced. Data transfer only starts
after the prompt has been answered by making the required selection.
3. Wait until the prompt disappears.
4. When data transfer has been completed, switch the cash register off and then on again.
Important: *** After data has been transferred, the software requires the cash register is switched off briefly! ***
5.8 Transferring data from the cash register to the PC (backup copy)
If you have completed programming directly on the cash register, we recommend you transfer the data to the PC to
create a backup copy because programming on the cash register is very time-consuming.
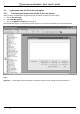
1. Click on ECR Setting(E).
2. Select Data Management.
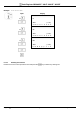
3. Click on the [Upload From ECR] button (see Fig. 9).
Data transfer then begins. A corresponding window appears on the screen and indicates the current transfer status.
Proceed as follows to save the file:
4. Click on System Setting(S).
5. Select Database Backup….
5.9 Data input, in detail
Chapter 6 of the operating instructions describes how to enter data using the cash register keyboard. Chapter 6 describes
the individual functions and necessary input.
If you want to enter this data using the PC, the relevant PC input mask is illustrated at the end of each subchapter of
Chapter 6. The way to complete the input mask is explained in Chapter 5. The basic procedure is identical for each mask.
In the case of queries regarding the fields, the Help feature can often provide assistance. This can be opened by double-
clicking the left-hand mouse button on the relevant field.