
Operation Manual


Cash Register CM 980-SF / 980-F / 960-SF / 962-SF
Olympia
2012 Page 60 All Rights Reserved!
6.7.2 Programming LINK PLUs
1. Set the key to PRG.
2. Select programming number 04 (see Chapter 6.1.2).
3. Press the ┣CASH┫ key to confirm the input.
The first PLU programmed is always displayed.
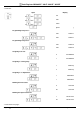
Entering the LINK PLU number:
4. Use the ┣↑┫ and ┣↓┫ keys to move to the input area for the LINK PLU number.
5. Use the numeric keys to define which LINK PLU is to be programmed.
6. Press the ┣CASH┫ key to confirm the input.
The cash register automatically switches to the next programming step.
Programming the LINK PLU name:
7. Use the ┣↑┫ and ┣↓┫ keys to move to the input area for the LINK PLU name.
8. Press the ┣CASH┫ key to confirm the input.
9. Enter the required text (max. 18 characters) (see Chapter 6.2).
Save each letter after entry by pressing the ┣CASH┫ key!
10. Press the ┣CASH┫ key to confirm the input.
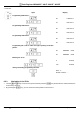
Programming LINK PLU fixed price 1:
11. Use the ┣↑┫ and ┣↓┫ keys to move to the input area for LINK PLU fixed price 1.
12. Enter the fixed price 1 (including decimal place and decimal point).
13. Press the ┣CASH┫ key to confirm the input.
The cash register automatically switches to the next programming step.
Programming LINK PLU fixed price 2:
14. Enter the fixed price 2 (including decimal places and decimal point).
15. Press the ┣CASH┫ key to confirm the input.
The cash register automatically switches to the next programming step.
Assigning to a PLU group:
16. Enter the 2-digit number of the PLU group.
17. Press the ┣CASH┫ key to confirm the input.
The cash register automatically switches to the next programming step.
Assigning a VAT rate:
18. Enter the tax rate group.
19. Press the ┣CASH┫ key to confirm the input.
The cash register automatically switches to the next programming step.
Assigning to a department :
20. Enter the department number as a 2-digit number.
21. Press the ┣CASH┫ key to confirm the input.
The cash register automatically switches to the next programming step.
Programming the LINK PLU status:
22. Enter the LINK PLU status number.
23. Press the ┣CASH┫ key to confirm the input.
The system is now at the beginning of the programmed LINK PLU.
24. After all of the PLUs have been programmed and saved, terminate programming
by pressing the ┣CASH┫ and ┣SUB-TOTAL┫ keys.