DIGITAL CAMERA FE-210/X-775 Advanced Manual Quick Start Guide Get started using your camera right away. Button operations Menu operations Printing pictures Using OLYMPUS Master Getting to know your camera better Appendix ( Thank you for purchasing an Olympus digital camera. Before you start to use your new camera, please read these instructions carefully to enjoy optimum performance. Keep this manual in a safe place for future reference.
Contents Quick Start Guide P. 3 Button operations Menu operations P. 16 Printing pictures P. 28 Using OLYMPUS Master P. 37 Getting to know your camera better Appendix 2 EN P. 10 Test out the functions of the camera buttons by following along with the illustrations Learn about the menus that control the functions and settings for basic operation. Learn how to print pictures you have taken. Learn how to transfer and save pictures to a computer. P.
Gather these items (box contents) USB cable Strap Video cable Other items AA batteries (2) OLYMPUS Master CD-ROM • Basic Manual • Advanced Manual (this manual) • Warranty card Contents may vary depending on purchase location. Quick Start Guide Digital camera Attach the strap ( Pull the strap tight so that it does not come loose.
Insert the batteries a. Insert the batteries into the camera. Quick Start Guide 2 6 3 1 4 5 ( Even when an optional xD-Picture Card™ (hereinafter called the card) is not inserted, you can take a picture. For details on inserting an optional card, please refer to “Inserting and removing the card” (P. 56). O Hint The directions of the arrow pad (ONXY) is indicated with ONXY in this manual.
Turn the camera on This explains how to turn on the camera in shooting mode. a. Set the mode dial to h. When shooting movies Still picture shooting modes h h B E M f g This function allows you to shoot with the camera's automatic settings. This function stabilizes images when taking pictures. Suitable for taking pictures of people. Suitable for taking pictures of landscapes. Suitable for taking pictures of people at night. Select from 10 scene modes according to the shooting conditions.
Set date and time About the date and time setting screen Y-M-D (Year-Month-Day) X Hour Y M D TIME ----.--.-- --:-- Quick Start Guide CANCEL Minute Date formats (Y-M-D, M-D-Y, D-M-Y). Y/M/D MENU Cancel the setting a. Press the OF/< button and the NY button to select [Y]. ( The first two digits of [Y] are fixed. OF/< button X Y < M D TIME 2007.--.-2007 .--.-- --:-- NY button CANCEL Y/M/D MENU b. Press the Y# button. < Y# button c. Press the OF/< button and the NY button to select [M].
X Y M D TIME 2007.08 2007 08.26 26 --:-- CANCEL f. Press the Y# button. g. Press the OF/< button and the NY button to select “hour” and “minute”. ( The time is displayed in the 24-hour format. MENU X Y M D TIME 2007.08 2007 08.26 26 12 12:30 30 CANCEL h. Press the Y# button. i. Press the OF/< button and the NY button to select [Y/M/D]. Y/M/D Y/M/D SET OK MENU X Y M D TIME 2007.08 2007 08.26 26 12 12:30 30 CANCEL j. Y/M/D Quick Start Guide d. Press the Y# button. e.
Take a picture a. Hold the camera. Horizontal grip Vertical grip [ ] Quick Start Guide HQ 3072×2304 [IN IN] b. Focus. 4 Place this mark over your subject. Shutter button Press halfway [ ] HQ 3072×2304 [ IN ] 4 The number of remaining still pictures is displayed. The green lamp indicates the focus and exposure are locked. c. Shoot. The card access lamp blinks.
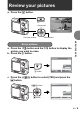
Review your pictures a. Press the q button. [IN IN] q button Arrow pad HQ 3072×2304 0.0 '07.08.26 12:30 100-0001 1 < Erase pictures a. Press the X& button and the Y# button to display the picture you want to erase. b. Press the S button. Quick Start Guide Next picture Previous picture ERASE YES NO S button BACK MENU SET OK c. Press the OF/< button to select [YES] and press the H button.
Button operations 3 1 4 2 6 0 9 < 5 a c 8 b 7 d Self-timer Shooting mode Exposure compensation +2.0 Button operations Macro/ Super macro mode 1 o button Power on: HQ 3072×2304 4 Flash mode Turning the camera on and off Camera turns on in the shooting mode. • Lens extends • Monitor turns on 2 Shutter button Shooting pictures Shooting still pictures Set the mode dial to anything except A and press the shutter button lightly (halfway).
Recording movies Set the mode dial to n, and press the shutter button halfway to lock the focus. Press the shutter button completely to start recording, and press the shutter button again to stop recording. 3 K button (Shooting) Selecting shooting mode/turning on the power Switching to the shooting mode. While the camera is off, it can be set to turn on in shooting mode when K is pressed. g “K/q Turning on the camera with the K or q button” (P.
f Shoot pictures by selecting a scene mode according to the situation You can shoot pictures by selecting from 10 types of scenes according to the situation. Press H to confirm your selection. jSPORT / NINDOOR / bCANDLE / RSELF PORTRAIT / SSUNSET / cFIREWORKS / VBEHIND GLASS / VCUISINE / dDOCUMENTS / iAUCTION j N W 1 SPORT R BACK MENU SET OK • The scene mode selection screen displays sample images as well as a description of the shooting situation for which it is designed.
6 Zoom lever Shooting mode: Zooming while shooting/close-up playback Zooming in on your subject (Optical zoom x digital zoom: 12x) Zoom out: Zoom in: Turn the zoom lever to the W side. Turn the zoom lever to the T side. Zoom bar White area: Optical zoom area Red area: Digital zoom area 4 HQ 3072×2304 Playback mode: 4 HQ 3072×2304 Changing the picture display Single-frame playback • Use the arrow pad to browse pictures. W T HQ 3072×2304 0.0 T ’07 07.08 08.
7 MENU button Displaying the menu Displays the Top Menu. 8 Arrow pad (ONXY) Use the arrow pad to select scenes, playback picture, and the items on the menus. 9 H button This button is used to confirm your selection. 0 OF / < button Changing picture brightness/Printing pictures Shooting mode: Changing picture brightness In shooting mode press OF/<, set with XY, then press H. • Adjustable from - 2.0 EV to + 2.0 EV. + 2.0 Y: Brightens. X: Darkens.
b NY button Self-timer shooting Press NY in shooting mode to select on and off of the self-timer. Press H to confirm your selection. OFF SELFTIMER OFF Cancel the self-timer. Y Set the self-timer. SELFTIMER ON • After setting the self-timer, press the shutter button completely. Then the self-timer lamp lights for approximately 10 seconds, blinks for approximately 2 seconds, and the shutter is released. • To cancel the self-timer, press NY.
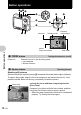
Menu operations K button (Shooting mode) q button (Playback mode) H button < Arrow pad (ONXY) MENU button About the menus Press m to display the Top Menu on the monitor. • The items displayed on the Top Menu differ according to the mode.
Operation guide During menu operations, the buttons and their respective functions are displayed at the bottom of the monitor. Follow these guides to navigate the menus. PANORAMA RESET IMAGE QUALITY SETUP SCENE EXIT MENU SILENT MODE SET OK Operation guide BACK MENU : EXIT MENU : : SET OK : Returns to the previous menu. Exits the menu. Press the arrow pad (ONXY) to select a setting. Sets the selected item.
3 Use arrow pad ON to select [VIDEO OUT], and press H. • Unavailable settings cannot be selected. • Press X in this screen to move the cursor to the page display. Press ON to change the page. To select an item or function, press Y or H. SETUP MEMORY FORMAT 1 2 BACKUP W ENGLISH PIXEL MAPPING K/q BACK Page display: The page display mark is displayed when there are additional menu items on the next page. MENU 1 SETUP s 2 BEEP X VIDEO OUT BACK MENU NO SET OK NORMAL ON '07.08.
1 IMAGE QUALITY Changing the image quality Still picture image quality and their applications Image quality/Image size Compression Application SHQ 3072 × 2304 Low compression HQ 3072 × 2304 Standard compression SQ1 2048 × 1536 Standard compression • This is useful for printing on A4-size (11.7 × 8.5 in.) or postcard-sized (6 × 4 in.) paper. • This is useful for computer editing such as rotating or adding text to a picture.
Use the arrow pad to specify at which edge you want to connect the pictures; and then compose your shots so that the edges of the pictures overlap. The part of the previous picture that will be combined will not remain in the frame. Remember the frame displayed on the monitor as a rough indication, then compose the shot so that the edges of the previous picture in the frame overlap with the next shot. • Press H to exit panorama shooting. • Panorama shooting is possible for up to 10 pictures.
q Playback mode menu When a still picture is selected 3 7* 1 5 6 SLIDESHOW RESIZE When a movie is selected PRINT ORDER MOVIE PLAY PLAYBACK MY MENU SETUP FAVORITE ERASE RESIZE PRINT ORDER PLAYBACK MY MENU SETUP FAVORITE SILENT MODE ERASE SILENT MODE SET OK EXIT MENU SET OK EXIT MENU 3 2 4 4 * A card is required. g “SETUP menu” (P. 25) g “SILENT MODE Setting to turn off operational sounds” (P. 20) • The factory default settings are displayed in gray ( 1 SLIDESHOW ).
Operations during pause HQ 320×24 32 240 ’07 07.08 08.16 16 12 12:30 30 100-0004 100 0004 00:05 00 05 / 00:36 00 36 O: Displays the first frame. N: Displays the last frame. Y: Plays the movie while pressed. X: Plays the movie in reverse while pressed. • To resume the movie, press H. • To cancel the playback of the movie in the middle of it or during pause, press MENU. 3 PLAYBACK MENU 0 .......................................................................................................
4 ERASE Erase selected pictures/Erase all pictures Protected pictures cannot be erased. Cancel protection before erasing protected pictures. Once erased, pictures cannot be restored. Check each picture before erasing to avoid accidentally erasing pictures you want to keep. • When erasing a picture in the internal memory, do not insert a card into the camera. • When erasing a picture from the card, insert a card into the camera in advance. SEL. IMAGE .......................................................
VIEW FAVORITES..................................................... Viewing the registered pictures • Select [VIEW FAVORITES] to display the registered pictures in My Favorite. Use the arrow pad to browse other pictures. • [ADD FAVORITE] and [SLIDESHOW] can be selected by pressing m. My Favorite ADD FAVORITE SLIDESHOW EXIT MENU EXIT SET OK ADD FAVORITE Register a picture in My Favorite. • Select the picture with XY, and press H. SLIDESHOW Plays back registered pictures automatically.
SETUP menu Shooting mode PANORAMA RESET IMAGE QUALITY SETUP SCENE SILENT MODE SET OK EXIT MENU Playback mode SLIDESHOW RESIZE PRINT ORDER PLAYBACK MY SETUP MENU FAVORITE ERASE EXIT MENU SILENT MODE SETUP MEMORY FORMAT (FORMAT*1) BACKUP*1 W PIXEL MAPPING*2 K/q s BEEP X VIDEO OUT *1 *2 A card is required. You cannot select this item in playback mode. SET OK All existing data, including protected pictures, are erased when the internal memory or card is formatted.
PIXEL MAPPING ........................................Adjusting the image processing function The pixel mapping feature allows the camera to check and adjust the CCD and image processing functions. It is not necessary to operate this function frequently. Approximately once a year is recommended. Wait at least one minute after taking or viewing pictures to allow the pixel mapping function to perform properly. If you turn the camera off during pixel mapping, start again.
VIDEO OUT .................................................................... Playing back pictures on a TV NTSC / PAL The factory default settings differ according to the region where the camera is sold. • TV video signal types by country/region. Check the video signal type before connecting the camera to the TV. NTSC: North America, Taiwan, Korea, Japan PAL: European countries, China Playing back pictures on a TV Turn off the camera and the TV before connecting.
Printing pictures Direct printing (PictBridge) By connecting the camera to a PictBridge-compatible printer, you can print pictures directly - no computer necessary. Select the pictures you want to print and the number of prints using the camera’s print menus. To find out if your printer is compatible with PictBridge, refer to the printer’s instruction manual. What is PictBridge? A standard for connecting digital cameras and printers of different makers and printing out pictures directly.
2 Turn the printer on and plug the USB cable (provided) into the camera’s USB connector and the printer’s USB port. Connector cover USB connector USB cable (provided) • The [EASY PRINT START] screen is displayed. • For details of how to turn the printer on and the position of the USB port, refer to the printer’s instruction manual. 3 Press OF/<. • Printing starts.
5 Disconnect the USB cable from the printer. You can use [EASY PRINT] even when the camera is turned off or in shooting mode. With the camera turned off or in shooting mode, connect the USB cable. The selection screen for the USB connection is displayed. Select [EASY PRINT]. g “EASY PRINT” step 3 (P. 29), “Other print modes and print settings (CUSTOM PRINT)” step 2 (P.
Selecting a print mode PRINT ALL PRINT PRINT MODE SELECT PRINT ALL PRINT MULTI PRINT MULTI PRINT ALL INDEX EXIT MENU SET OK ALL INDEX PRINT ORDER Prints the selected picture. Prints all the pictures stored in the internal memory or on the card. Prints one picture in multiple layout format on a single sheet of paper. Prints an index of all the pictures stored in the internal memory or on the card. Prints the pictures according to the print reservation data on the card.
Selecting the picture to print PRINT 100-0004 100 0004 PRINT OK MORE SINGLEPRINT < Prints one copy of the selected picture. When [SINGLE PRINT] or [MORE] has been selected, a single copy or more copies are printed. Makes a print reservation for the displayed picture. Sets the number of prints and data to be printed for the displayed picture. SINGLE PRINT MORE Press XY to select the picture you want to print. You can also use the zoom lever and select a picture from the index display.
5 In the [PRINT MODE SELECT] screen, press MENU. PRINT MODE SELECT PRINT • A message is displayed. ALL PRINT MULTI PRINT ALL INDEX 6 EXIT MENU SET OK Disconnect the USB cable from the camera. • The camera turns off. 7 Disconnect the USB cable from the printer. Print settings (DPOF) How to make print reservations Printing pictures Print reservations allows you to save printing data (the number of prints and the date and time information) with the pictures stored on the card.
Note • DPOF reservations set by another device cannot be changed by this camera. Make changes using the original device. If a card contains DPOF reservations set by another device, entering reservations using this camera may overwrite the previous reservations. • You can make DPOF print reservations for up to 999 images per card. • Not all functions may be available on all printers or at all photo stores.
6 Select [SET], and press H. PRINT ORDER 2 ( 4 ) SET CANCEL BACK MENU SET OK All-frame reservation Reserves all the pictures stored on the card. The number of prints is set at one print per picture. 1 2 3 Press MENU in the playback mode to display the Top Menu. Select [PRINT ORDER] Select the date and time setting, and press H. NO DATE TIME 4 and then [U], and press H. The pictures are printed without the date and time. All pictures are printed with the shooting date.
To reset the print reservation data for a selected picture: 2 3 4 Select [<] and press H. Select [KEEP], and press H. Press XY to select the picture with the print reservations you want to cancel, and press N to decrease the number of prints to 0. • Repeat step 4 to cancel print reservations for other pictures. 5 6 When you are finished canceling print reservations, press H. Select the date and time setting, and press H. • The setting is applied to the remaining pictures with print reservations.
Using OLYMPUS Master Overview Using the USB cable provided with your camera, you can connect the camera and computer and download (transfer) the images to your computer using the OLYMPUS Master software, also provided with the camera. Prepare the following items before starting. gP. 38 Connect the camera to the computer using the USB cable gP. 40 Start up the OLYMPUS Master software gP. 41 Download image files to the computer gP. 41 Disconnect the camera from the computer gP.
Install the OLYMPUS Master software Before installing the OLYMPUS Master software, please confirm that your computer is compatible with the following system requirements. For newer operating systems, please refer to the Olympus web site as shown on the back cover of this manual.
Windows 1 Insert the CD-ROM into the CD-ROM drive. • The OLYMPUS Master setup screen is displayed. • If the screen is not displayed, double-click the “My Computer” icon and click the CD-ROM icon. 2 Select the display language and click the “OLYMPUS Master 2” button. • When the component installation screen is displayed, click “OK”. 3 Click “Next” and follow the on-screen instructions. 4 When the user information screen is displayed, enter your “Name”, select your “Region” and click “Next”.
Macintosh 1 Insert the CD-ROM into the CD-ROM drive. • The CD-ROM window is displayed. • If the CD-ROM window is not displayed, double-click the CD-ROM icon on the desktop. 2 Double-click the “Setup” icon on the desktop. • The OLYMPUS Master installation screen is displayed. • Follow the on-screen instructions. • When the OLYMPUS Master licensing agreement is displayed, read the agreement and click “Continue” and then “Continue” to proceed with the installation.
4 The camera is recognized by the computer. • Windows When you connect the camera to your computer for the first time, the computer attempts to recognize the camera. Click “OK” to exit the message that is displayed. The camera is recognized as a “Removable Disk”. • Macintosh The iPhoto program is the default application for managing digital images. When you connect your digital camera for the first time, the iPhoto application starts automatically, so close this application and start OLYMPUS Master.
4 Click “Browse images now”. • The downloaded images are displayed in the browse window. To disconnect the camera 1 Make sure that the card access lamp has stopped blinking. 2 Make the following preparations for disconnecting the USB cable. Card access lamp Windows Using OLYMPUS Master 1 Click the “Unplug or Eject Hardware” icon in the system tray. 2 Click the message that is displayed. 3 When a message is displayed saying that the hardware can be ejected safely, click “OK”.
Viewing still pictures and movies 1 Click the “Album” tab on the browse window and select the album that you want to view. Thumbnail • The selected album image is displayed in the thumbnail area. 2 Double-click the still picture thumbnail that you want to view. • OLYMPUS Master switches to the image edit window and the picture is enlarged. • Click “Back” to return to the browse window. 1 Double-click the movie thumbnail that you want to see in the browse window.
Note • If your computer is running Windows 98SE, you will need to install the USB driver. Before connecting the camera to your computer with the USB cable, double-click the files from the following folders on the provided OLYMPUS Master CD-ROM. (Drive name): \win98usb\INSTALL.EXE • If your computer is running Windows Vista, you can select [PC] in Step 3 on P. 40, press Y, and select [MTP] to use Windows Photo Gallery.
Getting to know your camera better Shooting tips and information Tips before you start taking pictures The camera does not turn on even when a battery is loaded The battery is inserted incorrectly • Remove the batteries and insert them correctly. There is not enough power left in the battery • Insert new batteries. Or, charge it when using the rechargeable battery.
Shooting tips Focusing on the subject There are several ways to focus, depending on the subject. When the subject is not in the center of the frame • Place the subject in the center of the frame, lock the focus on the subject, and then recompose your picture. g “Shutter button Shooting pictures” (P. 10) The subject is moving quickly • Focus the camera on a point roughly the same distance away as the subject you want to shoot and lock the focus (by pressing the shutter button halfway).
Taking pictures without the flash The flash is activated automatically when there is insufficient light and the camera is shaken. To take pictures without using the flash even when it is dark, set the flash mode to [$] (FLASH OFF). The picture is too grainy There are several factors that can cause the picture to appear grainy. Using the digital zoom to take close-up pictures • With the digital zoom, part of the image is cropped and enlarged. The greater the magnification, the grainier the picture appears.
Additional shooting tips and information Increasing the number of pictures that can be taken There are two ways to record the pictures you take with this camera. Recording pictures to the internal memory • Pictures are recorded to the internal memory, and when the number of storable still pictures reaches 0, you must connect the camera to a computer to download the pictures, and then erase the pictures from the internal memory.
Lamp indicators This camera uses several lamps to indicate the camera status. Status The lamp lights for approximately 10 seconds, blinks for approximately 2 seconds, and then the picture is taken. Card access lamp Lit (red): Shooting mode and power is on. Lit (green): Playback mode and power is on. Off: Power is off. Blinking (red): An image or movie is being recorder or downloaded (when connected to a computer). • Do not do any of the following while the card access lamp is blinking.
Restoring default settings • To return the changed shooting settings to default settings while shooting, set [RESET] to [YES]. g “RESET Restoring default settings” (P. 20) • When the camera is turned off, all the shooting settings other than [IMAGE QUALITY] and the scene mode return to default. Playback tips Playing back the pictures in the internal memory A card is inserted in the camera • When a card has been inserted in the camera, the pictures in the internal memory cannot be played back.
Monitor indication q CARD ERROR q Possible cause There is a problem with the card. Corrective action This card cannot be used. Insert a new card. Writing to the card is prohibited. The recorded image has been protected (read-only) on a computer. Download the image to a computer and cancel the read-only setting. Insert a card or erase unwanted data. Before erasing, backup the data of important pictures using the card, or download such pictures to a computer. Replace the card or erase unwanted data.
Monitor indication CARD SETUP Possible cause This card cannot be used in this camera. Or, the card is not formatted. POWER OFF FORMAT SET OK There is an error in the internal memory. MEMORY SETUP POWER OFF MEMORY FORMAT Corrective action Format the card or replace. • Select [POWER OFF] and press H and then insert a new card. • Select [FORMAT] [YES] and press H. The card is formatted. All data on the card is erased during formatting. Select [MEMORY FORMAT] [YES] and press H.
Functions available in shooting modes and scene modes Some functions cannot be set in certain shooting modes. For more details, refer to the table below.
Appendix Camera care Cleaning the camera Exterior: • Wipe gently with a soft cloth. If the camera is very dirty, soak the cloth in mild soapy water and wring well. Wipe the camera with the damp cloth and then dry it with a dry cloth. If you have used the camera at the beach, use a cloth soaked in clean water and wrung well. Monitor: • Wipe gently with a soft cloth. Lens: • Blow dust off the lens with a commercial blower, then wipe gently with a lens cleaner.
( The battery life varies widely depending on the type of battery, manufacturer, shooting conditions, etc. Because of this, there may be cases where the camera turns itself off without displaying the battery level warning, or displays the battery level warning sooner than usual. Useful use of the accessories The card Pictures can be recorded on the optional card. The internal memory and card are the camera’s media for recording pictures, similar to film in a film camera.
Inserting and removing the card Turn off the camera. 1 2 Open the battery/card compartment cover. Battery/card compartment cover 2 3 Inserting the card 3 Orient the card as shown, and insert it into the card slot as shown in the illustration. • Insert the card straight in. • Insert the card until it clicks into place. Notch Removing the card 4 Push the card all the way in and release slowly. Appendix • The card protrudes slightly and stops. • Grasp the card and remove it.
5 Close the battery/card compartment cover. 2 1 Note • The card access lamp blinks while the camera is reading or writing the images. Do not open the battery/card compartment cover while the card access lamp is blinking. Doing so may damage the data in the internal memory or the card and render the internal memory or card unusable. Card access lamp AC adapter An AC adapter is useful for time-consuming tasks such as image downloads to a computer or when running a slideshow for a long period of time.
SAFETY PRECAUTIONS CAUTION RISK OF ELECTRIC SHOCK DO NOT OPEN CAUTION: TO REDUCE THE RISK OF ELECTRICAL SHOCK, DO NOT REMOVE COVER (OR BACK). NO USER-SERVICEABLE PARTS INSIDE. REFER SERVICING TO QUALIFIED OLYMPUS SERVICE PERSONNEL. An exclamation mark enclosed in a triangle alerts you to important operating and maintenance instructions in the documentation provided with the product.
Product Handling Precautions ( ( ( ( ( ( ( ( ( WARNING Do not use the camera near flammable or explosive gases. Do not use the flash on people (infants, small children, etc.) at close range. • You must be at least 1 m (3 ft.) away from the faces of your subjects. Firing the flash too close to the subject’s eyes could cause a momentary loss of vision. Keep young children and infants away from the camera.
WARNING • Keep batteries dry at all times. • To prevent batteries from leaking, overheating, or causing a fire or explosion, use only batteries recommended for use with this product. • Never mix batteries (old and new batteries, charged and uncharged batteries, batteries of different manufacture or capacity, etc.). • Do not charge alkaline or lithium batteries if they are not rechargeable. • Insert the battery carefully as described in the operating instructions.
Caution for Usage Environment •To protect the high-precision technology contained in this product, never leave the camera in the places listed below, no matter if in use or storage: • Places where temperatures and/or humidity are high or go through extreme changes. Direct sunlight, beaches, locked cars, or near other heat sources (stove, radiator, etc.) or humidifiers. • In sandy or dusty environments. • Near flammable items or explosives. • In wet places, such as bathrooms or in the rain.
Copyright Notice All rights reserved. No part of these written materials or this software may be reproduced or used in any form or by any means, electronic or mechanical, including photocopying and recording or the use of any type of information storage and retrieval system, without the prior written permission of Olympus.
For customers in Europe For customers in Europe “CE” mark indicates that this product complies with the European requirements for safety, health, environment and customer protection. “CE” mark cameras are intended for sales in Europe. Use Only Dedicated Rechargeable Battery and Battery Charger We strongly recommend that you use only the genuine Olympus dedicated rechargeable battery and battery charger with this camera.
Notes regarding warranty maintenance 1. This warranty will only be valid if the Warranty Certificate is duly completed by Olympus or an authorized dealer or other documents contain sufficient proof. Therefore, please make sure that your name, the name of the dealer, the serial number and the year, month and date of purchase are all completed or the original invoice or the sales receipt (indicating the dealer’s name, the date of purchase and product type) is attached to this Warranty Certificate.
Specifications (Camera Product type Recording system Still pictures : Digital recording, JPEG (for shooting and displaying) Appendix : Digital recording, JPEG (in accordance with Design rule for Camera File system (DCF)) Applicable standards : Exif 2.2, Digital Print Order Format (DPOF), PRINT Image Matching III, PictBridge Movie : AVI Motion JPEG Memory : Internal memory xD-Picture Card (16 MB to 2 GB) (Type H/M, Standard) Number of effective pixels : 7,100,000 pixels Image pickup device : 1/2.
Camera diagram Camera Strap eyelet (P. 3) Shutter button (P. 8, 10) Zoom lever (P. 13) VIDEO OUT jack (P. 27) o button (P. 5, 10) Connector cover/USB connector (P. 27, 29, 40) Monitor (P. 26, 61) Flash (P. 15) Lens (P. 54) Self-timer lamp (P. 15, 49) K button (P. 11) Card access lamp (P. 49) q button (P. 9, 11) Mode dial (P. 5, 11) F/< button (P. 14) Appendix Arrow pad (ONXY) (P. 14) # button (P. 15) H button (P. 14) & button (P. 14) Y button (P. 15) S button (P. 9, 15) MENU button (P.
Monitor symbols and icons (Shooting mode 1 2 3 4 5 6 1 2 +2.0 7 8 HQ 3072 3072×2304 10 11 4 5 7 13 8 +2.0 4 HQ 12 9 Still picture 14 13 00:36 11 12 Movie Item Indications 1 Shooting mode P, h, B, F, U, C etc. 2 Self-timer Y Ref. page P. 5, 18 P. 15 3 Exposure compensation -2.0 – +2.0 P. 14 4 Battery check e (full power), f (low power) P. 51 5 Green lamp | (Auto Focus Lock) P. 8, 49 6 Flash standby Camera movement warning/flash charge # (Lit) P.
(Playback mode 1 2 3 1 10 11 HQ 3072×2304 +2.0 ’07 07.08 08.16 16 12 12:30 30 100-0004 100 0004 4 4 5 6 7 2 11 Indications Ref. page 1 Battery check e (full power), f (low power) P. 51 2 Current memory [IN] (Playing back the pictures in the internal memory), [xD] (Playing back the pictures in the the card) P. 55 3 Print reservation/ number of prints <×10 P. 34 n P. 21 4 Protect 9 P. 22 5 Image quality SHQ, HQ, SQ1, SQ2, 16:9 P.
Index S button (Erase) . . . . . . . . . . . . . 9, 15 OF/< button (Exposure compensation/Print) . . . . . . . . . . . . . . . . 14, 29 Y#button (Flash mode) . . . . . . . . . 15 X& button (Macro) . . . . . . . . . . . . 14 H button (OK) . . . . . . . . . . . . . 14, 16 q button (Playback) . . . . . . . . . 9, 11 NY button (Self-timer). . . . . . . . . . 15 K button (Shooting) . . . . . . . . . . . 11 K/q . . . . . . . . . . . . . . . . . . . . . . . 26 h (Auto) . . . . . . . . . . . . . . . .
g (Shooting guide) . . . . . . 5, 12 H HQ. . . . . . . . . . . . . . . . . . . . . . . . . . 19 I IMAGE QUALITY . . . . . . . . . . . 19, 49 Image size. . . . . . . . . . . . . . . . . . . . 19 Index display G . . . . . . . . . . . . . . . 13 INDOOR N . . . . . . . . . . . . . . . . . . 12 Internal memory . . . . . . 25, 48, 50, 55 M Macro mode & . . . . . . . . . . . . . . . . 14 MEMORY FORMAT . . . . . . . . . . . . 25 Menu . . . . . . . . . . . . . . . . . . . . . 16, 17 MENU button. . . . . . . . . .
Single-frame reservation < . . . . . . 34 Sleep mode . . . . . . . . . . . . . . . . . . . 45 SLIDESHOW. . . . . . . . . . . . . . . 21, 24 SPORT j . . . . . . . . . . . . . . . . . . . 12 SQ1 . . . . . . . . . . . . . . . . . . . . . . . . . 19 SQ2 . . . . . . . . . . . . . . . . . . . . . . . . . 19 STANDARD. . . . . . . . . . . . . . . . . . . 28 SUNSET S . . . . . . . . . . . . . . . . . . 12 Super macro mode % . . . . . . . . . . 14 T Top Menu . . . . . . . . . . . . . . . . . . . .
VH929602