d4344_4356_e_0000.book Page 1 Monday, December 17, 2007 9:13 AM DIGITAL CAMERA Instruction Manual Quick Start Guide Get started using your camera right away. Button operations Menu operations Printing pictures Using OLYMPUS Master Getting to know your camera better Appendix ( Thank you for purchasing an Olympus digital camera. Before you start to use your new camera, please read these instructions carefully to enjoy optimum performance and a longer service life.
d4344_4356_e_0000.book Page 2 Monday, December 17, 2007 9:13 AM Contents Quick Start Guide Button operations 2 EN P.3 P.11 Test out the functions of the camera buttons by following along with the illustrations. Menu operations P.20 Learn about the menus that control the functions and settings for basic operation. Printing pictures P.40 Learn how to print pictures you have taken. Using OLYMPUS Master P.45 Getting to know your camera better P.
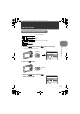
k Start Guide d4344_4356_e_0000.book Page 3 Monday, December 17, 2007 9:13 AM Gather these items (box contents) Digital Camera USB cable Lithium Ion Battery (LI-50B) AV Cable Quick Start Guide Battery Charger (LI-50C) Strap OLYMPUS Master 2 CD-ROM Items not shown: Instruction Manual (this manual), warranty card. Contents may vary depending on purchase location. Attach the strap Pull the strap tight so that it does not come loose.
d4344_4356_e_0000.book Page 4 Monday, December 17, 2007 9:13 AM Preparing the camera a. Charge the battery. Note There are two types of the LI-50C battery charger, one is “AC cable type” and the other is “plug-in type”. Depending on the region where you purchased the camera, the included battery charger type differs. We explain here how to use the AC cable type battery charger as an example. If you received the plug-in type battery charger, plug it directly into an AC outlet.
d4344_4356_e_0000.book Page 5 Monday, December 17, 2007 9:13 AM Preparing the camera ( Insert the battery in the correct way as shown in the illustration. 3 If you insert the battery reversely, the camera will not turn on even if the o button is pressed. Battery lock knob To remove the battery, slide the battery lock knob in the direction of the arrow. Quick Start Guide Contact area Orient the card as shown in the illustration and insert it straight into the card slot.
d4344_4356_e_0000.book Page 6 Monday, December 17, 2007 9:13 AM Turn the camera on This explains how to turn on the camera in shooting mode. a. Set the mode dial to h. When shooting still pictures (shooting mode) When shooting movies (shooting mode) Quick Start Guide When viewing pictures (playback mode) Still picture shooting modes h This function allows you to shoot with the camera’s automatic settings. K The camera automatically sets the optimum aperture value and shutter speed.
d4344_4356_e_0000.book Page 7 Monday, December 17, 2007 9:13 AM Set date and time About the date and time setting screen Y-M-D (Year-Month-Day) X Hour Y M D TIME ---- -- -- -- -- CANCEL Y M D Minute Date formats (Y/M/D, M/D/Y, D/M/Y) MENU Exits a setting. Quick Start Guide a. Press the1 F button and the 2Y button to select [Y]. • The first two digits of the year are fixed. 1 F button X Y M D TIME 2008 -- -- -- -- 2Y button CANCEL Y M D MENU b. Press the 3# button. 3# button c.
d4344_4356_e_0000.book Page 8 Monday, December 17, 2007 9:13 AM Set date and time d. Press the 3# button. e. Press the1 F button and the 2Y button to select [D]. X Y M D TIME -- -- -2008 08 26 f. Press the 3# button. g. Press the1 F button and the 2Y button to select the hours and minutes. Quick Start Guide • The time is displayed in the 24-hour format. h. Press the 3# button. i. Press the1 F button and the 2Y button to select [Y/M/D]. CANCEL After all items have been set, press the e button.
d4344_4356_e_0000.book Page 9 Monday, December 17, 2007 9:13 AM Take a picture a. Hold the camera. Horizontal grip Vertical grip F3.5 b. Focus. Quick Start Guide AF target mark Place this mark over your subject. Shutter button (Pressed Halfway) F3.5 • The AF target mark lights in green when the focus and exposure are locked. The shutter speed and aperture value are displayed. • If the AF target mark blinks in red, the focus is not adjusted properly. Try locking the focus again. c. Shoot.
d4344_4356_e_0000.book Page 10 Monday, December 17, 2007 9:13 AM View pictures a. Set the mode dial to q. o button Mode Dial Quick Start Guide Arrow pad Next Picture Prev. Picture 10M Erase pictures a. Press the 4& button and the 3# button to display the picture you want to erase. b. Press the f/S button. ERASE IN YES f /S button CANCEL SET OK MENU c. Press the1 F button to select [YES], and press the e button to erase the picture.
d4344_4356_e_0000.book Page 11 Monday, December 17, 2007 9:13 AM Button operations a 0 d b 7 8 9 3 4 c Playback modes 5 Macro mode/ Super macro mode Flash mode Shooting mode Self-timer 1 o button Power on: Turning the camera on and off Shooting mode • Lens extends • Monitor turns on 2 Shutter button The number of storable still pictures is displayed.
d4344_4356_e_0000.book Page 12 Monday, December 17, 2007 9:13 AM AF lock mark Locking the focus position (AF Lock) When the scene is kH, you can lock the focus position by pressing 2. Press 2 again to cancel the AF lock. g“s (Scene) Selecting a scene mode according to the shooting situation” (P.25) • AF lock is automatically canceled after one shot.
d4344_4356_e_0000.book Page 13 Monday, December 17, 2007 9:13 AM g Follow the shooting guide to take better pictures SHOOTING GUIDE 1 Shoot w/ effects preview. 2 Brightening subject. 3 Shooting into backlight. 4 Set particular lighting. 5 Blurring background. SET OK Follow the shooting guide displayed on the screen to set the target items. • Press m to display the shooting guide again. • To change the setting without using the shooting guide, set the shooting mode to another one.
d4344_4356_e_0000.book Page 14 Monday, December 17, 2007 9:13 AM Operations during movie playback 2008.08.26 12:30 100-0004 IN 00:12 /00:34 3 : Each time you press the button, the playback speed changes in the following order: 2x; 20x; and back to 1x. 4 : Plays the movie in reverse. Each time you press the button, the playback speed changes in the following order: 1x; 2x; 20x; and back to 1x. Playing time/Total recording time 1 : Increases the volume. 2 : Reduces the volume.
d4344_4356_e_0000.book Page 15 Monday, December 17, 2007 9:13 AM P Viewing “My Favorite” The still pictures registered in “My Favorite” are displayed. • Press the arrow pad to view other pictures. • Use the zoom button to switch among close-up playback and index display. My Favorite My Favorite SLIDESHOW EXIT ADD FAVORITE SET MENU Press m during “My Favorite” playback to display the top menu, and then select [SLIDESHOW] or [ADD FAVORITE]. g“SLIDESHOW Playing back pictures automatically” (P.
d4344_4356_e_0000.book Page 16 Monday, December 17, 2007 9:13 AM 6 m button (MENU) plays the top menu ooming while shooting/Close-up playback Displays the top menu Displays the top menu. 7 Zoom button Zooming while shooting/Close-up playback Shooting mode: Zooming in on your subject Optical zoom ratio: 7× Zoom out: Press W on the zoom button. Zoom in: Press T on the zoom button.
d4344_4356_e_0000.book Page 17 Monday, December 17, 2007 9:13 AM nging picture brightness (Exposure Compensation) 8 1 F button F +0.7 +1.0 9 3# button Flash shooting Press 3# in shooting mode to select the flash setting. Press e to confirm your selection. AUTO Auto-flash The flash fires automatically in low light or backlight conditions. ! Red-eye reduction flash This emits pre-flashes to reduce the occurrence of red-eye in your pictures.
d4344_4356_e_0000.book Page 18 Monday, December 17, 2007 9:13 AM b q /P button wing pictures/Printing pictures Viewing pictures/Printing pictures q Viewing pictures immediately Press q in shooting mode to switch to playback mode and display the last picture taken. Press q again or press the shutter button halfway to return to shooting mode. g “q Viewing pictures/Selecting playback mode” (P.
hanging the information on display/ ay the menu guide/Checking the time d4344_4356_e_0000.book Page 19 Monday, December 17, 2007 9:13 AM d g /E button Changing the information on display/ Display the menu guide/Checking the time g Changing the information displays Press g to change the display in the following order. Shooting mode Playback mode Normal display P Normal display ISO 1600 10M 10M +2.0 IN 4 2008.08.26 12:30 100-0004 IN 4 Simple display*1 Detailed display 1/1000 F3.5 +2.
d4344_4356_e_0000.book Page 20 Monday, December 17, 2007 9:13 AM Menu operations e button m button Arrow pad (1243) About the menus Pressing m displays the top menu on the monitor. • The items displayed on the top menu differ according to the mode.
d4344_4356_e_0000.book Page 21 Monday, December 17, 2007 9:13 AM Using the menus This explains how to use the menus with [AF MODE] setting as an example. 1 2 Set the mode dial to K. Press m to display the top menu. Select [CAMERA MENU] and press e to confirm your selection. • [AF MODE] is one of the selections on the [CAMERA MENU]. IMAGE QUALITY RESET CAMERA SETUP MENU PANORAMA EXIT 3 Use the arrow pad 12 to select [AF MODE], and press e.
d4344_4356_e_0000.book Page 22 Monday, December 17, 2007 9:13 AM hKsn Shooting mode menu 5CAMERA MENU 1 IMAGE QUALITY 2 RESET 3* CAMERA MENU SETUP SCN SILENT MODE SET OK PANORAMA EXIT MENU WB ISO DRIVE FINE ZOOM DIGITAL ZOOM 5 6 ESP/n AF MODE R IMAGE STABILIZER / DIS MOVIE MODE * An OLYMPUS xD-Picture Card is required. 4 • Some menu items are not available in certain modes. g “Functions available in shooting modes and scene modes” (P.59) “SETUP menus” (P.
estoring default settings 2 RESET NO Restoring default settings / YES It restores shooting functions back to default settings. The mode dial must not be set to g. Functions restored to the factory default settings Function Factory default setting Ref. Page F 0.0 P.17 # AUTO P.17 Y OFF P.17 & OFF P.17 Shadow Adjustment Technology OFF P.18 IMAGE SIZE (still picture/movie) F /E COMPRESSION (still picture) P.22 P.22 FRAME RATE (movie) O P.22 WB AUTO P.26 ISO AUTO P.
d4344_4356_e_0000.book Page 24 Monday, December 17, 2007 9:13 AM [COMBINE IN CAMERA 1] As you recompose the frame, the camera automatically shoots and combines pictures for a single panoramic picture in the camera.Only combined pictures are saved. 1st CANCEL 2nd CANCEL MENU Connects pictures from left to right MENU 3rd CANCEL SAVE OK Target mark MENU CANCEL SAVE OK MENU SAVE OK Pointer • Take the first picture.
cting a scene mode according to the shooting tion d4344_4356_e_0000.book Page 25 Monday, December 17, 2007 9:13 AM [COMBINE IN PC] Create a panoramic picture using the OLYMPUS Master software from the provided CDROM. 3 :The next picture is connected at the right edge. 4 :The next picture is connected at the left edge. Connects pictures from left to right 1 :The next picture is connected at the top. 2 :The next picture is connected at the bottom.
d4344_4356_e_0000.book Page 26 Monday, December 17, 2007 9:13 AM [eSHOOT & SELECT1]/[fSHOOT & SELECT2] • These scene modes allow you to take sequential pictures by holding down the shutter button. After shooting the pictures, select the ones you want to erase by marking them with a R and press f/S to erase them. Selected picture. Press 43 to scroll through the pictures. Pictures with R mark are erased. BACK MENU OK GO S Press e to set or cancel the R mark on the picture.
sing sequential (continuous) shooting ming in on your subject without reducing image ty ooming in on your subject d4344_4356_e_0000.book Page 27 Monday, December 17, 2007 9:13 AM DRIVE ....................................................... Using sequential (continuous) shooting o Shoots 1 frame at a time when the shutter button is pressed. j Focus and exposure are locked at the first frame. The sequential shooting speed varies depending on the image quality setting.
d4344_4356_e_0000.book Page 28 Monday, December 17, 2007 9:13 AM hanging the area for measuring the brightness of a ect hanging the focusing area Changing the area for measuring the brightness of a subject ESP Meters the brightness at the center of the monitor and the surrounding area separately to capture an image with balanced brightness. When taking pictures against strong backlight, the center of the picture may appear dark. n Only the center of the monitor is metered.
ying back pictures automatically d4344_4356_e_0000.book Page 29 Monday, December 17, 2007 9:13 AM qP Playback mode menu 4 EDIT Q*2 P*2 1 COLOR EDIT*2 FRAME*2 LABEL*2 CALENDAR*2 INDEX*3 SLIDESHOW 4 5*1 EDIT PRINT ORDER 6 PLAYBACK MENU 0 y R PERFECT PLAYBACK SETUP MENU FIX 2 ADD FAVORITE EXIT SILENT MODE ERASE *1 *2 SET OK MENU 3 7 6 *3 A card is required. This is not displayed when a movie is selected. This is not displayed when the still picture is selected. g “SETUP menus” (P.
d4344_4356_e_0000.book Page 30 Monday, December 17, 2007 9:13 AM 2 PERFECT FIX ing images Editing images The recorded image is corrected and saved as a new one. • PERFECT FIX • ALL SHADOW ADJ ALL REDEYE FIX EXIT MENU Use 12 to select the item you want to edit and press e to execute the selected feature. Use 43 to display picture you want to edit and press e. SET OK SHADOW ADJ REDEYE FIX Shadow adjustment and red-eye fix are activated together.
d4344_4356_e_0000.book Page 31 Monday, December 17, 2007 9:13 AM pping a part of pictures P .................................................................................. Cropping a part of pictures Designates and crops part of a still picture and saves it as a new file. • Select the picture to be cropped with 43 , and press e. • Use the arrow pad and the zoom button to adjust the position and size of the trimming frame, and presse.
d4344_4356_e_0000.book Page 32 Monday, December 17, 2007 9:13 AM CALENDAR ...................................................... Create a calendar print with a picture ate a calendar print with a picture This function lets you select a calendar format, integrate the calendar with a picture, and save it as a new file. CALENDAR SET OK king an index picture from a movie • Select the picture with 43 and press e.
dding sound to still pictures se selected pictures/Erase all pictures y y y EXIT OK EXIT OK +90° EXIT 0° OK -90° Select a picture with 43, and use 12 to select [U+90°], [V0°], or [T-90°]. You can rotate several frames in succession. R ............................................................................ Adding sound to still pictures YES / NO Sound is recorded for about 4 seconds. • Select a picture with 43, and select [YES] with 12, then press e to begin recording.
SETUP menus Shooting Mode SETUP IMAGE QUALITY RESET PANORAMA EXIT MENU CAMERA MENU SETUP SCN SILENT MODE SET OK Playback mode SLIDESHOW EDIT PRINT ORDER PERFECT PLAYBACK SETUP MENU FIX ADD FAVORITE EXIT MENU ERASE SILENT MODE MEMORY FORMAT(FORMAT*1) BACKUP*1 W PW ON SETUP MENU COLOR SOUND SETTINGS*2 REC VIEW FILE NAME PIXEL MAPPING s X DUALTIME ALARM CLOCK VIDEO OUT POWER SAVE SET OK *1 A card is required. *2 This feature is not available in [SILENT MODE].
ecting a display language d4344_4356_e_0000.book Page 35 Monday, December 17, 2007 9:13 AM W .......................................................................... Selecting a display language You can select a language for on-screen display. Available languages vary depending on where you purchased this camera. ing the startup screen and volume ing the menu screen color and background SCREEN OFF (No picture is displayed.
d4344_4356_e_0000.book Page 36 Monday, December 17, 2007 9:13 AM REC VIEW .......................................Viewing pictures immediately after they are taken wing pictures immediately after they are taken OFF The picture being recorded is not displayed. This is useful when you want to prepare for your next shot while the previous picture is being recorded. ON The picture being recorded is displayed. This is useful for making a brief check of the picture you have just taken.
usting the brightness of monitor ing the date and time ing the date and time for another time zone d4344_4356_e_0000.book Page 37 Monday, December 17, 2007 9:13 AM s .................................................................... Adjusting the brightness of monitor s 1 : Brightens the monitor. 2 : Darkens the monitor. BACK MENU SET OK Press e to confirm your selection. X ...................................................................................
d4344_4356_e_0000.book Page 38 Monday, December 17, 2007 9:13 AM ALARM CLOCK .............................................................................. Setting alarms ing alarms OFF No alarm is set or alarm is canceled. ONE TIME Alarm is activated once. After the alarm goes off, the setting is canceled. DAILY Alarm is activated daily at the set time. • When [X] has not been set, [ALARM CLOCK] is not available. • When [SILENT MODE] is set to [ON], the alarm will not sound.
ying back pictures on a TV d4344_4356_e_0000.book Page 39 Monday, December 17, 2007 9:13 AM VIDEO OUT.................................................................Playing back pictures on a TV NTSC / PAL The factory default settings differ according to the region where the camera is sold. To play back camera images on a TV, set the video output according to your TV’s video signal type. • TV video signal types by country/region. Check the video signal type before connecting the camera to the TV.
d4344_4356_e_0000.book Page 40 Monday, December 17, 2007 9:13 AM Printing pictures Direct printing (PictBridge) By connecting the camera to a PictBridge-compatible printer, you can print pictures directly. EASY PRINT ............... Prints the picture displayed in the monitor by using the standard settings of your printer. CUSTOM PRINT ......... Prints with the various print settings.
d4344_4356_e_0000.book Page 41 Monday, December 17, 2007 9:13 AM Other print modes and print settings (CUSTOM PRINT) 1 Follow Steps 1 and 2 on P.40 to display the screen for Step 3 above, and then press e. 2 Select [CUSTOM PRINT], and press e. USB PC 3 Follow the operation guide to adjust print settings.
d4344_4356_e_0000.book Page 42 Monday, December 17, 2007 9:13 AM Selecting the picture to print Press 43 to select the picture you want to print. You can also use the zoom button and select a picture from the index display. PRINT 100-0004 IN 4 PRINT OK MORE SINGLEPRINT Prints one copy of the selected picture. When [SINGLE PRINT] or [MORE] has been selected, a single copy or multiple copies are printed. Makes a print reservation for the displayed picture.
d4344_4356_e_0000.book Page 43 Monday, December 17, 2007 9:13 AM Print settings (DPOF) Print reservation allows you to save printing data (the number of prints and the date and time information) with the pictures stored on the card. With print reservation, you can print out pictures easily either at home using a personal DPOF-compatible printer or at a photo store that supports DPOF. DPOF is a standard format used to record automatic print information from digital cameras.
d4344_4356_e_0000.book Page 44 Monday, December 17, 2007 9:13 AM Resetting print reservation data You can reset the print reservation data for all pictures or only those selected. 1 Select top menu [PRINT ORDER], and press e. To reset the print reservation data for all the pictures 2 3 Select [P] or [U], and press e. Select [RESET], and press e.
d4344_4356_e_0000.book Page 45 Monday, December 17, 2007 9:13 AM Using OLYMPUS Master Using the USB cable provided with your camera, you can connect the camera and computer and download (transfer) the images to your computer using the OLYMPUS Master software, also provided with the camera. Prepare the following items before starting. OLYMPUS Master 2 CD-ROM USB cable PC satisfying the operating environment (P.
d4344_4356_e_0000.book Page 46 Monday, December 17, 2007 9:13 AM Note • Use a computer with a pre-installed operating system. Operations are not guaranteed on homebuilt computers or computers with an updated operating system. • Operations are not guaranteed when using an added USB or IEEE 1394 (FireWire) port. • To install the software, you must log on as a user with administrators’ privileges.
d4344_4356_e_0000.book Page 47 Monday, December 17, 2007 9:13 AM 4 The camera is recognized by the computer. • Windows When you connect the camera to your computer for the first time, the computer attempts to recognize the camera. Click “OK” to exit the message that is displayed. The camera is recognized as a “Removable Disk”. • Macintosh The iPhoto program is the default application for managing digital images.
d4344_4356_e_0000.book Page 48 Monday, December 17, 2007 9:13 AM Displaying camera images on a computer Downloading and saving images 1 Click “Transfer Images” on the browse window, and then click “From Camera” . Using OLYMPUS Master • A window showing all of the pictures that can be transferred from the camera is displayed. 2 Select “New Album” and enter an album name. 3 Select the image files and click “Transfer Images”. • A window indicating that the download is complete is displayed.
d4344_4356_e_0000.book Page 49 Monday, December 17, 2007 9:13 AM Macintosh 1 The trash icon changes to the eject icon when the “Untitled” or “NO_NAME” icon on the desktop is dragged. Drag and drop it on the eject icon. 3 Disconnect the USB cable from the camera. Note • Windows: When you click “Unplug or Eject Hardware”, a warning message may be displayed. Make sure that image data is not being downloaded from the camera and that all applications are closed.
d4344_4356_e_0000.book Page 50 Monday, December 17, 2007 9:13 AM Getting to know your camera better Shooting tips and information Tips before you start taking pictures The camera does not turn on even when the batteries are loaded The battery is not fully charged • Charge the battery with the charger. The direction of the batteries is incorrect • Insert the batteries in the correct direction.
d4344_4356_e_0000.book Page 51 Monday, December 17, 2007 9:13 AM Shooting tips Focusing on the subject There are several ways to focus, depending on the subject. When the subject is not in the center of the frame • Place the subject in the center of the frame, lock the focus on the subject, and then recompose your picture. • Set [AF MODE] to [iESP]. g “AF MODE Changing the focusing area” (P.
d4344_4356_e_0000.book Page 52 Monday, December 17, 2007 9:13 AM The picture is too grainy There are several factors that can cause the picture to appear grainy. Using the digital zoom to take close-up pictures • With the digital zoom, part of the image is cropped and enlarged. The greater the magnification, the grainier the picture appears. g “DIGITAL ZOOM Zooming in on your subject” (P.
d4344_4356_e_0000.book Page 53 Monday, December 17, 2007 9:13 AM • It is effective to set the exposure compensation to [+] by pressing1 F when shooting against strong backlighting. g “1 F button Changing picture brightness (Exposure Compensation)” (P.17) • Adjusting exposure of person’s face by setting [AF MODE] to [FACE DETECT] makes the subject’s face appear brighter even against strong backlighting. g “AF MODE Changing the focusing area” (P.
d4344_4356_e_0000.book Page 54 Monday, December 17, 2007 9:13 AM Using a new card • If you use a non-Olympus card or a card that was used on a computer for another application, use the [FORMAT] function to format the card. g “MEMORY FORMAT (FORMAT) Formatting the internal memory or card” (P.34) The card access lamp is blinking • An image or movie is being recorded or downloaded (when connected to a computer). • Do not do any of the following while the card access lamp is blinking.
d4344_4356_e_0000.book Page 55 Monday, December 17, 2007 9:13 AM Confirming the exposure when the monitor is difficult to see outdoors The monitor may be difficult to see and the exposure difficult to confirm when shooting outdoors. Press g/E repeatedly to display the histogram • Set the exposure so that the graph is concentrated on the outer edges and the graph is balanced on both sides. How to read the histogram 1 If the peak fills too much of the frame, the image will appear mostly black.
d4344_4356_e_0000.book Page 56 Monday, December 17, 2007 9:13 AM Viewing pictures on a computer Viewing the entire picture on a computer screen The size of the picture displayed on a computer screen changes depending on the computer settings. When the monitor setting is 1,024X768 and you are using Internet Explorer to view a picture with an image size of 2,048X1,536 at 100 %, the entire picture cannot be viewed without scrolling.
d4344_4356_e_0000.book Page 57 Monday, December 17, 2007 9:13 AM When you get an error message on the camera Monitor indication q Possible cause There is a problem with the card. Corrective action This card cannot be used. Insert a new card. Writing to the card is prohibited. The recorded image has been protected (read-only) on a computer. Download the image to a computer and cancel the readonly setting. The internal memory has no available memory and cannot store any new data.
d4344_4356_e_0000.book Page 58 Monday, December 17, 2007 9:13 AM Monitor indication Possible cause The printer has run out of ink. Corrective action Replace the ink cartridge in the printer. The paper is jammed. Remove the jammed paper. The printer’s paper tray has been removed or the printer has been operated while changing settings on the camera. Do not operate the printer while changing settings on the camera. There is a problem with the printer and/or camera. Turn off the camera and printer.
d4344_4356_e_0000.book Page 59 Monday, December 17, 2007 9:13 AM Functions available in shooting modes and scene modes Some functions cannot be set in certain shooting modes. For more details, refer to the table below. indicates a restriction to the respective function of each s mode. g“Functions available in shooting scenes” (P.60) Functions available in shooting modes K s n Ref. Page F 9 9 9 9 P.17 # 9 9 - P.17 &/% 9 9 9 P.17 Y 9 9 9 P.
d4344_4356_e_0000.
d4344_4356_e_0000.book Page 61 Monday, December 17, 2007 9:13 AM Appendix Camera care Cleaning the camera Exterior: • Wipe gently with a soft cloth. If the camera is very dirty, soak the cloth in mild soapy water and wring well. Wipe the camera with the damp cloth and then dry it with a dry cloth. If you have used the camera at the beach, use a cloth soaked in clean water and wrung well. Monitor: • Wipe gently with a soft cloth.
d4344_4356_e_0000.book Page 62 Monday, December 17, 2007 9:13 AM Battery and charger ( This camera uses one Olympus lithium ion battery (LI-50B). No other type of batteries can be used. ( Power consumption by the camera varies depending on which functions are used. ( During the conditions described below, power is consumed continuously and the battery becomes exhausted quickly. • The zoom is used repeatedly. • The shutter button is pressed halfway repeatedly in shooting mode, activating the auto focus.
d4344_4356_e_0000.book Page 63 Monday, December 17, 2007 9:13 AM Using the internal memory or card You can confirm on the monitor whether the internal memory or card is being used during shooting and playback operations. Shooting mode Playback mode P Memory indicator B:When using the internal memory No display : When using a card 10M 10M IN 4 2008.08.
d4344_4356_e_0000.book Page 64 Monday, December 17, 2007 9:13 AM SAFETY PRECAUTIONS CAUTION RISK OF ELECTRIC SHOCK DO NOT OPEN CAUTION: TO REDUCE THE RISK OF ELECTRICAL SHOCK, DO NOT REMOVE COVER (OR BACK). NO USER-SERVICEABLE PARTS INSIDE. REFER SERVICING TO QUALIFIED OLYMPUS SERVICE PERSONNEL. An exclamation mark enclosed in a triangle alerts you to important operating and maintenance instructions in the documentation provided with the product.
d4344_4356_e_0000.book Page 65 Monday, December 17, 2007 9:13 AM Handling the Camera WARNING ( Do not use the camera near flammable or explosive gases. ( Do not use the flash and LED on people (infants, small children, etc.) at close range. • You must be at least 1 m (3 ft.) away from the faces of your subjects. Firing the flash too close to the subject’s eyes could cause a momentary loss of vision. ( Keep young children and infants away from the camera.
d4344_4356_e_0000.book Page 66 Monday, December 17, 2007 9:13 AM Battery Handling Precautions Follow these important guidelines to prevent batteries from leaking, overheating, burning, exploding, or causing electrical shocks or burns. DANGER • The camera uses a lithium ion battery specified by Olympus. Charge the battery with the specified charger. Do not use any other chargers. • Never heat or incinerate batteries.
d4344_4356_e_0000.book Page 67 Monday, December 17, 2007 9:13 AM Caution for Usage Environment • To protect the high-precision technology contained in this product, never leave the camera in the places listed below, no matter if in use or storage: • Places where temperatures and/or humidity are high or go through extreme changes. Direct sunlight, beaches, locked cars, or near other heat sources (stove, radiator, etc.) or humidifiers. • In sandy or dusty environments. • Near flammable items or explosives.
d4344_4356_e_0000.book Page 68 Monday, December 17, 2007 9:13 AM Legal and Other Notices • Olympus makes no representations or warranties regarding any damages, or benefit expected by using this unit lawfully, or any request from a third person, which are caused by the inappropriate use of this product. • Olympus makes no representations or warranties regarding any damages or any benefit expected by using this unit lawfully which are caused by erasing picture data.
d4344_4356_e_0000.book Page 69 Monday, December 17, 2007 9:13 AM For customers in North and South America For customers in USA Declaration of Conformity Model Number : Stylus1020/µ1020, Stylus1010/µ1010 Trade Name : OLYMPUS Responsible Party : Address : 3500 Corporate Parkway, P.O. Box 610, Center Valley, PA 18034-0610, U.S.A. Telephone Number : 484-896-5000 Tested To Comply With FCC Standards FOR HOME OR OFFICE USE This device complies with Part 15 of the FCC rules.
d4344_4356_e_0000.
d4344_4356_e_0000.book Page 71 Monday, December 17, 2007 9:13 AM Package the Product carefully using ample padding material to prevent damage in transit and either deliver it to the Authorized Olympus Dealer that sold you the Product or ship it postage prepaid and insured to any of our Olympus Service Centers. When returning Products for service, your package should include the following: 1. Sales receipt showing date and place of purchase. 2.
d4344_4356_e_0000.book Page 72 Monday, December 17, 2007 9:13 AM SPECIFICATIONS Camera Product type Recording system Still pictures Applicable standards Sound with still pictures Movies Memory No. of pictures (when fully charged) No.
d4344_4356_e_0000.book Page 73 Monday, December 17, 2007 9:13 AM Lithium ion battery (LI-50B) Product type Model No. Standard voltage Standard capacity Battery life Operating environment Temperature Dimensions Weight : : : : : Lithium ion rechargeable battery LI-50BA / LI-50BB DC 3.7 V 925 mAh Approx. 300 full charges (varies on usage) : 0°C to 40°C (32°F to 104°F) (charging)/ -10°C to 60°C (14°F to 140°F) (operation)/ -10°C to 35°C (14°F to 95°F) (storage) : 34.4 × 40.0 × 7.0 mm (1.4× 1.6 × 0.3 in.
d4344_4356_e_0000.book Page 74 Monday, December 17, 2007 9:13 AM CAMERA DIAGRAM Camera Self-timer lamp (P.17) Shutter button (P.9, 11) Multi-connector (P.39, 40, 46) o button (P.6, 11) Microphone (P.28) Flash (P.17) Connector cover (P.39, 40, 46) Strap Eyelet (P.3) Lens (P.11, 61) Zoom button (P.16) Monitor (P.37, 75) Card access lamp (P.48, 63) Mode Dial (P.6, 10, 12) Appendix q /P button (Playback/Print) (P.18) Arrow pad (1243) (P.6,15) m button (P.16) e button (OK/FUNC) (P.
d4344_4356_e_0000.book Page 75 Monday, December 17, 2007 9:13 AM Monitor Symbols & Icons (Shooting Mode 1 2 3 4 5 6 7 P 24 23 22 21 20 19 AFL ISO 1600 10 M +2.0 1/30 18 F3.5 17 4 IN 1 8 9 10 11 12 13 14 2 3 4 5 24 21 20 19 10 VGA 15 +2.0 16 15 18 Still picture Item IN 16 Movie Indications 1 Shooting Mode , , B, F, D, G etc. 2 Flash mode !, #, $ 3 Silent mode U 7 4 Image stabilization (still picture) h Digital image stabilization (movie) 00:34 11 12 13 14 15 Ref.
d4344_4356_e_0000.book Page 76 Monday, December 17, 2007 9:13 AM Item Ref. Page Indications 21 Spot metering n 22 Drive j, W 23 ISO ISO 100, ISO400, ISO1600, etc. 24 White balance 5, 3, 1, w ~ y P.28 P.27 P.26 P.26 (Playback mode 1 2 3 4 5 1 3 4 5 x10 1/1000 F3.5 +2.0 ISO1600 10M 15 2008.08.26 12:30 14 13 Still picture 100-0004 IN 4 6 7 8 9 10 11 12 12 Movie Item 1 Silent mode 15 VGA 2008.08.
d4344_4356_e_0000.book Page 77 Monday, December 17, 2007 9:13 AM Index e button (OK/FUNC) ................. q/P button ................................... f/S button (Shadow Adjustmemt Technology/erase) ...................... 3# button (flash mode).................. 4& button (macro)......................... 1F button (exposure compensation)............ 15 18 18 17 17 17 A AC adapter ...................................... 63 ADD FAVORITE........................ 15, 30 Adding sound to still pictures R....
d4344_4356_e_0000.book Page 78 Monday, December 17, 2007 9:13 AM Fill-in flash # .................................. 17 FINE ZOOM .................................... 27 Flash ............................................... 17 Flash charge ............................. 50, 75 Flash mode #........................... 11, 17 Flash off $ ..................................... 17 Fluorescent lamp 1/2/3 wxy.... 26 Focus ........................ 9, 11, 12, 27, 51 Focus lock .......................................
d4344_4356_e_0000.book Page 79 Monday, December 17, 2007 9:13 AM PRINT ORDER <..................... 32, 43 Protect 0 ..................................... 32 PW ON SETUP ............................... 35 R REC VIEW....................................... Recording movies n ...................... Recording sound with still pictures R............................. REDEYE FIX ................................... Red-eye reduction flash !........... RESET ............................................ Resizing Q.
d4344_4356_e_0000.
d4344_4356_e_0000.
d4344_4356_e_0000.
d4344_4356_e_0000.
d4344_4356_e_0000.