DIGITAL CAMERA STYLUS-9010 / STYLUS-7040 / STYLUS-5010 / μ-9010 μ-7040 μ-5010 Instruction Manual ● Thank you for purchasing an Olympus digital camera. Before you start to use your new camera, please read these instructions carefully to enjoy optimum performance and a longer service life. Keep this manual in a safe place for future reference. ● The application software and instruction manual PDF file are stored on the internal memory of the camera.
Step 1 Checking the contents of the box or Strap * Lithium Ion Battery* STYLUS-9010/μ-9010: LI-50B STYLUS-7040/μ-7040 and STYLUS-5010/μ-5010: LI-42B Digital camera or USB cable AV cable USB-AC adapter (F-2AC) Other accessories not shown: Warranty card Contents may vary depending on purchase location. Step 2 Step 3 Preparing the Camera Shooting and Playing Back Images “Preparing the Camera” (p. 10) “Shooting, Playback, and Erasing” (p.
Camera Settings Using the Direct Buttons Frequently used functions can be accessed using the direct buttons. Operation guide The symbols FGHI displayed for image selections and settings indicate that the wheel controller is to be used by pressing, not turning, the wheel controller sections shown below. 4/30 X Y M D TIME 2010 . 02 .
Using the Menu Use the menu to change camera settings such as the shooting mode. Press the m button to display the function menu. The function menu can be used to set frequently used shooting and playback functions such as shooting mode. Selected option Shooting PROGRAM AUTO P 0.0 WB AUTO ISO AUTO 1 Shooting mode SLIDESHOW PHOTO SURFING EVENT Function menu BEAUTY FIX EDIT ERASE o [SETUP] menu 4 14M To select the shooting mode Use HI to select the shooting mode and press the A button.
Menu Index Menus for Shooting Functions P PROGRAM AUTO 0.0 WB AUTO ISO AUTO 4 14M 1 2 3 4 5 6 7 8 9 1 IMAGE SIZE 2 COMPRESSION 1 NORMAL R SHADOW ADJUST AUTO 2 IMAGE STABILIZER AF MODE FACE/iESP REC VIEW ESP ESP/ PIC ORIENTATION FINE ZOOM OFF 1 ICON GUIDE DIGITAL ZOOM OFF 1 2 3 14M 1 2 OFF ON IMAGE SIZE ON IMAGE QUALITY ON IS MOVIE MODE ON R OFF ON 2 EXIT MENU SET OK 3 1 2 EXIT MENU 3 SET OK EXIT MENU 1 Shooting mode P (PROGRAM AUTO) .......p. 15 M (iAUTO) ....................p.
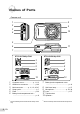
Names of Parts Camera unit 1 8 2 9 3 4 10 5 6 11 7 STYLUS-7040/μ-7040 STYLUS-5010/μ-5010 3 2 3 2 8 9 8 9 12 12 1 2 3 4 5 6 *1 6 EN Connector cover ..................... p. 11, 12 HDMI micro connector ................. p. 46 Multi-connector........... p. 11, 12, 45, 47 Strap eyelet .................................... p. 7 Flash ............................................ p. 26 Battery/card compartment lock*1 .................................................... p.
1 6 2 7 3 8 9 10 11 4 5 1 2 3 4 5 6 7 8 9 * 12 Speaker* n button........................ p. 13, 15 Zoom buttons ......................... p. 16, 19 Monitor ......................... p. 8, 15, 43, 52 m button .............................. p. 3, 4 Shutter button......................... p. 15, 52 Indicator lamp......................... p. 11, 12 Movie record button ..................... p. 16 q button (switching between shooting and playback) ................... p.
Monitor Shooting mode display 1 2 P 24 23 22 21 20 19 18 0.0 P WB AUTO ISO AUTO 00:34 4 14M NORM 3 4 5 6 7 8 9 10 17 16 15 14 13 12 11 1 2 3 4 5 6 7 8 9 10 11 12 13 8 EN 1/100 F3.2 26 25 Battery check ......................... p. 12, 53 Shooting mode ....................... p. 15, 21 Flash ............................................ p. 26 Flash standby/flash charge .......... p. 52 Macro/super macro ...................... p. 26 Self-timer ...................................... p.
Playback mode display ● Standard display 1 2 3 4 5 6 10 1 4/30 ’10/02/26 12:30 00:12/00:34 17 Still image 6 Movie ● Advanced display 1 2 3 4 5 6 10 4/30 1/1000 F3.2 P 2.0 ISO WB AUTO AUTO NORM 14M FILE 100 0004 ’10/02/26 12:30 1 2 3 4 5 6 7 8 9 10 8 9 10 11 2.0 7 22 1/1000 F3.2 ISO WB 21 P AUTO AUTO 20 19 NORM 14M 18 FILE 100 0004 12 13 14 15 16 ’10/02/26 12:30 17 Battery check ......................... p. 12, 53 Print reservation/ number of prints .................. p. 50/p.
Preparing the Camera 3 Inserting the battery STYLUS-9010/μ-9010 STYLUS-7040/μ-7040 1 STYLUS-9010/μ-9010 STYLUS-7040/μ-7040 STYLUS-5010/μ-5010 2 2 STYLUS-5010/μ-5010 1 1 2 2 1 1 Battery/card compartment lock Battery/card compartment cover Battery/card compartment cover 2 STYLUS-9010/μ-9010 STYLUS-7040/μ-7040 STYLUS-5010/μ-5010 STYLUS-9010/μ-9010, STYLUS-7040/ μ-7040: Insert the battery by putting in the ▼ marked side first, with the B marks toward the battery lock knob.
1 Camera setup Connect the camera to the computer. STYLUS-7040/μ-7040 STYLUS-5010/μ-5010 Set the camera date and time, time zone and display language automatically; install the camera instruction manual and PC software (ib). STYLUS-9010/ μ-9010 Do not insert SD/SDHC memory cards before the camera setup. Multi-connector Do not format the internal memory until the camera setup is complete.
Charging the battery with the included USB-AC adapter The included USB-AC adapter (F-2AC) (hereafter referred as AC adapter) has been designed to be used for charging and playback. Make sure that shooting is not being used while the AC adapter is connected to the camera. Example: AC adapter with an AC cable 1 STYLUS-7040/μ-7040 STYLUS-9010/ μ-9010 STYLUS-5010/μ-5010 The battery is not fully charged at shipment.
Setting the date, time and time zone 4 The date and time set here are saved to image file names, date prints, and other data. 1 As in Steps 2 and 3, use FGHI and the A button to set [M] (month), [D] (day), [TIME] (hours and minutes), and [Y/M/D] (date order). Press the n button to turn on the camera. For precise time setting, press the A button as the time signal strikes 00 seconds. ● The date and time setting screen is displayed To change the date and time, adjust the setting from the menu.
Changing the display language The language for the menu and error messages displayed on the monitor is adjustable. 1 1 STYLUS-9010/μ-9010 STYLUS-5010/μ-5010 Write-protect switch Contact area Display the [SETUP] menu. “Using the Menu” (p. 4) 2 2 INTERNAL/SD MEMORY FORMAT DATA REPAIR AUTO Insert the card straight until it clicks into place. COPY ENGLISH 1 2 3 RESET USB CONNECTION EXIT MENU 4 5 Write-protect switch Use FG to select the r (Settings 1) tab and then press I.
Shooting, Playback, and Erasing 2 Shooting with the optimum aperture value and shutter speed (P mode) Hold the camera and compose the shot. In this mode, automatic shooting settings are activated while also allowing changes to a wide range of other shooting menu functions, such as exposure compensation, white balance, etc. as needed. 1 Monitor Horizontal grip Press the n button to turn on the camera. P mode indicator P Vertical grip 0.
4 To take the picture, gently press the shutter button all the way down while being careful not to shake the camera. 2 Press the movie record button again to stop recording. Sound will also be recorded. During sound recording, only the digital zoom can be used. To record a movie with optical zoom, set [R] (movies) (p. 32) to [OFF]. P Using the zoom Press fully 1/400 F3.2 Pressing the zoom buttons adjusts the shooting range.
Changing the shooting information display The display of the screen information can be changed to best match the situation, for example, the need for a clear view of the screen or for making a precise composition by using the grid display. 1 Viewing images 1 Press the q button. Number of frames/ Total number of images 4/30 Press F (INFO). ● The displayed shooting information changes in the order shown below each time the button is pressed. “Shooting mode display” (p. 8) Normal ’10/02/26 12:30 P 0.
To play back movies Operations while playback is paused Select a movie, and press the A button. 4/30 00:14/00:34 MOVIE PLAY OK During pause ’10/02/26 12:30 Movie Cueing Operations during movie playback Use F to display the first frame and press G to display the last frame. Turn the wheel controller to Advancing advance or rewind by one and rewinding frame at a time. Keep turning one frame at a the wheel controller for time*1 continuous advance or rewind.
Index view, close-up view, and event index To select an image in index view Use FGHI to select an image, and press the A button to display the selected image in single-image view. Index view enables quick selection of a desired image. Close-up view (up to 10x magnification) allows checking of image details. In event index*1, images are grouped by the shooting dates and representative images for an event can be displayed. *1 To scroll an image in close-up view Use FGHI to move the viewing area.
Playing back panorama images Using the menu guide Panorama images that were combined together using [AUTO] or [MANUAL] can be scrolled for viewing. If the E button is pressed while settings are being adjusted in the playback function or [SETUP] menus, a description of the selected option is displayed. “Using the Menu” (p. 4) “Creating panoramic images (p mode)” (p. 23) 1 Using the camera guide Select a panorama image during playback. Use the camera guide to look up camera operations.
Using Shooting Modes To change the shooting mode The shooting mode (P, M, s, P, p, Q) can be changed with using the function menu. “Using the Menu” (p. 4) Using the best mode for the shooting scene (s mode) 1 SCENE MODE Shooting with automatic settings (M mode) The camera will automatically select the optimal shooting mode for the scene. This is a fully automatic mode that allows you to take a picture suited to the scene by simply pressing the shutter button.
In s modes, the optimum shooting settings are pre-programmed for specific shooting scenes. For this reason, settings may not be changed in some modes. Option B PORTRAIT/F LANDSCAPE/ G NIGHT SCENE*1/ M NIGHT+PORTRAIT/ C SPORT/N INDOOR/ W CANDLE/ R SELF PORTRAIT/ S SUNSET*1/X FIREWORKS*1/ V CUISINE/d DOCUMENTS/ q BEACH & SNOW/ PET *1 Application Shooting with special effects (P mode) To add expression to your photo, select the desired special effect. 1 Set the shooting mode to P.
Creating panoramic images (p mode) 1 Taking pictures with [AUTO] 1 Press the shutter button to take the first frame. 2 Move the camera slightly in the direction of the second frame. Set the shooting mode to p. PANORAMA AUTO AUTO Target mark 0.0 WB AUTO 2 Press G to go to the submenu. 3 Use HI to select the desired mode and then press the A button to set. Submenu 1 Pointer CANCEL MENU 4 14M Application AUTO Three frames are taken and combined by the camera.
Taking pictures with [MANUAL] Taking pictures with [PC] 1 Use HI to specify at which edge the next picture is to be connected. 1 Use FGHI to select the direction that the frames are combined. MANUAL Direction for combining the next frame 1 2 2 Press the shutter button to take the first frame, and then compose the second shot. Before first shot PC 1 BACK MENU 2 Press the shutter button to take the first frame.
Smoothing out skin tone and texture (Q mode) The camera identifies a person’s face and gives the skin a smooth, translucent look for taking the picture. 1 Set the shooting mode to Q. P BEAUTY 0.0 WB AUTO 4 14M 2 Point the camera toward the subject. Check the frame appearing around the face detected by the camera, and then press the shutter button to take the picture. ● The unedited image and edited image are both saved. ● If the image cannot be retouched, only the unedited image is saved.
Using Shooting Functions Shooting closeups (Macro shooting) “Using the Menu” (p. 4) Using the flash This function enables the camera to focus and shoot subjects at close distances. The flash functions can be selected to best match the shooting conditions. 1 1 Select the flash option in the shooting function menu. Select the macro option in the shooting function menu. P P FLASH AUTO OFF 0.0 WB AUTO ISO AUTO 0.
Option Application Description Macro mode is deactivated. OFF ― When the zoom is at the widest (W) position, this function enables shooting as close as the following distances. MACRO This enables the camera to shoot subjects at close distances. STYLUS-9010/μ-9010 STYLUS-7040/μ-7040 STYLUS-5010/μ-5010 10 cm (3.9 in.) 10 cm (3.9 in.) 15 cm (5.9 in.) When the zoom is at the most telephoto (T) position, this function enables shooting as close as the following distances.
2 Adjusting the brightness (Exposure compensation) The standard brightness (appropriate exposure) set by the camera based on the shooting mode (except for M) can be adjusted brighter or darker to obtain a desired shot. 1 Select the exposure compensation option in the shooting function menu. P 0.0 0.3 0.0 0.3 WB AUTO ISO AUTO 2 Use HI to select the desired brightness, and press the A button.
1 Select the ISO setting option in the shooting function menu. P Sequential shooting (Drive) Pictures are taken sequentially while the shutter button is held down. 1 Select the drive option in the shooting function menu. 0.0 ISO 200 1/400 ISO 100 ISO 200 P WB AUTO ISO 400 F3.2 0.0 2 WB AUTO ISO AUTO Use HI to select the setting option, and press the A button to set. Option ISO AUTO Option Description The camera automatically adjusts the sensitivity according to the shooting scene.
Menus for Shooting Functions The default settings of the function are highlighted in . Selecting the image quality for still images [IMAGE SIZE/COMPRESSION] I (Shooting menu 1) X IMAGE SIZE/COMPRESSION Available shooting modes: P M s P p Q Submenu 1 IMAGE SIZE COMPRESSION Submenu 2 Application 14M (4288×3216) Suitable for printing pictures over A3 (11×17 in.). 8M (3264×2448) Suitable for printing pictures up to A3 (11×17 in.). 5M (2560×1920) Suitable for printing pictures at A4 (8.5×11 in.).
For information on using the menus, see “Using the Menu” (p. 4). Brightening the subject against backlight [SHADOW ADJUST] I (Shooting menu 1) X SHADOW ADJUST Available shooting modes: P M s P p Q Submenu 2 Application AUTO The shadow adjustment effect is applied when shooting against backlight. OFF The effect is not applied. ON Shoot with automatic adjustment to brighten an area that has become darker.
Shooting at higher magnifications than optical zoom without reducing the image quality [FINE ZOOM] I (Shooting menu 1) X FINE ZOOM Available shooting modes: P M s P p Q Submenu 2 Application OFF Optical zoom is used to zoom in for shooting. ON Optical zoom and image cropping are combined to zoom in for shooting.*1 *1 STYLUS-9010/μ-9010 STYLUS-7040/μ-7040 STYLUS-5010/μ-5010 Approx. 67× (max.) Approx. 47× (max.) Approx. 33.5× (max.
For information on using the menus, see “Using the Menu” (p. 4). The camera’s default settings are [IMAGE STABILIZER] (still images) to [ON] and [IS MOVIE MODE] (movies) to [OFF]. There may be a noise coming from inside the camera when the shutter button is pressed with [IMAGE STABILIZER] (still images) set to [ON].
Menus for Playback, Editing, and Printing Functions The default settings of the function are highlighted in . Data must have been created with the PC software (ib) before using some function. Refer to the PC software (ib) help guide for details on how to use the PC software (ib). For details on installing the PC software (ib), see “Battery charge and camera setup” (p. 10).
For information on using the menus, see “Using the Menu” (p. 4). Viewing images by event [EVENT q] EVENT q In [EVENT q], images in an event are played back. (Images with the same shooting date are grouped into the same event.) To start [EVENT q] To start [COLLECTION q] Press the A button, and then use FGHI to select the desired collection. Press the A button again to start playback of the selected collection. Use HI to advance or rewind by one frame. To stop [COLLECTION q], press the m button.
Retouching the skin and eyes [BEAUTY FIX] Changing the image size [Q] EDIT X Q BEAUTY FIX Depending on the picture, the editing may not be effective. Submenu 1 Submenu 2 ― ALL CLEAR SKIN SOFT/AVG/ HARD SPARKLE EYE ― DRAMATIC EYE ― Application [CLEAR SKIN], [SPARKLE EYE] and [DRAMATIC EYE] are applied together. Makes skin look smooth and translucent. Select the correction effect from 3 levels. Enhances the contrast of the eyes. Enlarges the subject’s eyes.
For information on using the menus, see “Using the Menu” (p. 4). Changing the color tone of image [COLOR EDIT] 1 Use HI to select an image, and press the A button. 2 Use HI to select a calendar. Use FG to select the image orientation, and then press the A button. EDIT X COLOR EDIT Submenu 2 Application BLACK & WHITE This changes the image to black and white. 3 Use FG to select the Year of the calendar, and press I. SEPIA This changes the image to a sepia tone.
Erasing images [ERASE] To erase all images [ALL ERASE] ERASE Submenu 1 Application ALL ERASE All images in the internal memory or card will be erased. SEL. IMAGE Images are individually selected and erased. ERASE/ Deletes the image displayed. ERASE EVENT*1 CANCEL *1 Cancels deletion of the image. If G is pressed when an event is played back, all images in the event are erased. When erasing pictures in the internal memory, do not insert the card into the camera. Or set [INTERNAL/SD] to [IN].
For information on using the menus, see “Using the Menu” (p. 4). Adding sound to still images [R] q (Playback menu) X R 1 Use HI to select an image. 2 Aim the microphone toward the sound source. Microphone 3 Press the A button. ● Recording starts. ● The camera adds (records) sound for approx. 4 seconds while playing back the image.
Menus for Other Camera Settings The default settings of the function are highlighted in Selecting a storage device [INTERNAL/SD] r (Settings 1) X INTERNAL/SD Submenu 2 Application AUTO If a card is inserted, the card is automatically selected. If no card is inserted, internal memory is used. IN*1 Internal memory is selected. *1 Internal memory is used even if a card is inserted.
For information on using the menus, see “Using the Menu” (p. 4). Restoring the shooting functions to the default settings [RESET] Even if a computer has USB ports, proper operation is not guaranteed in the following cases: r (Settings 1) X RESET Submenu 2 Restores the following menu functions to the default settings. • Flash (p. 26) • Macro (p. 26) • Self-timer (p. 27) • Exposure compensation (p. 27) • White balance (p. 27) • ISO (p. 28) • Drive (p. 29) • Menu functions in [I, J, A] (p.
Selecting the camera sound and its volume [SOUND SETTINGS] s (Settings 2) X SOUND SETTINGS Submenu 2 Submenu 3 SILENT MODE*1, 2 Submenu 4 OFF/ON BEEP SHUTTER SOUND — SOUND TYPE 1/2/3 VOLUME OFF (No Sound)/ LOW/HIGH SOUND TYPE 1/2/3 VOLUME OFF (No Sound)/ LOW/HIGH Selects the type and volume of the shutter sound. OFF (No Sound)/ LOW/HIGH — Selects the warning sound volume. q VOLUME OFF (No Sound) or 5 levels of volume — Selects the image playback volume.
For information on using the menus, see “Using the Menu” (p. 4). Adjusting the CCD and the image processing function [PIXEL MAPPING] s (Settings 2) X PIXEL MAPPING This function has already been adjusted at factory shipping, and no adjustment is needed right after purchase. Approximately once a year is recommended. For best results, wait at least one minute after taking or viewing pictures before performing pixel mapping. If the camera is turned off during pixel mapping, be sure to perform it again.
Choosing home and alternate time zones [WORLD TIME] t (Settings 3) X WORLD TIME You will not be able to select a time zone using [WORLD TIME] if the camera clock has not first been set using [X]. Submenu 2 Submenu 3 Application x The time in the home time zone (the time zone selected for x in submenu 2). y The time in the travel destination time zone (the time zone selected for y in submenu 2). HOME/ALTERNATE x*1 — Select the home time zone (x).
For information on using the menus, see “Using the Menu” (p. 4). To play back camera images on a TV ● Connection via AV cable 1 Use the camera to select the same video signal system as the one of connected TV ([NTSC]/[PAL]). 2 Connect the TV and camera. STYLUS-9010/ μ-9010 STYLUS-7040/ μ-7040 Multi-connector STYLUS-5010/ μ-5010 Multi-connector Multi-connector Connect to the TV video input jack (yellow) and audio input jack (white).
STYLUS-9010/ μ-9010 STYLUS-7040/ μ-7040 HDMI micro connector STYLUS-5010/ μ-5010 HDMI micro connector HDMI micro connector HDMI cable (type D/sold separately) Connect to the HDMI connector on the TV. 3 Turn on the TV, and change “INPUT” to “VIDEO (an input jack connected to the camera).” For details on changing the input source of the TV, refer to the TV’s instruction manual. 4 Turn on the camera, and use HI to select the image for playback.
Printing Direct printing (PictBridge*1) By connecting the camera to a PictBridgecompatible printer, you can print images directly without using a computer. To find out if your printer supports PictBridge, refer to the printer’s instruction manual. *1 2 Turn on the printer, and then connect the printer and camera.
Changing the printer’s settings for printing [CUSTOM PRINT] 1 2 3 5 Follow Steps 1 and 2 for [EASY PRINT] (p. 47). Submenu 4 Press the A button. OFF/ON*1 Use FG to select the print mode, and press the A button. (The number of images per sheet varies depending on the printer.) The number of images per sheet ([PICS/SHEET]) is selectable only when [MULTI PRINT] is selected in Step 3. *1 PRINT ALL PRINT MULTI PRINT ALL INDEX The available settings for [BORDERLESS] vary depending on the printer.
Submenu 5 Submenu 6 9 Application <× 0 to 10 This selects the number of prints. DATE WITH/ WITHOUT Selecting [WITH] prints the images with the date. Selecting [WITHOUT] prints the images without the date. FILE NAME WITH/ WITHOUT Selecting [WITH] prints the file name on the image. Selecting [WITHOUT] does not print any file name on the image. P (Proceeds to the setting screen.) This selects a portion of the image for printing. Press the A button.
11 Press the m button. 3 Use FG to select [<], and press the A button. 12 When the message [REMOVE USB 4/30 CABLE] is displayed, disconnect the USB cable from the camera and printer. 0 NORM 14M 100 0004 ’10/02/26 12:30 Print Reservations (DPOF*1) In print reservations, the number of prints and date imprint option are saved in the image on the card. This enables easy printing at a printer or print shop supporting DPOF by using only the print reservations on the card without a computer or a camera.
Reserving one print each of all images on the card [U] 1 2 3 Follow Steps 1 and 2 in [<] (p. 50). Use FG to select [U], and press the A button. 2 1 2 3 Follow Steps 5 and 6 in [<]. Resetting all print reservation data 1 Resetting the print reservation data for selected images 4 Follow Steps 1 and 2 in [<] (p. 40). Select either [<] or [U], and press the A button. 5 6 PRINT ORDER SETTING PRINT ORDERED 3 Use FG to select [<], and press the A button.
Usage Tips If the camera does not work as intended, or if an error message is displayed on the screen, and you are unsure of what to do, refer to the information below to fix the problem(s). Troubleshooting Battery “The camera does not work even when batteries are installed”. ● Insert recharged batteries in the correct direction. “Inserting the battery” (p. 10), “Battery charge and camera setup” (p. 10), “Charging the battery with the included USB-AC adapter” (p.
Error message Error message When one of the messages below is displayed on the monitor, check the corrective action. Error message NO INK Corrective action JAMMED CARD ERROR WRITE PROTECT Card problem Insert a new card. Card problem The card write-protect switch is set to the “LOCK” side. Release the switch. MEMORY FULL Internal memory problem • Insert a card. • Erase unwanted images.*1 CARD FULL Card problem • Replace the card. • Erase unwanted images.
Shooting tips When you are unsure of how to take a picture that you envision, refer to the information below. Fast-moving object Focusing “Focusing on the subject” ● Taking a picture of a subject not in the center The subject is not in the center of the frame of the screen After focusing on an object at the same distance as the subject, compose the shot, and take the picture. Pressing the shutter button halfway (p. 15) ● Set [AF MODE] (p.
Exposure (brightness) “Taking pictures with the right brightness” ● Taking pictures of a subject against a backlight Faces or backgrounds are bright even when shot against backlight. [SHADOW ADJUST] (p. 31) ● Taking pictures using [FACE/iESP] (p. 31) Appropriate exposure is obtained for a face against backlight, and the face is brightened. ● Taking pictures using [n] for [ESP/n] (p. 31) Brightness is matched with a subject in the center of the screen and the image is not affected by background light.
Playback/Editing tips Playback “Playing images in the internal memory and card” ● Remove the card and display the images in internal memory ● “Inserting the battery” (p. 10), “Inserting the SD/SDHC memory card (sold separately)” (p. 14) ● Selecting a storage device [INTERNAL/SD] (p. 40) “Viewing images with high picture quality on a high-definition TV” ● Connect the camera to the TV using an HDMI cable (sold separately) ● “To play back camera images on a TV” (p.
Appendix Camera care Exterior • Wipe gently with a soft cloth. If the camera is very dirty, soak the cloth in mild soapy water and wring well. Wipe the camera with the damp cloth and then dry it with a dry cloth. If you have used the camera at the beach, use a cloth soaked in clean water and wrung well. Monitor • Wipe gently with a soft cloth. Lens • Blow dust off the lens with a commercial blower, then wipe gently with a lens cleaner. Battery/USB-AC adapter • Wipe gently with a soft, dry cloth.
• The included USB-AC adapter (F-2AC) is designed to be used only with this camera. Other cameras cannot be charged with this USB-AC adapter. • Do not connect the included USB-AC adapter (F-2AC) to equipment other than this camera. • For plug-in type USB-AC adapter: The included USB-AC adapter (F-2AC) is intended to be correctly orientated in a vertical or floor mount position. Charging the battery by connecting the camera to a computer The battery can be charged by connecting the camera to a computer.
Using a new card Readout/recording process of the card Cards must be formatted with this camera before first use or after being used with other cameras or computers. [MEMORY FORMAT]/[FORMAT] (p. 40) Checking the image saving location The memory indicator shows whether the internal memory or card is being used during shooting and playback. During shooting, the current memory indicator blinks red while the camera is writing data. Never open the battery/card compartment cover or unplug the USB cable.
Number of storable pictures (still images)/Continuous recording length (movies) in the internal memory and SD/SDHC memory cards The figures in the following tables are quoted only as a rough guideline. The actual number of storable pictures or continuous recording lengths will differ according to the shooting conditions and memory cards used. The figures in the table below are the number of the storable pictures when using the internal memory formatted. [MEMORY FORMAT]/[FORMAT] (p.
Movies IMAGE SIZE L 1280×720 IMAGE QUALITY L M L 8 640×480 M 9 320×240 IMAGE SIZE L 1280×720 L IMAGE QUALITY L M L 8 640×480 M 9 320×240 L Continuous recording length Internal memory STYLUS-9010/μ-9010 STYLUS-7040/μ-7040 STYLUS-5010/μ-5010 With Without With Without With Without sound sound sound sound sound sound 19 min. 20 min. 19 min. 20 min. 9 min. 9 min. 53 sec. 13 sec. 53 sec. 13 sec. 13 sec. 22 sec. 18 min. 18 min. 29 min. 29 min. 29 min. 29 min. 9 sec. 44 sec. 39 min. 40 min. 39 min.
SAFETY PRECAUTIONS CAUTION RISK OF ELECTRIC SHOCK DO NOT OPEN CAUTION: TO REDUCE THE RISK OF ELECTRICAL SHOCK, DO NOT REMOVE COVER (OR BACK). NO USER-SERVICEABLE PARTS INSIDE. REFER SERVICING TO QUALIFIED OLYMPUS SERVICE PERSONNEL. DANGER WARNING CAUTION An exclamation mark enclosed in a triangle alerts you to important operating and maintenance instructions in the documentation provided with the product.
• Handle the camera with care to avoid getting a low-temperature burn. • When the camera contains metal parts, overheating can result in a low-temperature burn. Pay attention to the following: • When used for a long period, the camera will get hot. If you hold on to the camera in this state, a low-temperature burn may be caused. • In places subject to extremely cold temperatures, the temperature of the camera’s body may be lower than the environmental temperature.
Battery Handling Precautions • This camera uses a lithium ion battery specified by Olympus. Do not use any other type of battery. • If the battery’s terminals get wet or greasy, camera contact failure may result. Wipe the battery well with a dry cloth before use. • Always charge a battery when using it for the first time, or if it has not been used for a long period. • When operating the camera with battery power at low temperatures, try to keep the camera and spare battery as warm as possible.
FCC Notice • Radio and Television Interference • Changes or modifications not expressly approved by the manufacturer may void the user’s authority to operate this equipment. This equipment has been tested and found to comply with the limits for a Class B digital device, pursuant to Part 15 of the FCC Rules. These limits are designed to provide reasonable protection against harmful interference in a residential installation.
Representative plug of power supply cord of countries/regions around the world A Type B Type (American Type) (British Type) BF Type (British Type) B3 Type (British Type) C Type (CEE Type) SE Type (CEE Type) O Type (Oceania Type) The representative supply voltage and plug type are described in this chart. Depending on the area, different types of plugs and supply voltages are used. Attention: Power cord meeting demands from each country shall be used. - For only the United States Use a UL Listed, 1.
For customers in North and South America For customers in USA Declaration of Conformity Model Number : STYLUS-9010/μ-9010 STYLUS-7040/μ-7040 STYLUS-5010/μ-5010 Trade Name : OLYMPUS Responsible Party : Address Telephone Number : 3500 Corporate Parkway, P.O. Box 610, Center Valley, PA 18034-0610, U.S.A. : 484-896-5000 Tested To Comply With FCC Standards FOR HOME OR OFFICE USE This device complies with Part 15 of the FCC rules.
REPRESENTATION AS TO THE SUITABILITY, DURABILITY, DESIGN, OPERATION, OR CONDITON OF THE PRODUCTS (OR ANY PART THEREOF) OR THE MERCHANTABILITY OF THE PRODUCTS OR THEIR FITNESS FOR A PARTICULAR PURPOSE, OR RELATING TO THE INFRINGEMENT OF ANY PATENT, COPYRIGHT, OR OTHER PROPRIETARY RIGHT USED OR INCLUDED THEREIN. IF ANY IMPLIED WARRANTIES APPLY AS A MATTER OF LAW, THEY ARE LIMITED IN DURATION TO THE LENGTH OF THIS LIMITED WARRANTY.
For customers in Europe “CE” mark indicates that this product complies with the European requirements for safety, health, environment and customer protection. “CE” mark cameras are intended for sales in Europe. This symbol [crossed-out wheeled bin WEEE Annex IV] indicates separate collection of waste electrical and electronic equipment in the EU countries. Please do not throw the equipment into the domestic refuse.
Notes regarding Guarantee maintenance 1 This Guarantee will only be valid if the Guarantee Certificate is duly completed by Olympus or an authorized dealer or other documents contain sufficient proof. Therefore, please make sure that your name, the name of the dealer, the serial number and the year, month and date of purchase are all completed or the original invoice or the sales receipt (indicating the dealer’s name, the date of purchase and product type) is attached to this Guarantee Certificate.
Disclaimer of Warranty Olympus makes no representations or warranties, either expressed or implied, by or concerning any content if these written materials or software, and in no event shall be liable for any implied warranty of merchantability or fitness for any particular purpose or for any consequential, incidental or indirect damages (including but not limited to damages for loss of business profits, business interruption and loss of business information) arising from the use of inability to use these w
SPECIFICATIONS Camera Product type : Digital camera (for shooting and displaying) Recording system Still pictures : Digital recording, JPEG (in accordance with Design rule for Camera File system (DCF)) Applicable standards : Exif 2.2, Digital Print Order Format (DPOF), PRINT Image Matching III, PictBridge Sound with still pictures : Wave format Movie : MPEG-4AVC./H.264 Memory : Internal memory SD memory card SDHC memory card No.
Lithium ion battery (LI-42B) Product type : Lithium ion rechargeable battery Standard voltage : DC 3.7 V Standard capacity : 740 mAh Battery life : Approx. 300 full charges (varies on usage) Operating environment Temperature : 0 °C to 40 °C (32 °F to 104 °F) (charging)/ -10 °C to 60 °C (14 °F to 140 °F) (operation)/ -20 °C to 35 °C (-4 °F to 95 °F) (storage) Dimensions : 31.5 mm (W) × 39.5 mm (H) × 6.0 mm (D) (1.2 × 1.5 × 0.2 in.) Weight : Approx. 15 g (0.
VN688501