d4314_15_e.book Page 1 Friday, July 14, 2006 2:47 PM DIGITAL CAMERA / / Instruction Manual Quick Start Guide Get started using your camera right away. Button operations Menu operations Printing pictures Using OLYMPUS Master Getting to know your camera better Miscellaneous Thank you for purchasing an Olympus digital camera. Before you start to use your new camera, please read these instructions carefully to enjoy optimum performance and a longer service life.
d4314_15_e.book Page 2 Friday, July 14, 2006 2:47 PM Contents Quick Start Guide P. 3 P. 10 Test out the functions of the camera buttons by following the illustrations and actually trying them out on the camera. Menu operations P. 16 Learn everything about the menus, from basic operations to the functions of each menu and their various settings. Printing pictures P. 35 Learn how to print pictures you have taken. Using OLYMPUS Master P.
d4314_15_e.book Page 3 Friday, July 14, 2006 2:47 PM Gather these items (box contents) Strap LI-40C Battery Charger USB Cable LI-42B Lithium Ion Battery AV Cable Quick Start Guide Digital Camera OLYMPUS Master Software CD-ROM Items not shown: Instruction Manual (this manual), warranty card. Contents may vary depending on purchase location. Attach the strap Pull the strap tight so that it does not come loose.
d4314_15_e.book Page 4 Friday, July 14, 2006 2:47 PM Prepare the battery a. Charge the battery 3 Lithium Ion Battery Power Cable Battery Charger 1 Quick Start Guide AC Wall Outlet 2 Charging Indicator Light On (Red): Charging Light Off: Charging complete (Charging time: Approx. 5 hours) Battery comes partially charged. b. Insert the battery in the camera 2 1 3 3 4 5 Insert the battery from the side. Battery lock knob • To remove the battery, slide in the direction of the arrow.
d4314_15_e.book Page 5 Friday, July 14, 2006 2:47 PM Turn the camera on This explains how to turn on the camera in shooting mode. a. Set the mode dial to K. When shooting still pictures (shooting mode) When shooting movies (shooting mode) (Stylus750/µ750) (Stylus740/µ740) Quick Start Guide When viewing pictures (playback mode) Still picture shooting modes K This function allows you to shoot with the camera's automatic settings.
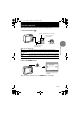
d4314_15_e.book Page 6 Friday, July 14, 2006 2:47 PM Set date and time About the date and time setting screen Y-M-D (Year-Month-Day) X Hour Y M D TIME ----.--.-- --:-- CANCEL Minute Y/M/D Date formats (Y-M-D,M-D-Y,D-M-Y) MENU Quick Start Guide Exits a setting. a. Press the 1 F button and the 2Y button to select [Y]. • The first two digits of the year are fixed. 1F Button X Y M D TIME 2006.--.-2006 .--.-- --:-- 2Y Button CANCEL Y/M/D MENU b. Press the 3# button. 3# Button c.
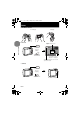
d4314_15_e.book Page 7 Friday, July 14, 2006 2:47 PM Set date and time e. Press the 1 F button and the 2Y button to select [D]. X Y M D TIME 2006.11 2006 11.26 26 --:-- CANCEL f. Press the 3# button. g. Press the 1 F button and the 2Y button to select “hour”, “minute”. Y/M/D MENU X Y M D TIME • The time is displayed in the 24-hour format. CANCEL h. Press the 3# button. i. Press the 1 F button and the 2Y button to select [Y/M/D]. Y/M/D Quick Start Guide 2006.11 2006 11.
d4314_15_e.book Page 8 Friday, July 14, 2006 2:47 PM Shoot a. Hold the camera Horizontal grip Quick Start Guide b. Focus Vertical grip Place this mark over your subject. Shutter Button (Pressed halfway) P [ ] [ IN ] HQ 3072×2304 4 The number of storable still pictures is displayed. The green lamp indicates the focus and exposure are locked. c. Shoot Shutter Button (Pressed completely) The card access lamp blinks.
d4314_15_e.book Page 9 Friday, July 14, 2006 2:47 PM View pictures a. Set the mode dial to q. o Button Mode Dial [ IN IN] Arrow Pad HQ '06.11.26 12:30 100-0001 1 Prev. Picture Erase pictures a. As described in a. above, display the picture you want to erase. b. Press the S button. E RAS E [IN] YES NO S Button BACK MENU SET OK c. Press the 1F button to select [YES] and press the o button to erase the image.
d4314_15_e.
d4314_15_e.book Page 11 Friday, July 14, 2006 2:47 PM Locking the focus position (AF lock) When the scene is kH, you can lock the focus position by pressing 2. Press 2 again to cancel the AF lock. g“s (Scene) Shooting pictures by selecting a scene according to the situation” (P. 19) AF lock mark k [ • AF lock is automatically canceled after one shot.
d4314_15_e.book Page 12 Friday, July 14, 2006 2:47 PM q Viewing still pictures/Selecting playback mode The last picture taken is displayed. • Press the arrow pad to view other pictures. • Use the zoom button to switch among close-up playback, index display and calendar display. g Movie playback “MOVIE PLAY Playing back movies” (P. 23) 4 Arrow pad (1243) Use the arrow pad to select scenes, playback picture, and the items on the menus.
d4314_15_e.book Page 13 Friday, July 14, 2006 2:47 PM Playback mode: Switching the picture display Single-frame playback • Use the arrow pad to browse pictures. [IN IN] HQ W T T W '06.11.26 12:30 100-0004 4 [IN IN] 1 2 4 3 W [IN IN] 2 4 5 7 8 T [ IN IN] Close-up playback Index displays 1 3 • Use the arrow pad to select a picture for playback, and press o 9 to play back the singleW frame of the picture selected.
d4314_15_e.book Page 14 Friday, July 14, 2006 2:47 PM 0 2Y button Self-timer shooting Press 2Y in shooting mode to select on and off of the self-timer. Press o for setting. Y ON Y OFF Set the self-timer. Cancel the self-timer. • After pressing the shutter button completely, the self-timer lamp lights up for approximately 10 seconds, blinks for approximately 2 seconds, and then the picture is taken. • To cancel the self-timer, press 2Y. • Self-timer shooting is automatically canceled after one shot.
d4314_15_e.book Page 15 Friday, July 14, 2006 2:47 PM e button Changing the information on display /Display the menu guide/Checking the time Changing the information displays Press to change the display in the following order. Shooting mode Playback mode P ISO 1600 +2.0 [ Normal display [IN IN] HQ ] lR k[IN IN] j% n Normal display $ HQ 3072×2304 '06.11.26 12:30 100-0004 4 4 Simple display*1 Detailed display [IN IN] HQ 3072× 2304 +2.0 ] P ISO 1600 +2.
d4314_15_e.book Page 16 Friday, July 14, 2006 2:47 PM Menu operations Menu operations o MENU button Mode Dial Arrow pad (1243) About the menus Pressing m displays the top menu on the monitor. • The items displayed on the top menu differ according to the mode.
d4314_15_e.book Page 17 Friday, July 14, 2006 2:47 PM Using the menus This explains how to use the menus with the [AF MODE] setting as an example. Set the mode dial to K. Press m to display the top menu. Select [CAMERA MENU] and press o. IMAGE QUALITY • [AF MODE] is on a menu in [CAMERA MENU]. Press o. RESET CAMERA MENU SCN EXIT 3 Press 12 to select [AF MODE], and press o. • Unavailable settings cannot be selected. • When pressing 4 on this screen, the cursor moves to the page display.
d4314_15_e.book Page 18 Friday, July 14, 2006 2:47 PM 1 IMAGE QUALITY Changing the image quality Still picture image quality and their applications Image quality/Image size SHQ 3072 × 2304 HQ 3072 × 2304 SQ1 2560 × 2304 × 2048 × 1600 × 1280 × SQ2 1920 1728 1536 1200 960 1024 × 768 640 × 480 Compression Low compression Standard compression Application • This is useful for printing large images on A3-size paper.
d4314_15_e.
d4314_15_e.book Page 20 Friday, July 14, 2006 2:47 PM ISO ...................................................................................... Changing the ISO sensitivity AUTO Sensitivity is automatically adjusted according to the conditions of the subject. 80/100/200/ 400/800/1600 A low value lowers the sensitivity for daylight shooting of clear, sharp pictures. The higher the value, the better the camera’s light sensitivity and ability to shoot with a fast shutter speed and in low light conditions.
d4314_15_e.book Page 21 Friday, July 14, 2006 2:47 PM AF MODE............................................................................ Changing the focusing area iESP The camera determines which subject within the screen to focus on. Even when the subject is not in the center of the screen, focusing is possible. SPOT Focus selection is based on the subject within the AF target mark. R ..............................................................................
d4314_15_e.
d4314_15_e.book Page 23 Friday, July 14, 2006 2:47 PM 2 MOVIE PLAY Playing back movies Select [MOVIE PLAY] from the top menu, and press o to play back the movie. Another option is to select a picture with the movie icon (n), and press o to play back the movie. [IN IN] '06.11.26 12:30 100-0004 OK 4 MOVIEPLAY Operations during movie playback [IN IN] '06.11.26 12:30 100-0004 00:00 00:36 3 : Each time you press the button, the playback speed changes in the following order: 2×; 20×; and back to 1×.
d4314_15_e.book Page 24 Friday, July 14, 2006 2:47 PM 5 EDIT This function lets you edit still pictures saved on a card and store them as new pictures. Q ................................................................................................. Changing the size of pictures 640 × 480 /320 × 240 This changes the image size of a picture and saves it as a new file. REDEYE FIX ................................................................................
d4314_15_e.book Page 25 Friday, July 14, 2006 2:47 PM CALENDAR ............................................................ Synthesize the calendar using the picture This function lets you select the calendar, synthesize the calendar and the picture, and store it as a new picture. • Select the picture with 43, and press o. • Select the calendar with 43, and press o. (Press 12 to turn the picture 90 degrees clockwise or 90 degrees counterclockwise.) • Set the Month of the calendar, and press o.
d4314_15_e.book Page 26 Friday, July 14, 2006 2:47 PM 7 PLAYBACK MENU 0 ...................................................................................................................Protecting pictures OFF /ON 0 [IN] OFF ON Protected pictures cannot be erased with [ERASE]/[SEL.IMAGE]/[ALL ERASE], but they are all erased by formatting. • Select the picture with 43, and protect it by selecting [ON] with 12. You can protect several frames in succession. 0 is displayed when the picture is protected.
d4314_15_e.book Page 27 Friday, July 14, 2006 2:47 PM ALBUM ENTRY ............................................................................. Adding pictures to an album Pictures recorded to the card can be organized by sorting them into albums. Pictures stored in the internal memory cannot be entered in albums. g“Album playback menus” (P. 28) Select the album entry method A L B U M E N T RY [SEL. IMAGE] SEL. IMAGE SET CALENDAR SEL.
d4314_15_e.book Page 28 Friday, July 14, 2006 2:47 PM ALL ERASE ................................. Erase all the pictures in the internal memory and the card • Select [YES], and press o. Album playback menus • A card registered with an album is required. g “ALBUM ENTRY Adding pictures to an album” (P. 27) When the still picture is selected 2 SLIDESHOW 1 3 2 PLAYBACK MENU PRINT P ORDER EDIT 0 y*1 R*1*2 SEL.
d4314_15_e.book Page 29 Friday, July 14, 2006 2:47 PM LABEL IMAGE ........................................................................................ Selecting label images You can change the label image (the first frame in the album) displayed on the SEL. ALBUM screen. SEL. ALBUM 1 8 BACK Title image (first frame in the album) SET OK MENU Other album menus g “0 Protecting pictures” (P. 26) “y Rotating pictures” (P. 26) 3 CLOSE ALBUM This function exits album playback.
d4314_15_e.book Page 30 Friday, July 14, 2006 2:47 PM MEMORY FORMAT (FORMAT)................................... Formatting the internal memory or card All existing data, including protected pictures, are erased when the internal memory or card is formatted. Make sure that you save or transfer important data to a computer before formatting the internal memory or card. • Make sure there is no card inserted in the camera when formatting the internal memory.
d4314_15_e.book Page 31 Friday, July 14, 2006 2:47 PM 8.................................................................... Adjusting the volume of camera warning sound OFF (No sound) / LOW / HIGH SHUTTER SOUND ................................................. Selecting the sound of the shutter button OFF (No sound) 1 LOW / HIGH 2 LOW / HIGH 3 LOW / HIGH VOLUME ........................................................................
d4314_15_e.book Page 32 Friday, July 14, 2006 2:47 PM PIXEL MAPPING .....................................................Adjusting the image processing function The pixel mapping feature allows the camera to check and adjust the CCD and image processing functions. It is not necessary to operate this function frequently. Approximately once a year is recommended. Wait at least one minute after taking or viewing pictures to allow the pixel mapping function to perform properly.
d4314_15_e.book Page 33 Friday, July 14, 2006 2:47 PM DUALTIME .......................................................Setting the date and time in another time zone OFF Switches to the date and time set in [X]. Pictures are recorded with the date and time set in [X]. ON Switches to the date and time set in [DUALTIME]. When setting the dual time, select [ON], and then set the time. Pictures are recorded with the date and time set in [DUAL TIME]. • The date format is the same as that set with [X].
d4314_15_e.book Page 34 Friday, July 14, 2006 2:47 PM Operating, shutting off and checking the alarm • Operating the alarm: Turn off the camera. The alarm only operates when the camera is off. • Shutting off the alarm: While the alarm is sounding, press any button to shut off the alarm and turn off the camera. Note that pressing o will turn the camera on. When [SNOOZE] is set to [OFF], the alarm stops automatically and the camera turns off after 1 minute of no operation.
d4314_15_e.book Page 35 Friday, July 14, 2006 2:47 PM Printing pictures Printing pictures Direct printing (PictBridge) Using the direct printing function By connecting the camera to a PictBridge-compatible printer, you can print out pictures directly. Select the pictures you want to print and the number of prints on the camera’s monitor. To find out if your printer is compatible with PictBridge, refer to the printer’s instruction manual.
d4314_15_e.book Page 36 Friday, July 14, 2006 2:47 PM 3 Press <. • Printing starts. EASY PRINT START PC / CUSTOM PRINT OK • When printing is finished, the picture selection screen is displayed. To print another picture, press 43 to select a picture, and press <. • When you are finished, disconnect the USB cable from the camera with the picture selection screen displayed. Printing pictures EXIT 4 Remove the USB cable from the camera. 5 Remove the USB cable from the printer.
d4314_15_e.book Page 37 Friday, July 14, 2006 2:47 PM 3 Make the print settings according to the operation guide. Selecting the picture to print (available only when a card is inserted) ALL IMAGES Allows you to select from all pictures in the card to print. SEL. ALBUM Select an album and the pictures in the album to print. ALL IMAGES SEL. ALBUM SET OK Selecting a print mode PRINT MODE SELECT [ I N ] PRINT PRINT Prints the selected picture.
d4314_15_e.book Page 38 Friday, July 14, 2006 2:47 PM Setting the number of prints and data to be printed [IN] PRINT INFO
d4314_15_e.book Page 39 Friday, July 14, 2006 2:47 PM Pictures with print reservations can be printed using the following procedures. Printing using a DPOF-compatible photo store. You can print the pictures using the print reservation data. Printing using a DPOF-compatible printer. Printing is possible directly from a card containing print reservation data, without using a computer. For more details, refer to the printer’s instruction manual. A PC card adapter may also be necessary.
d4314_15_e.book Page 40 Friday, July 14, 2006 2:47 PM 6 Select [SET], and press o. < P R IN T O R D E R 1( 1) SET CANCEL BACK MENU SET OK All-frame reservation Reserves all the pictures stored on the card. The number of prints is set at one print per picture. 1 2 Press m in the playback mode and display the top menu. Select [PRINT ORDER] [U], and press o. • Playing back the album:Top menu 3 [PRINT ORDER] [U] Select the date and time setting, and press o.
d4314_15_e.book Page 41 Friday, July 14, 2006 2:47 PM Using OLYMPUS Master Using OLYMPUS Master Flow Using the USB cable provided with your camera, you can connect the camera and computer and download (transfer) the images to your computer using the OLYMPUS Master software, also provided with the camera. Install the OLYMPUS Master software Connect the camera to the computer using the USB cable OLYMPUS Master CD-ROM USB cable Computer equipped with a USB port gP. 42 gP.
d4314_15_e.book Page 42 Friday, July 14, 2006 2:47 PM Install the OLYMPUS Master software Before installing the OLYMPUS Master software, please confirm that your computer is compatible with the following system requirements. For newer operating systems, please refer to the Olympus web site as shown on the back cover of this manual.
d4314_15_e.book Page 43 Friday, July 14, 2006 2:47 PM 2 Click “OLYMPUS Master”. • The QuickTime installation screen is displayed. • QuickTime is required to use OLYMPUS Master. If the QuickTime screen is not displayed, QuickTime 6 or later is already installed on the computer. In this case, go to step 4. 3 Click “Next” and follow the on-screen instructions. • When the QuickTime licensing agreement is displayed, read the agreement and click “Agree” to proceed with the installation.
d4314_15_e.book Page 44 Friday, July 14, 2006 2:47 PM 2 3 Double-click on the desired language folder. Double-click the “Installer” icon. • The OLYMPUS Master installer starts up. • Follow the on-screen instructions. • When the OLYMPUS Master licensing agreement is displayed, read the agreement and click “Continue” and then “Agree” to proceed with the installation. • The screen confirming that installation is completed is displayed. 4 Click “Finish”. • The first screen is displayed. 5 Click “Restart”.
d4314_15_e.book Page 45 Friday, July 14, 2006 2:47 PM Start up the OLYMPUS Master software Windows 1 Double-click the “OLYMPUS Master” icon on the desktop. • The main menu is displayed. • When OLYMPUS Master is started up for the first time after installation, the “Registration” dialog box is displayed before the main menu. Follow the prompts and fill in the registration form. Macintosh 1 Double-click the “OLYMPUS Master” icon Master” folder.
d4314_15_e.book Page 46 Friday, July 14, 2006 2:47 PM Displaying camera images on a computer Downloading and saving images 1 Click “Transfer Images” on the OLYMPUS Master main menu. • The menu for selecting the source is displayed. 2 Click “From Camera” . • The window for selecting images is displayed. All the images in the camera are displayed. 3 Select the image files and click “Transfer Images”. Using OLYMPUS Master • A window indicating that the download is complete is displayed.
d4314_15_e.book Page 47 Friday, July 14, 2006 2:47 PM 2 Make the following preparations for disconnecting the USB cable. Windows 98SE 1 Double-click the “My Computer” icon and right-click the “Removable Disk” icon to display the menu. 2 Click “Eject” on the menu. Windows Me/2000/XP 1 Click the “Unplug or Eject Hardware” icon in the system tray. 2 Click the message that is displayed. 3 When a message is displayed saying that the hardware can be ejected safely, click “OK”.
d4314_15_e.book Page 48 Friday, July 14, 2006 2:47 PM • OLYMPUS Master switches to view mode and the picture is enlarged. • To return to the main menu, click “Menu” in the “Browse” window. To view a movie 1 Double-click the movie thumbnail that you want to see in the “Browse” window. • OLYMPUS Master switches to view mode and the first frame of the movie is displayed. 2 To play back the movie, click the playback button at the bottom of the screen.
d4314_15_e.book Page 49 Friday, July 14, 2006 2:47 PM 3 Click “Settings” in the “Photo Print” window. • The printer settings screen is displayed. Make the necessary printer settings. 4 Select a layout and size. • To print the date and time with your image, check the box next to “Print Date”, and select between “Date” and “Date & Time”. 5 Select the thumbnail image that you want to print and click “Add”. • A preview of the selected image is displayed on the layout. 6 7 Select the number of copies.
d4314_15_e.book Page 50 Friday, July 14, 2006 2:47 PM To increase the number of languages Please take care that your battery is fully charged ! 1 Make sure that your PC is connected to the Internet. Click “Update Camera” on the OLYMPUS Master main menu. • After selecting the Update Camera function OLYMPUS Master shows a Window with security advices. 2 Plug the USB cable into the USB port on the computer. 3 Plug the other end of the USB cable into the camera’s USB connector.
d4314_15_e.book Page 51 Friday, July 14, 2006 2:47 PM Getting to know your camera better Getting to know your camera better Shooting tips and information Tips before you start taking pictures The camera does not turn on even when a battery is loaded The battery is not fully charged • Charge the battery with the charger. The battery is temporarily unable to function because of the cold • Battery performance declines in low temperatures, and the charge may not be sufficient to turn on the camera.
d4314_15_e.book Page 52 Friday, July 14, 2006 2:47 PM Shooting tips Focusing on the subject There are several ways to focus, depending on the subject. When the subject is not in the center of the frame • Place the subject in the center of the frame, lock the focus on the subject, and then recompose your picture. • Set [AF MODE] to [iESP]. g “AF MODE Changing the focusing area” (P.
d4314_15_e.book Page 53 Friday, July 14, 2006 2:47 PM Taking stabilized pictures without the flash The flash is activated automatically when there is insufficient light, or when the camera is shaken. To take pictures with no flash in dark places, set the flash mode to $ and set as follows: Set the camera to h mode g “h button Shooting pictures using the image stabilizer (Stylus750/µ750)” (P. 14) “h Shooting pictures using digital image stabilization (Stylus740/µ740)” (P.
d4314_15_e.book Page 54 Friday, July 14, 2006 2:47 PM Taking pictures of a subject against backlight • With [ESP/n] set to [n], the picture can be taken based on the brightness at the center of the monitor without being affected by the light in the background. g “ESP/n Changing the area for measuring the brightness of a subject” (P. 20) • Set the flash to [#] to activate fill-in-flash. You can shoot a subject against backlight without the face of the subject appearing dark.
d4314_15_e.book Page 55 Friday, July 14, 2006 2:47 PM Movie Image quality SHQ HQ SQ Image size 640 × 480 (15 frames/sec.) 320 × 240 (30 frames/sec.) 160 × 120 (15 frames/sec.) Recording length Internal memory Using a 512 MB card 19 sec. 563 sec. 46 sec. 1334 sec. 117 sec. 3395 sec. Using a new card • If you use a non-Olympus card or a card used for another application, such as for a computer, the message [CARD ERROR] is displayed.
d4314_15_e.book Page 56 Friday, July 14, 2006 2:47 PM Functions that cannot be selected from menus • Some items may not be selectable from the menus when using the arrow pad. • Items that cannot be set with the current shooting mode • Items that cannot be set because of an item that has already been set: [%], Flash Mode, etc. • Items that cannot be set because the pictures taken by other camera will be edited. • Some functions cannot be used when there is no card in the camera.
d4314_15_e.book Page 57 Friday, July 14, 2006 2:47 PM Playback help and troubleshooting tips The red-eye cannot be fixed • Depending on the picture, the red-eye may not be fixed. Also, parts except the eye may be fixed. The picture cannot be registered in the album • Up to 200 pictures can be registered in each album. • The same picture cannot be registered in several albums.
d4314_15_e.book Page 58 Friday, July 14, 2006 2:47 PM Viewing pictures on a computer Viewing the entire picture on a computer screen Getting to know your camera better The size of the picture displayed on a computer screen changes depending on the computer settings. When the monitor setting is 1,024 × 768 and you are using Internet Explorer to view a picture with an image size of 2,048 × 1,536 at 100%, the entire picture cannot be viewed without scrolling.
d4314_15_e.book Page 59 Friday, July 14, 2006 2:47 PM When you get an error message on the camera... Monitor indication q Possible cause Corrective action There is a problem with the card. This card cannot be used. Insert a new card. Writing to the card is prohibited. The recorded image has been protected (read-only) on a computer. Download the image to a computer and cancel the readonly setting. The internal memory has no available memory and cannot store any new data.
d4314_15_e.book Page 60 Friday, July 14, 2006 2:47 PM Monitor indication Possible cause Corrective action The printer has run out of ink. Replace the ink cartridge in the printer. NO INK The paper is jammed. Remove the jammed paper. The printer’s paper tray has been removed or the printer has been operated while changing settings on the camera. Do not operate the printer while changing settings on the camera. There is a problem with the printer and/or camera. Turn off the camera and printer.
d4314_15_e.book Page 61 Friday, July 14, 2006 2:47 PM Stylus740/µ740 P AUTO h s 9 n F 9 9 9 Flash 9 9 9 — 9 &/% 9 9 9 9 Y 9 9 9 9 Optical zoom 9 9 9 WB 9 — 9 ISO 9 — — — DRIVE 9 — 9* — ESP/n 9 — 9 9 IMAGE QUALITY 9 9 9 9 SILENT MODE 9 9 9 9 DIGITAL ZOOM 9 — 9 9 AF MODE 9 — 9 — R 9 — 9 — PANORAMA 9 — 9 — 9 9 9 * i cannot be selected.
d4314_15_e.book Page 62 Friday, July 14, 2006 2:47 PM Miscellaneous Miscellaneous Camera care Cleaning the camera Exterior: • Wipe gently with a soft cloth. If the camera is very dirty, soak the cloth in mild soapy water and wring well. Wipe the camera with the damp cloth and then dry it with a dry cloth. If you have used the camera at the beach, use a cloth soaked in clean water and wrung well. Monitor: • Wipe gently with a soft cloth.
d4314_15_e.book Page 63 Friday, July 14, 2006 2:47 PM Useful use of the accessories The card Pictures can be recorded on the optional card. The internal memory and card are the camera’s media for recording pictures, similar to film in a film camera. Pictures recorded to the internal memory or card can be easily erased on the camera or processed using a computer. Unlike portable storage media, the internal memory cannot be removed or exchanged.
d4314_15_e.book Page 64 Friday, July 14, 2006 2:47 PM Inserting and removing the card 1 2 Turn off the camera. Open the battery compartment/card cover. Inserting the card 3 2 1 Battery compartment/card cover Contact area Orient the card as shown, and insert it into the card slot as shown in the illustration. Notch • Insert the card straight in. • Insert the card until it clicks into place. Removing the card 3 Push the card all the way in and release slowly.
d4314_15_e.book Page 65 Friday, July 14, 2006 2:47 PM AC adapter An AC adapter is useful for time-consuming tasks such as image downloads to a computer or when running a slideshow for a long period of time. To use an AC adapter for this camera, the multiadapter (CB-MA1/accessory) is required. Do not use any other AC adapter with this camera. SAFETY PRECAUTIONS Weatherproof feature This camera is weatherproof, but it cannot be used underwater.
d4314_15_e.book Page 66 Friday, July 14, 2006 2:47 PM CAUTION RISK OF ELECTRIC SHOCK DO NOT OPEN CAUTION: TO REDUCE THE RISK OF ELECTRICAL SHOCK, DO NOT REMOVE COVER (OR BACK). NO USER-SERVICEABLE PARTS INSIDE. REFER SERVICING TO QUALIFIED OLYMPUS SERVICE PERSONNEL. An exclamation mark enclosed in a triangle alerts you to important operating and maintenance instructions in the documentation provided with the product.
d4314_15_e.book Page 67 Friday, July 14, 2006 2:47 PM Handling the Camera WARNING Do not use the camera near flammable or explosive gases. Do not use the flash on people (infants, small children, etc.) at close range. • You must be at least 1 m (3 ft.) away from the faces of your subjects. Firing the flash too close to the subject’s eyes could cause a momentary loss of vision. Keep young children and infants away from the camera.
d4314_15_e.book Page 68 Friday, July 14, 2006 2:47 PM WARNING • Keep batteries dry at all times. • To prevent batteries from leaking, overheating, or causing a fire or explosion, use only batteries recommended for use with this product. • Insert the battery carefully as described in the operating instructions. • If rechargeable batteries have not been recharged within the specified time, stop charging them and do not use them. • Do not use a battery if it is cracked or broken.
d4314_15_e.book Page 69 Friday, July 14, 2006 2:47 PM Monitor • Do not push the monitor forcibly; otherwise the image may become vague, resulting in a playback mode failure or damage to the monitor. • A strip of light may appear on the top/bottom of the monitor, but this is not a malfunction. • When a subject is viewed diagonally in the camera, the edges may appear zigzagged on the monitor. This is not a malfunction; it will be less noticeable in playback mode.
d4314_15_e.book Page 70 Friday, July 14, 2006 2:47 PM FCC Notice • Radio and Television Interference Changes or modifications not expressly approved by the manufacturer may void the user’s authority to operate this equipment. This equipment has been tested and found to comply with the limits for a Class B digital device, pursuant to Part 15 of the FCC Rules. These limits are designed to provide reasonable protection against harmful interference in a residential installation.
d4314_15_e.book Page 71 Friday, July 14, 2006 2:47 PM For customers in Europe “CE” mark indicates that this product complies with the European requirements for safety, health, environment and customer protection. “CE” mark cameras are intended for sales in Europe. Use Only Dedicated Rechargeable Battery and Battery Charger We strongly recommend that you use only the genuine Olympus dedicated rechargeable battery and battery charger with this camera.
d4314_15_e.book Page 72 Friday, July 14, 2006 2:47 PM Notes regarding warranty maintenance 1. This warranty will only be valid if the Warranty Certificate is duly completed by Olympus or an authorized dealer or other documents contain sufficient proof.
d4314_15_e.book Page 73 Friday, July 14, 2006 2:47 PM SPECIFICATIONS (Camera Applicable standards Sound with still pictures Movie Memory No. of effective pixels No.
d4314_15_e.book Page 74 Friday, July 14, 2006 2:47 PM (Lithium ion battery (LI-42B) Product type Standard voltage Standard capacity Battery life Operating environment Temperature Dimensions Weight : : : : Lithium ion rechargeable battery DC 3.7 V 740 mAh Approx. 300 full recharges (varies on usage) : 0°C to 40°C (32°F to 104°F) (charging)/ 0°C to 60°C (32°F to 140°F) (operation)/ -20°C to 35°C (-4°F to 95°F) (storage) : 31.5 × 39.5 × 6 mm (1.2 × 1.5 × 0.2 in.) : Approx. 15 g (0.
d4314_15_e.book Page 75 Friday, July 14, 2006 2:47 PM CAMERA DIAGRAM Camera Strap Eyelet h button (Image stabilizer) (Stylus750/µ750) (P. 3) (P. 14) Multi-Connector (P. 34, 35, 44) Self-Timer Lamp (P. 14, 55) Connector Cover (P. 34, 35, 44) Flash (P. 13) Shutter Button (P. 8, 10) o Button (P. 5, 10) Microphone (P. 21) Lens (P. 10, 62) Zoom Button (P. 12) Mode Dial (P. 5, 9, 11) Miscellaneous Monitor (P. 32, 76) Stylus750/µ750 Stylus740/µ740 Card Access Lamp (P.
d4314_15_e.book Page 76 Friday, July 14, 2006 2:47 PM Monitor Symbols & Icons (Monitor – Shooting Mode 3 2 1 23 4 5 6 7 8 9 10 (# ISO 1600 j% n 22 P +2.
d4314_15_e.book Page 77 Friday, July 14, 2006 2:47 PM (Monitor – Playback mode 1 2 15 10 3 [ IN IN] 4 1 5 6 ×10 HQ 3072× 2304 +2.0 ISO 1600 '06.11.26 12:30 100-0004 4 7 8 9 10 11 12 13 3 4 5 6 [ IN ] 15 HQ 320× 240 '06.11.26 12:30 100-0004 00:00 00:36 7 8 10 12 13 14 14 Items 1 Battery check 2 Album Indications Ref. Page e = full power, f = low power P. 59 - P. 23, 28 [IN] (Playing back the picture in the internal memory), [xD] (Playing back pictures in the card) P.
d4314_15_e.book Page 78 Friday, July 14, 2006 2:47 PM Index ! Red-eye reduction flash . . . . . . . . . . . 13 # Fill-in flash . . . . . . . . . . . . . . . . . . . . . . 13 $ Flash off . . . . . . . . . . . . . . . . . . . . . . . . 13 % Super macro mode . . . . . . . . . . . . . . . 13 & Macro mode . . . . . . . . . . . . . . . . . . . . . 13 1 F button (exposure compensation) . . . . . . . . . . . . . . . . . . . . . . . . . . . . . . . 14 2Y button (self-timer) . . . . . . . . . . . . . .
d4314_15_e.book Page 79 Friday, July 14, 2006 2:47 PM Menu guide . . . . . . . . . . . . . . . . . . . . . . . . 15 Microphone . . . . . . . . . . . . . . . . . . 21, 26, 75 Mode dial . . . . . . . . . . . . . . . . . . . 5, 9, 11, 75 Monitor . . . . . . . . . . . . . . . . . . . . . 32, 75, 76 Monitor brightness adjustment s . . . . . . 32 Monitor Symbols & Icons . . . . . . . . . . . . . 76 MOVIE PLAY . . . . . . . . . . . . . . . . . . . . . . 23 MULTI PRINT . . . . . . . . . . . . . . . . . . . . . .
d4314_15_e.