
User's Manual

111
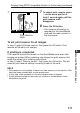
7 To cancel print reserve, press
on the arrow pad for at
least 1 second again until the
print reserve mark
disappears.
8 Press the OK button.
• Print reserve information is
recorded on the SmartMedia
card and the menu returns to
the first screen.
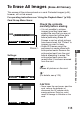
To set print reserve for all images
In step 3, select all-frame reserve, then press the OK button. Print
reserve will be set for all images.
If printing is completed
Print reserve instructions remain on the SmartMedia card even after
images are printed. When selecting new images for print reserve, first
erase the current print ordering instructions.
In step 3, select “Reserve cancel”, then press the OK button. This will
erase all print reserve settings currently stored on the card.
HELP
• Print reserve is not possible if there is no free memory on the card or if the
card has been covered with a write-protect seal.
• It may take a few moments for the print reserve mark to appear.
• Some printers and photo labs may not be able to include date or time
information on prints.
6
Advanced Playback Techniques
Printing Using DPOF-Compatible Printers or Photo Labs (continued)
EXIT
CANCEL
OK
7
Print reserve
mark