
Assembly Instructions
MULTIPLE PIECE FLAGPOLE INSTALLATION INSTRUCTIONS
FOR INTERNAL AND EXTERNAL HALYARD POLES
NOTE: Assembly and installation should always be performed by a qualified contractor with
experience installing similar products. The following information is intended to be a
helpful
guide to the installing contractor. This information cannot be comprehensive
enough to
cover all situations or the details of all multiple piece poles. Therefore it
is essential that
the owner and contractor carefully plan all aspects of the installation
process, not relying
entirely on these guidelines to determine the steps to be followed.
This is general information
about a standard multiple piece flagpole. Special features
required by individual owners may
require unique installation methods. For these
applications the Contractor must be familiar with
the owner’s plans and specifications.
Due to the varied methods used by contractors in actual field
operations, we cannot be
liable for structural damage or injury occurring during flag pole assembly and
erection.
ASSEMBLY:
Read through this entire document before beginning the assembly and installation process. Do
not expect to be able to disassemble the shaft sections after they have been put together.
They are designed to have a strong friction fit and taking them apart without damaging the
flagpole will be extremely difficult or impossible. For this reason the finish of the pole should be
inspected and approved before beginning assembly
.
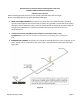
Multiple section flagpoles are designed to be field assembled with a patented, self-
aligning,
internal sleeve assembly using close tolerances. These units have been pre-fit
at the manufacturing
facility to ensure a snug fit between sections.
It is imperative that these sections be handled and
assembled with care to avoid altering the fit.
1. ASSEMBLE THE SHAFT IN A HORIZONTAL POSITION, WITH THE BUTT OF
THE POLE NEAR THE FOUNDATION.
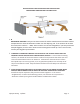
2. RAISE THE SHAFT OFF THE GROUND FOR ASSEMBLY. Place the shaft sections up on
blocks or saw horses so that dirt, gravel or other debris does not get into
the joint and
interfere with assembly. Place the bottom of the shaft against a solid,
unmovable
object (such as a steel column) to help in the fitting process. Protect all
surfaces with thick
wooden blocks and padding (See figure # 1).
Olympus Group, 12/2017 Page 1